Creating Tileable Textures in Illustrator
(using Symbols)
Create artwork.
Make it a symbol.
Copy/paste it four times.
Make edges seamless.
In this tutorial we will use Adobe Illustrator to create tileable or ‘seamless‘ textures the smart way, using Dynamic Symbols.
By using Symbols we can overcome a lot of the difficulties that are involved in making the edges of textures line-up and blend together perfectly, so that when multiple textures are tiled horizontally and/or vertically, the edges remain invisible.
Of course there are many ways to make textures tileable and this is only just one of the methods, but in a lot of occasions this is the method that I prefer.
By using symbols we can immediately see if and how the edges of a texture blend together and we can work on any of the tiled symbols that we want and have those changes reflected to all the other symbols automatically.
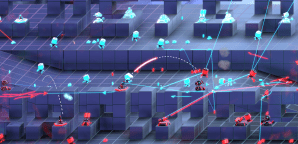
For this tutorial the example image will be a PCB-like sci-fi texture that can be tiled both horizontally and vertically:
If you want to start off easy than you can start with making a texture that is only tileable in one direction, horizontally or vertically:

1 Creating a part of the artwork first
1.1 Create a new Illustrator document
Launch Adobe Illustrator and create a new document that is 1000 by 1000 points:


To keep it simple we will only create one black line, made up of an elongated rectangle, with only one black coloured circle at the end of the line and copy paste this a bunch of times. But first we’ll make one square, the size of the artboard, so a 1000 x 1000 pt, that we will use to make the borders of the texture visible, this border can be removed later on.
1.2 Creating borders
Select the rectangle tool from the Toolbar and click once (without dragging) somewhere inside of the artboard. A pop-up menu will appear that we can use to fill in the size of the rectangle, make it a 1000 by a 1000:


For visibility purpose, give the rectangle a 10pt line width and a red line color. Select the square first with the black cursor, then you can change the line width and line color in the top left of the application bar:

Select the black cursor tool from the Toolbar and drag the square shape to the center of the Artboard. :

After that, lock the square shape into position by clicking right next to the eye symbol in the layers panel, this way it cannot accidentally be moved while working on the rest of the texture:

1.3 Creating the line
Select the Rectangle tool again and create another rectangle by clicking somewhere. This time make it around 40 x 200 pt. Turn of the line color by selecting the transparent color icon and make the fill color black:


1.4 Creating the circle
Create a circle with the Oval tool from the toolbar. It uses the same button as the rectangle tool but you have to hold the button in the toolbar for a second before the menu appears:

Click somewhere in the vicinity of the black rectangle and make the circle 75×75 pt in size. After that, drag it on top of the black rectangle:

1.5 Making a sketch
Select both the black rectangle and circle with the black cursor tool.
Two ways to so this, one: click-drag a rectangle around both of the shapes, two: click one of the shapes and while holding shift click on the other one.
With both shapes selected Right-click and choose ‘Group’. Both shapes will be grouped together in the layers panel, this will make it easier to select both shapes the next time:


With the group selected, press Ctrl+C to copy and then Ctrl+V to clone it a couple of times:

Fill the entire square with lines that start from the edges and then go in the direction of the center. Simply create copies of the line+circle and and sometimes diagonal lines until you get a result like this:

To make diagonal lines that are exactly at a 45 degree angle, you can use the black cursor. By holding shift while rotating a shape with the black cursor you can make it snap to increments of 45 degrees.
2 Turning artwork into a Dynamic Symbol
When you turn you artwork into a symbol, the artwork that you made the symbol of will be linked to the Symbol that is created in the Symbols panel. After artwork is linked to a symbol, any copy that you make of the artwork, or if you drag it in new from the symbols panel, will be linked to the original master Symbol. You can consider a Symbol to be a blueprint for all the clones that are made from it. The great part is that when you edit the master Symbol, all the clones will also change to reflect the changes made to their blueprint or ‘owner’. Another great advantage that Symbols give is that different ‘clones’ can have different sizes, colours etc. that are unique to those individual clones, but they can always be reverted back to the properties from the master Symbol.
Symbols are great and they can be used for many, many things. That’s why it is important to learn how to use them if you want to be proficient with Illustrator and using them to create tileable textures like this, is a good exercise for learning how to use symbols.
2.1 Select everything
Unlock the square that is used for the borders all the way at the bottom in the layers panel because it cannot be selected if it is locked. Now select everything by pressing Ctrl+A or by using the black cursor to click-drag select:

Scale everything down to half of the size by using the black cursor to scale or by changing the width and the height of the selection in the Transform or Properties panel. If you use the Transform panel you can just type /2 after the width and press Enter, you will see that the width is then divided in half. In other words, you can do calculations in the Transform panels number fields (and in a lot of other number fields in Illustrator and other programs):

Remember that you can open every panel Illustrator has from the Window menu in the top menu bar:

2.2 Turn it into a Symbol
Click and drag the entire selection into the Symbols panel, to create a new Symbol of the artwork. You can name it PatternTry1 or something like that, it’s always good to name stuff:


2.3 Duplicating the Symbol
Two ways to duplicate the Symbol.
One: Copy the ‘instance’ of the Symbol that you already have on your Artboard with Ctrl+C and duplicate it another three times with Ctrl+V:

Two: click and drag the newly created Symbol from the Symbols panel on top or your artboard another three times:

2.4 Line up the borders
Line up the borders from the four symbols so we can start to make them seamless:

3 Making the edges seamless
Because all four of the copies are linked to the master Symbol we can now edit any single one of them and have those changes made to all the others as well
3.1 Changing the original master Symbol by changing a clone
Double click on one or the four Symbols with the black cursor tool to go into Symbol editing mode, you can also click on the ‘Edit Symbol’ button in the top left of the application bar if you have one of the four Symbols selected:

You can see that you’re inside of edit mode by the grey with green bar at the top of the drawing window and by looking at the layer in the layers panel:

When you are inside of Symbol Editing Mode you can only make changes to the Symbol, not to any other art that you have on the artboard, all other art will be shown slightly greyed out.
Try to move a couple of the lines left and right untill they line up at the edges. If you have the black cursor tool selected, you can also use your arrow keys to move a shape one point with every press:


when you moved a couple of lines into the correct positions, go out of Symbol editing mode by pressing escape or by double-clicking somewhere in the empty space next to your artwork. When you go out of Symbol editing mode you will immediately see the other three symbols change:

Keep going back and forth between editing the four instances of the Symbol and keep connecting the lines until all of them line up along the edges. Try to keep it simple and only use a couple of lines at first, once you have all the lines connected you can start adding more lines inside the empty areas:


4 Finishing up
4.3 Getting rid of borders
To fully make the texture tileable, let’s get rid of the red borders by hiding them in the layers panel. Go into Symbol Editing Mode on one of the four symbols and in the layers panel click on the eye icon on the left of the rectangle shape layer at the bottom:


4.2 Resizing
When finished with making all the lines connect to each other we can delete 3 of the symbols and scale the one that is left to be the size of the entire artboard again:

4.2 Saving twice
Always save your original illustrator files so you can make changes to the image in vector format later. Go to File > Save as and name your texture something, save it as a Illustrator .ai file first.
When it’s done saving go to File > Export as and export it as a .PNG image, so you can use it in other applications or anywhere on the web. When you save it as a .PNG image make sure to enable ‘Use artboards’ with a range of 1-1. If you don’t enable this then the parts of the art that are outside of the artboard area are also saved: