


YouTube
Introduction
⚠️(This tutorial is currently under construction)⚠️
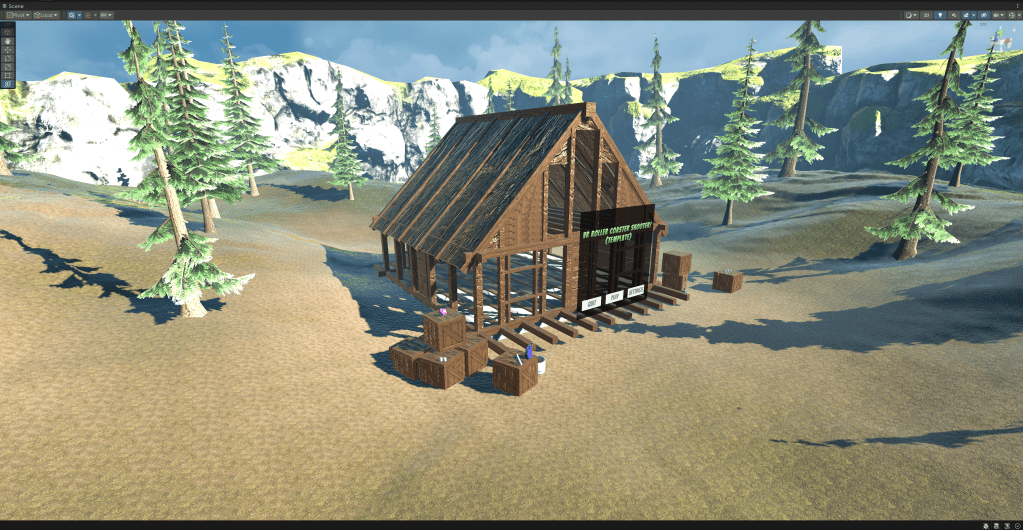
In this tutorial we are going to create a VR Roller Coaster Shooter Game (an on-rails shooter) for the Oculus/Meta Quest 2 headset!
The gameplay for the game that we are going to make is inspired by Until Dawn: Rush of Blood, one of the first games I ever played in VR. Until Dawn: Rush of Blood is a horror themed on-rails VR shooter game from Supermassive Games, the creators of the 2015 PS4 horror game Until Dawn and the 2022 PS5 horror game The Quarry.
The concept of the game works really well in VR, because you’re probably sitting down in reality and because you’re also sitting down in the virtual reality rollercoaster train cart, it just feels right.
Looking around while riding a rollercoaster and shooting at targets placed alongside the rollercoaster tracks from inside the rollercoaster train is a lot of fun and can be really challenging when there are lots of targets to hit and when the train is moving at a high velocity.
Also, you know that queasy feeling in your stomach when you’re on a actual rollercoaster that is going into a steep drop?
That turns out to be something your brain does to you because you will also get that same stomach feeling in VR when the roller coaster train makes a steep drop, making everything feel extra real!
In this tutorial you will learn:
- How to setup your project for building to the Oculus/Meta Quest 2 VR headset.
- How to setup your project for VR using the XR Interaction Toolkit package.
- How to setup a VR Player Controller with Full Locomotion using dual thumb sticks.
- How to test your game in VR during Unity Playmode with Quest Link.
- How to create a Unity Terrain with hills, grass, trees, bushes and water.
- How to setup a skybox.
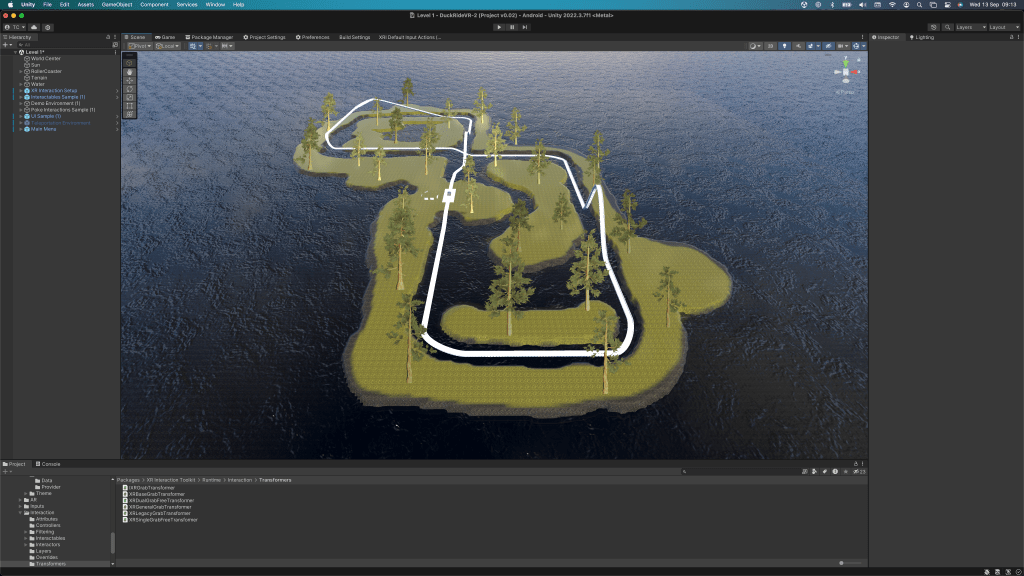
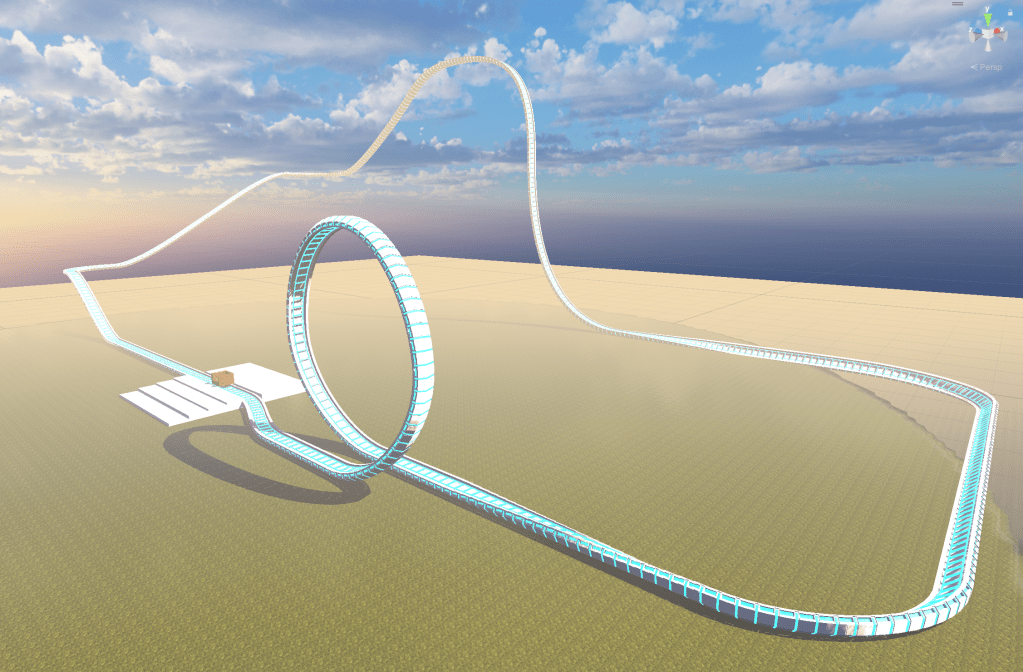
- How to create a roller coaster track using the Unity Splines Package.
- How to make a train cart follow the spline of the roller coaster track.
- How to let the player enter and exit the train.
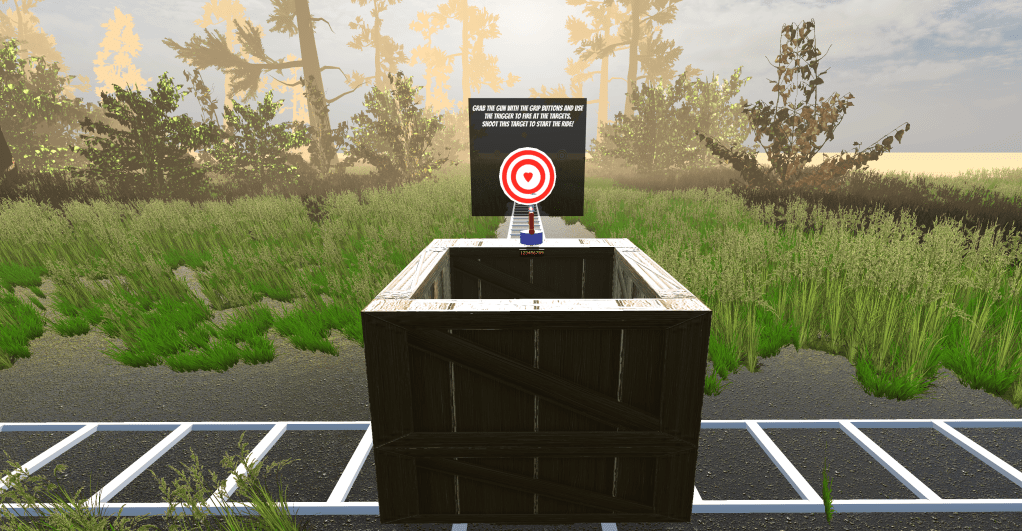
- How to make pistols and rifles that can be picked up and fired with.
- How to make moving targets for the player that can be shot.
- How to create a player scoring system and UI score display.
- How to create a invisible trigger box that can make ‘things’ happen when the player enters.
- How to create a VR Title scene with a floating Main Menu window for your game.
- How to build your game to your Quest 2 VR headset.
This tutorial was created using Unity 2022.3.9f1 LTS with the 3D Core project template.
Dependencies
Hardware Requirements
– A VR Ready PC with a USB-C port
– An Oculus/Meta Quest 2, 3 or Pro VR HMD (Head Mounted Display)
– An Oculus/Meta Quest Link capable USB-C cable
Notes
To use the Quest as a regular PC connected VR Headset, instead of a stand alone mobile one, a Quest Link cable is required.
Connecting the Quest to your PC using the Link cable will allow you to play test your game live in the Unity Editor while you are creating it, this way you can see what is going on in the Scene view while you are play testing your game so it will be possible to adjust things while the game is running (and will also allow you to play all the great PC VR games out there instead of only the games library that you can buy on the Quest in the Meta Quest store):

Without the Quest Link cable you can still connect your Quest to the Oculus PC application over Wi-Fi but then you’re Wi-Fi router/connection has to be fast enough to transfer the display data without any stutter or lag (6G Wi-Fi) or you may experience motion sickness very quickly.
The default USB-C Quest charging cable that came with the Quest can only be used to charge the headset and to transfer data/builds to the Quest but not to transfer the large display data. So without the Link cable you can still transfer your game builds to the Quest, but it will be a lot less easy to play test and debug your game.
Basically there are different kinds of USB-C cables, some of them are ‘smart’/’active’ and expensive and some are ‘dumb’/’passive’ and inexpensive.
To get a better clue on what is going on with those expensive USB-C cables I recommend watching this YouTube video about Apple USB-C cables from Myth Busters Adam Savage: https://www.youtube.com/watch?v=AD5aAd8Oy84
Software
Unity Hub (To install the Unity Editor with)
Unity 2022.3.7f1 LTS (Installed with the Unity Hub app)
Visual Studio Code (To use as external code editor for writing C# scripts for Unity)
Oculus Rift Software (To playtest the game during playing and editing in Unity without having to build the game)
Meta Quest Developer Hub (Optional. To manually transfer build Android .apk game files to the Quest and to manage installed apps on the Quest from PC.)
Unity Packages and Assets
This tutorial uses a bunch of packages with scripts and 3D-Models etcetera from the Unity Registry and from the Asset Store.
You don’t have to download these packages right away, we’ll go over downloading and installing them individually in the steps of this tutorial.
Packages : Unity Registry
XR Plugin Management
XR Interaction Toolkit + Starter Assets Samples
Oculus XR Plugin
Splines
Textmesh Pro + TMP Essential Resources + TMP Examples & Extras
Terrain Tools (Optional)
Packages : Asset Store
Allsky Free – 10 Sky / Skybox Set
https://assetstore.unity.com/packages/2d/textures-materials/sky/allsky-free-10-sky-skybox-set-146014
Dream Forest Tree
https://assetstore.unity.com/packages/3d/vegetation/trees/dream-forest-tree-105297
Unity Technologies Particle Pack
https://assetstore.unity.com/packages/vfx/particles/particle-pack-127325
(Exclude Textmesh Pro folder on Import! Textmesh Pro is an official Unity Registry package nowadays so install the Textmesh Pro package with the package manager yourself if it is not already installed by default, which it should be.)
Tutorial Conventions
(This means clicking on VRPlayer in the Hierarchy view to select the player GameObject from the Level 1 scene)
(This means clicking on the arrow in front of the VRPlayer GameObject in the Hierarchy view from Level 1 to unfold it and then selecting the Main Camera GameObject which is a ‘child’ of the VRPlayer, so it sits ‘inside’ of the VRPlayer GameObject like a file in a folder.)
    public GameObject sun;
    private Light light;

    void Start()
    {
        light = sun.GetComponent<Light>();


        sun.light.intensity = 4.0f;
    }


    void Update()
    {
            sun.light.intensity = Mathf.PingPong(Time.time, 8);
    }
Usually things are addressed going from the top down like in the example above where we go from GameObject Sun, to component Light, to variable Intensity, but sometimes also from the bottom up like like in the example below where we access a parent GameObject above, and then its parent GameObject, from a script/component of a child GameObject below:
using System.Collections;
using System.Collections.Generic;
using UnityEngine;

public class ParentingExample : MonoBehaviour
{
    private GameObject myParent;
    private GameObject myGrandParent;

    // Start is called before the first frame update
    void Start()
    {
        myParent = transform.parent.gameObject;
        myGrandParent = myParent.transform.parent.gameObject;

        Debug.Log("The name of my parent is " + myParent.name);
        Debug.Log("The name of my parents parent is " + myGrandParent.name);
    }
}
Remember that all that the Unity Inspector view does is display the ‘public’ variables from the script components that it ‘inspects’ to you. So all the variables/properties of all the scripts/components that are attached to all the GameObjects of your game that you can see in the Unity Inspector view, can be addressed, and their values changed, in more or less the same way, using the .dot operator.
One thing I always ask myself when looking at variables in the Inspector is:
“What would happen if I change/animate that value over time (using Time.deltaTime or Time.time) in the Update() function during the game?”
or: “What would happen if I hooked that variable up to some input from the player, like a button press or a UI Button, and let the player mess with the value during the game?”.
A good example of a VR game that messes with an often overlooked variable that can be easily manipulated during the game, the Time.timeScale variable, which can be found in the Unity Project settings under Time and accessed from code with Time.timeScale, is the game SuperHot. ( https://superhotgame.com/ )
In SuperHot time only moves when the player moves, so in SuperHot the player can dodge bullets in slow motion ‘The Matrix’ style ,by moving very slowly, because the bullets and enemies only move when the player moves.
To create this effect the Time.timeScale variable, which controls the game speed and is usually used to pause the game, could simply be hooked up to the velocity/speed variables of the players VR controllers and VR headset.
The example script below, taken from the Unity Scripting API page for Time.timeScale demonstrates how it can be used to create a slow motion effect when the player presses the left mouse button:
using UnityEngine;

public class TimeScaleExample : MonoBehaviour
{
    // Toggles the time scale between 1 and 0.7
    // whenever the user presses the left mouse button.
    void Update()
    {
        if (Input.GetMouseButtonDown(0))
        {
            if (Time.timeScale == 1.0f){
                Time.timeScale = 0.7f;
            }else{
                Time.timeScale = 1.0f;
            }
        }
    }
}
Steps Phase 1
Phase one will be all about creating a VR Roller Coaster Shooter ‘template’ project first, meaning that we’ll create the basic structure and prototype game objects for the entire game so that in Phase two we can iterate on it, and develop things further.
Install the Visual Studio Code script editor
Notes
If you download Unity in the next step you can choose to install the external code editor that comes with Unity by default, which at the time of writing is Microsoft Visual Studio Community 2022, but I personally prefer to use the lighter Visual Studio Code package instead, because I only use Visual Studio to write code for Unity, but not to develop software applications for Windows with.
Unity let’s us choose which external code editor we want to use when we write scripts for Unity in the Unity settings, so when we setup the Unity project in the next steps we’ll change the external code editor in Unity to be Visual Studio Code. If you prefer to use Visual Studio Community or your own script editor instead then feel free to skip this step.
Download & Install Visual Studio Code
https://code.visualstudio.com/
Install the Unity for Visual Studio Code extension
Visual Studio Code > left side bar > Extensions > search ‘Unity’ (Unity for Visual Studio Code by Microsoft ) > Install
See the link below for detailed instructions on how to install Visual Studio Code and the ‘Unity for Visual Studio Code’ extension for Visual Studio Code. The Unity for Visual Studio Code extension enables Unity specific C# refactoring amongst other things helps when writing code for Unity.
https://code.visualstudio.com/docs/other/unity
Download & Install the .NET 7.0 Core SDK
https://dotnet.microsoft.com/en-us/download
Create Unity Documents Folder Structure
Windows File Explorer > ../Documents > right click > New Folder..
/Documents
/Unity
/Projects
/VRRollerCoasterShooter
/Builds
/Backups
Notes
If this is your first Unity Project then I highly recommend to create the folder structure that you see above here inside of your own Documents folder on your hard drive, to store this project, the builds of this project and for all your other future Unity projects.
To create this folder structure, first create a new /Unity folder inside of your ../Documents folder.
Then inside ../Documents/Unity create a /Projects folder for your Unity Projects.
Then inside the ../Documents/Unity/Projects folder create a VRRollerCoasterShooter folder for this project.
Finally inside the ../Documents/Unity/Projects/VRRollerCoasterShooter folder, create a /Builds folder for all future builds of this project and a /Backups folder for complete project backup files:
../Documents/Unity/Projects/VRRollerCoasterShooter
/Builds
/Backups
When we create the Unity Project in the next step another folder will be created by Unity for the actual game’s project files, which we will tell Unity to place inside of the ../VRRollerCoasterShooter folder. So inside of the ../VRRollerCoasterShooter folder will be three other folders; the actual project folder, the /Builds folder and the /Backups folder, like this:
../VRRollerCoasterShooter
/Builds
/Backups
/VRRollerCoasterShooter-Project
Each project that you’re going to create might have builds and each project you create might have other things that you want to save with your project, but outside of the actual game’s project folder. For instance, project backups, notes for yourself, screenshots for something, screen recordings and other things that don’t belong in the actual game. This way you can keep it all neatly organized!
Install the Unity Editor (with Android build support)
Unity Hub > Installs > Install Editor > Official releases > 2022.3.7f1 LTS > Install
> select Android Build Support
> select Windows Build Support (IL2CPP)
> Install
Notes
Open the Unity Hub application and go to Installs.
Click on Install Editor and choose Unity 2022.3.7f1 LTS from the list of Official releases.
(This project uses Unity version 2022.3.7f1 LTS but should also work with later 2022 LTS versions)
Click on Install and make sure to select Android Build Support in the list of platforms. (The Quest headset runs on Android hardware.)
You can also select Windows Build Support (IL2CPP) if you want to be able to build games to Windows with this Unity Editor.
Keep in mind that you can always add individual build modules to your installed Unity Editor later on by going to Installs in the Unity Hub and by clicking on the cog wheel next to the installed editor in the Installs list:

Create New Unity Project
YouTube
Unity Hub > New Project
> Template = 3D Core Template
> Project name = VRRollerCoasterShooter-Project
> Project location = ../Documents/Unity/Project/VRRollerCoasterShooter
> Create Project
Notes
Open the Unity Hub application and click on New project to create a new project.
For the project’s template choose the regular 3D Core Template.
For the project name enter VRRollerCoasterShooter-Project.
(you can of course choose your own name, just make sure that you add -Project to the end of the name to make things clear.)
For the location to create the project in choose the ../Documents/Unity/Projects/VRRollerCoasterShooter folder that you’ve created in the previous step.

Click on Create project.
Unity will create a folder with the project name that you’ve chosen inside of the ../Documents/Unity/Projects/VRRollerCoasterShooter folder in which all the necessary project settings files will be created so if you look in the Windows File Explorer after Unity is done creating the project files you will see these folders inside of ../Documents/Unity/Projects/VRRollerCoasterShooter/:
../Documents/Unity/Projects/VRRollerCoasterShooter/
/Backups
/Builds
/VRRollerCoasterShooter-Project
Inside the ../VRRollerCoasterShooter-Project folder Unity will also create a folder named /Assets.
All of the game asset files that we are going to put into our game will go end up in the ../VRRollerCoasterShooter-Project/Assets folder, but we will add all of those asset files to our game from within Unity, in the Unity Project view, (Unity’s own file explorer), so not from outside Unity using the Windows File Explorer, to keep things easy, but know that the ../Assets folder that you see in the Unity Project view, is the same /Assets folder that you see in your Windows File Explorer!
The ../Documents/Unity/Projects/VRRollerCoasterShooter/VRRollerCoasterShooter-Project/Assets folder will be like the ‘root’ folder of your game inside of the Unity Editor.
When Unity is done creating the project directory and files the Unity Editor will launch and will open in a empty template ‘Sample Scene.unity’ level with nothing but a camera and a sun (directional light).
We are now ready to start building our game but before we start adding things to the now empty game world, we are going to create a basic folder structure inside of the /Assets folder for all of the game files first (there will be a lot of those), using the Unity Project view. We’ll also do the necessary setup for creating a Android Quest VR game and download the packages and assets to work with first..
Create Project Folder Structure
YouTube
Project View > /Assets > right click > Create > Folder..
../MyGame
/3DModels
/Audio
/Music
/SoundFX
/LensFlares
/Materials
/Prefabs
/Scenes
/Scripts
/Skyboxes
/Terrains
/TerrainData
/TerrainLayers
/Textures
/Trees
Notes
Create the folder structure that you see above here inside of the /Assets folder of your new empty Unity project, to store all the files for your game.
First create a folder named ‘MyGame’ by right clicking on the /Assets folder in the Unity Project view, and selecting Create > Folder.
Then create the folders with the names ‘3DModels’, ‘Audio’, ‘LensFlares’, ‘Materials’, etcetera, inside of the Assets/MyGame folder.
Also create two folders inside the Audio folder for SoundFX and Music, and two folders inside the Terrains folder for TerrainData and TerrainLayers.
Links
Unity Manual / Working in Unity / Unity’s interface
https://docs.unity3d.com/Manual/UsingTheEditor.html
Unity Manual / Working in Unity / Unity’s interface / The Project Window
https://docs.unity3d.com/Manual/ProjectView.html
Unity Manual / Working in Unity / Unity’s interface / The Scene View
https://docs.unity3d.com/Manual/UsingTheSceneView.html
Unity Manual / Working in Unity / Unity’s interface / The Game View
https://docs.unity3d.com/Manual/GameView.html
Unity Manual / Working in Unity / Unity’s interface / The Hierarchy Window
https://docs.unity3d.com/Manual/Hierarchy.html
Unity Manual / Working in Unity / Unity’s interface / The Inspector Window
https://docs.unity3d.com/Manual/UsingTheInspector.html
Set Visual Studio Code as the default external script editor
Unity Menu Bar > Edit > Preferences > External Tools
> External Script Editor = Visual Studio Code
> click Regenerate Project Files
Notes
Skip this step if you are using the default Visual Studio Community external script editor which came with Unity.
Create Empty Script Files
Project view > Assets/MyGame/Scripts > right click > Create > C# Script * 9
Assets/MyGame/Scripts
/AnimateRollerCoasterTrain.cs
/Bullet.cs
/CustomEventTrigger.cs
/GameManager.cs
/GameOverCanvas.cs
/MainMenuCanvas.cs
/RollerCoasterTrain.cs
/Target.cs
/VRGun.cs
/VRPlayer.cs
Notes
In the list above you can see the script files that are going to be created during this tutorial. The tutorial will go over how to create each script individually in the steps of the tutorial but you can choose to create the empty script files with the names that you see above here beforehand.
Make sure to copy the name of each script exactly (filenames are case sensitive) and make sure that the class names written at the top inside of each script in line 5 match the scripts filenames or you will get error messages popping up in the Unity Console view:
using System.Collections;
using System.Collections.Generic;
using UnityEngine;

public class Bullet : MonoBehaviour
{
    // Start is called before the first frame update
    void Start()
    {

    }

    // Update is called once per frame
    void Update()
    {

    }
}
If you name scripts immediately during creation then Unity will write the correct class name inside the script but if you rename a script after it is created then you will have to open the script and rename the class file manually.
To do this simply double click on a script file in the Project view to open it in your script editor, rename the name of the class and save the script (Ctrl+S).
Create Empty Scene Files
YouTube
Project view > Assets/MyGame/Scenes> right click > Create > Scene * 4
Assets/MyGame/Scenes
/Level 1.unity
/Level 2.unity
/Level 3.unity
/MainMenu.unity
Notes
In the list above you can see the Scene (Level) files that are going to be created during this tutorial. The tutorial will go over how to create each Scene individually in the steps of this tutorial but you can choose to create the empty Scene files with the names that you see above here beforehand. Creating the empty Scene files beforehand will make the loading of next level scenes and going from a level back to the main menu scene easier to test.
Of course feel free to create your own scenes for instance if you want to test stuff in a empty scene. I also recommend working on two or three levels at the same time by copy and pasting things from one scene to the other so you can find out what each level will have to have in common and so you can learn to make re-usable GameObjects and component based systems for your own game(s).
Keep in mind that Scenes are called scenes because they don’t always have to be levels for your game,
a scene can also be a cut-scene movie, a loading screen, a main menu, a multiplayer lobby with chat or something else, and that one level of your game can consist of multiple scenes loaded one after each other, or loaded at the same time and stacked on top of each other.
For instance one scene could be used as a base scene that contains all the GameObjects that are always needed in each level (think camera’s, game managers, a lighting setup etcetera) which ‘additively’ loads the individual level scenes with the level geometries from script. So there is a lot of flexibility, but that is a story for another time…
Switch Build Platform
YouTube
Unity Menu Bar > File > Build Settings
> Platform > select Android
> click Switch Platform
Notes
Open the Build Settings window and choose Android from the list of Platforms on the left side of the window. Then tell Unity to switch the build platform to Android by pressing the Switch Platform button.
You can always switch the build platform of a project later on but because each platform can have different (graphics) quality settings, depending on the platform that you choose, Unity will automatically reimport all of the asset files in your project and adjust their import settings when you switch platform so that for instance textures have a lower max resolution setting when built to mobile devices than they have when built to PC’s or other consoles.
Switching platforms and reimporting assets later is not a problem but it can take a lot longer to reimport all the assets when there are already a lot of assets in your game..
If you look at the Quality settings in the Project Setting window you can see the default quality settings for each individual platform. The default quality setting for Android is set to Medium as opposed to the default Quality setting for PC which is High, so expect the quality of shadows and textures etcetera to be a lot lower when you run your game on the Quest’s hardware instead of while playtesting in the Unity Editor using the Oculus Rift software, with the Quest in Quest Link mode. But you can create your own custom quality settings if you want to increase the quality of the graphics on the Quest hardware!
Install ‘XR Plugin Management’ Package
YouTube
Unity Menu Bar > Window > Package Manager
> switch ‘Packages: in Project’ to ‘Packages: Unity Registry’)
> Packages > XR Plugin Management > click Install
> Restart? > Yes
Change Project Settings
YouTube
Unity Menu Bar > Edit > Project Settings
> XR Plug-in Management
> Android Settings tab > Plug-in Providers = Oculus
(this will automatically install the Oculus XR Plugin package)
> Windows, Mac, Linux Settings tab > Plug-in Providers = OpenXR
> OpenXR > Windows, Mac, Linux Settings tab > Interaction Profiles > + (click Plus Button) > Oculus Touch Controller Profile
> Player
> Company Name = <Your Company Name>
> Product Name = VR Roller Coaster Shooter
> Android Settings Tab
> Other Settings
> Rendering
> Color Space = Linear
> Auto Graphics API = Off
> Graphics APIs = Vulkan, OpenGLES3
> Identification
> Override Default Package Name = Off
> Minimum API Level = Android 10.0 (API level 29)
> Configuration
> Scripting Backend = IL2CPP
> Target Architectures = Arm64
> Install Location = Automatic
Install ‘XR Interaction Toolkit’ Package
YouTube
Unity Menu Bar > Window > Package Manager > Packages > XR Interaction Toolkit > click Install
Install XR Interaction Toolkit Samples
YouTube
Unity Menu Bar > Window > Package Manager > Packages > XR Interaction Toolkit > Samples > Starter Assets > click Import
Import TextMeshPro Examples
YouTube
Unity Menu Bar > Window > TextMeshPro
> Import TMP Essential Resources
> Import TMP Examples & Extras
Setup Level 1. unity Scene
Create new Level 1.unity scene file
Project view > Assets/MyGame/Scenes
> right click > Create > Scene
> rename ‘New Scene.unity‘ to ‘Level 1.unity‘
Open Level 1.unity
Project view > Assets/MyGame/Scenes > double click Level 1.unity
Notes
Double click on the Level 1.unity file in the Project view to open up the empty level Scene. In the following steps we will start with setting up the environment for Level 1 by adding a skybox an by setting up the sun and fog etcetera.
Links
Unity Manual / Working in Unity / Create Gameplay / Scenes
https://docs.unity3d.com/2022.3/Documentation/Manual/CreatingScenes.html
Unity Manual / Working in Unity / Create GamePlay / Scenes / Creating, Loading and Saving Scenes
https://docs.unity3d.com/2022.3/Documentation/Manual/scenes-working-with.html
Download Roller Coaster Train Sound Effect
YouTube
Download roller coaster train wheels sound loop
https://freesound.org/people/wmquincy101/sounds/351382/
Download Skyboxes
YouTube
Add Skyboxes package from the Unity Asset Store to Your Assets
Unity Menu Bar > Window > Asset Store > search ‘Allsky Free – 10 Sky / Skybox Set’
https://assetstore.unity.com/packages/2d/textures-materials/sky/allsky-free-10-sky-skybox-set-146014
Import Skyboxes package into your project
Unity Menu Bar > Window > Package Manager
> Package Manager Menu Bar > Packages: = My Assets
> AllSky Free – 10 Sky / Skybox Set
> click Download
> click Import
> import All
Move Allskyfree folder to MyGame/Skyboxes folder
Project View > move folder Assets/Allskyfree to folder Assets/MyGame/Skyboxes
/Assets
/MyGame
/3DModels
/Audio
/Music
/SoundFX
/Materials
/Prefabs
/Scenes
/Scripts
/Skyboxes
/AllSkyFree
/Terrains
/TerrainData
/TerrainLayers
/Textures
/Trees
Notes
Go to the Unity Asset Store in your webbrowser and search for the Allsky Free skyboxes package with the Store search bar. Add the Allsky Free Skyboxes package to ‘Your Assets’. When the website asks if you want to open the package in Unity click yes to be taken back to Unity to the Package Manager window from where you can download the skyboxes package to your computer. (All Asset store packages that you download will be placed in the …. folder)
Click on Import to import the skyboxes into your project folder after the package is downloaded. Finally move the AllSkyFree folder from the root Assets/ folder of your project to the Assets/MyGame/Skyboxes folder.
Setup Skybox
YouTube
Apply the downloaded skybox material to the scene
Unity Menu Bar > Window > Rendering > Lighting > Environment > Environment > Skybox Material = Epic_BlueSunset.mat
Save Changes Made to the Scene
Unity > (Ctrl + S) or Unity Menu Bar > File > Save
(Save your scene regularly to avoid losing your progress in case of a crash either by going to File > Save in the Unity menu bar or by pressing Control + S on your keyboard. You can see if there are any changes made to the scene that still need to be saved if there is a star * character displayed right after the name of your scene in the Hierarchy view.)
Notes
…
Links
Unity Manual / Skybox
https://docs.unity3d.com/Manual/skyboxes.html
Unity Manual / Using Skyboxes
https://docs.unity3d.com/Manual/skyboxes-using.html
Unity Manual / Graphics / Graphics Overview / Lighting / Lighting Window
https://docs.unity3d.com/2017.4/Documentation/Manual/GlobalIllumination.html
Enable Fog
YouTube
Enable camera fog in the scene’s lighting settings
Unity Menu Bar > Window > Rendering > Lighting > Environment > Other Settings
> Fog = Enabled
> Density = 0.02
Save changes made to the scene
Unity > (Ctrl + S) or Unity Menu Bar > File > Save
(Save your scene regularly to avoid losing your progress in case of a crash either by going to File > Save in the Unity menu bar or by pressing Control + S on your keyboard. You can see if there are any changes made to the scene that still need to be saved by a * character that is displayed right after the name of your scene in the Hierarchy view.)
Notes
Depending on how far in the distance you want the player to be able to see, set the distance of the fog to something very low like 0.01 or 0.02.
For the color of the fog it is usually best to pick a very light color that is close to the color on the horizon of your skybox. (tip; you can use the color picker from the color selection window to sample the color of the skybox at the horizon)
Camera fog is useful to emulate the effect of colors of buildings and trees getting whiter towards the horizon (and to hide culled level geometry popping up in the distance) but it doesn’t create realistic fog clouds. For those you will have to use fog particle systems, volumetric fog systems or other methods in conjunction with the standard camera fog.
Keep in mind that to be able to see the camera fog you will have to have some objects like a terrain with trees and buildings in your scene, so that you can see the effect of it, so it is good to come back to this step again later on when you have more in your scene, to re-adjust these settings.
Links
Setup Sun
YouTube
Hierarchy view
> rename ‘Directional Light’ to ‘Sun’
> select Sun
Inspector view > Sun.Light
.Color = RGBA 0-1.0 (1, 1, 1, 1)
.Intensity = ~4
Save changes made to the scene
Unity > (Ctrl + S) or Unity Menu Bar > File > Save
(Save your scene regularly to avoid losing your progress in case of a crash either by going to File > Save in the Unity menu bar or by pressing Control + S on your keyboard. You can see if there are any changes made to the scene that still need to be saved if there is a star * character displayed right after the name of your scene in the Hierarchy view.)
Notes
Setting the light intensity relatively high during the creation of a scene makes it much easier to see differences in different smooth and rough materials, and to see all the details of your textures and normal maps.
It is also smart to set the color of the Directional Light to pure white at first, so you can see the colors of your textures/materials exactly the way they are. Usually when something looks realistic in white light it will also look realistic in colored light. Depending on the kind of atmosphere that you want, you can set it to a ‘cool’ very light blue-ish white, a ‘warm’ very light orange white or a completely different color later.
Links
Introduction to Lighting – Unity Manual
https://docs.unity3d.com/Manual/LightingInUnity.html
Light class – Unity Manual
https://docs.unity3d.com/Manual/class-Light.html
Light class – Unity Scripting API
https://docs.unity3d.com/ScriptReference/Light.html
Types of Lights – Unity Manual
https://docs.unity3d.com/Manual/Lighting.html
Add Terrain
YouTube
Add Empty Terrain
Unity Menu Bar > GameObject > 3D Object > Terrain
Position Terrain
Hierarchy view > select Terrain
Inspector view > Terrain.Transform.Position = (-250, 0, -250)
Set Terrain Size
Inspector view > Terrain.Terrain.Terrain Settings.Mesh Resolution
.Terrain Width = 500
.Terrain Length = 500
Move Terrain Data File
Project view > Assets/ > move file ‘New Terrain.asset’ to folder Assets/MyGame/Terrains/TerrainData
Rename Terrain data
Project view > Assets/MyGame/Terrains/TerrainData > rename file ‘New Terrain.asset’ to ‘Level 1-TerrainData.asset’
(Each time you create a new terrain, unity will automatically create a new terrain data file in the Assets/ folder, the root folder of your project. This terrain data file is linked to the terrain in your scene.)
Save changes made to the scene
Unity > (Ctrl + S) or Unity Menu Bar > File > Save
(Save your scene regularly to avoid losing your progress in case of a crash either by going to File > Save in the Unity menu bar or by pressing Control + S on your keyboard. You can see if there are any changes made to the scene that still need to be saved if there is a star * character displayed right after the name of your scene in the Hierarchy view.)
Links
Unity Manual / World Building
https://docs.unity3d.com/Manual/CreatingEnvironments.html
Unity Manual / World Building / Terrain
https://docs.unity3d.com/Manual/script-Terrain.html
Unity Manual / World Building / Terrain/ Creating and Editing Terrains
https://docs.unity3d.com/Manual/terrain-UsingTerrains.html
Download Trees
YouTube
Unity Menu Bar > Window > Asset Store > Dream Forest Tree
https://assetstore.unity.com/packages/3d/vegetation/trees/…
Project view
> move folder Assets/Dream Forest Tree/ to Assets/MyGame/Trees/
> remove folder Assets/MyGame/Trees/DreamForestTree/PostProcessing
(For PostProcessing effects download the latest version of the Unity Post Processing package from the Package Manager instead)
Download Textures
This project uses terrain textures (images for use in games) from the Dream Forest Tree package and from other packages used in the tutorial. Of course feel free to download your own textures from any source available. There are many free textures packages in the Unity Asset store and you can search for textures with Google images etcetera. If you want textures that can be repeated/tiled without any visible seams at the edges then search for ’tileable’ or ‘seamless’ textures and go for square textures because they’re easier to work with when tiling and offsetting them on materials.
To check if a texture is square you can look at the pixel dimensions/resolution of the texture’s properties, shown as two numbers for the width and height of the texture with an x in between, like so: 1024 x 1024.
If you search for tileable wood, stone, metal, grass, brick or sci-fi textures you will probably find a lot of textures that are useful for your games.
I also recommend downloading a bunch of ‘debug’ textures with just basic grids, lines, sizes and other shapes on them that might help with building your level geometry to a certain scale.
Add Textures To Terrain
YouTube
Hierarchy view > select Terrain
Inspector view > Terrain.Terrain.Paint Terrain.switch ‘Set Height’ to ‘Paint Texture’
Create Terrain Layers
Create Layer 1 (Grass)
Inspector view > Terrain.Terrain Layers
.Edit Terrain Layers.Create Layer.Texture2D = ‘Grass 3.psd’
.select ‘New Layer’.unfold ‘New Layer (Terrain Layer)’
.Normal map = ‘Grass 3.psd’ texture
.Normal Scale = 3.5
.Metalic = 0.15
.Smoothness = 0.5
.Tiling Settings.Size = (1, 1)
Rename Layer 1
Inspector view > Terrain.Terrain.Terrain Layers.select ‘New Layer’.New Layer (Terrain Layer).click ‘Open’
Project view > rename file ‘New Layer.terrainlayer’ to ‘Grass1-TerrainLayer.terrainlayer’
Project view > move file ‘Grass1-TerrainLayer.terrainlayer’ to folder Assets/MyGame/Terrains/TerrainLayers
Create Layer 2 (Ground)
Inspector view > Terrain.Terrain.Terrain Layers
.Edit Terrain Layers.Create Layer.Texture2D = Ground1.psd
.select ‘New Layer’ > unfold ‘New Layer (Terrain Layer)’
.Normal Map = ‘Ground1 N.psd’ texture
.Metalic = 0.4
.Smoothness = 0.05
.Tiling Settings.Size = (1, 1)
Rename Layer 2
Inspector view > Terrain.Terrain Layers.select ‘New Layer’.New Layer (Terrain Layer).click ‘Open’
Project view > rename file New Layer.terrainlayer to Ground1-TerrainLayer.terrainlayer
Project view > move file Ground1-TerrainLayer.terrainlayer to folder Assets/MyGame/Terrains/TerrainLayers
Save changes made to the scene
Unity > (Ctrl + S) or Unity Menu Bar > File > Save
(Save your scene regularly to avoid losing your progress in case of a crash either by going to File > Save in the Unity menu bar or by pressing Control + S on your keyboard. You can see if there are any changes made to the scene that still need to be saved by a * character that is displayed right after the name of your scene in the Hierarchy view.)
Links
Unity Manual / World Building / Terrain / Terrain Layers
https://docs.unity3d.com/2022.3/Documentation/Manual/class-TerrainLayer.html
Draw Textures on Terrain
Inspector view > Terrain.Terrain.Paint Terrain.Paint Texture
Grass
Terrain.Terrain Layers > select ‘Grass 1-Terrain Layer’
Terrain.Brush Size = ~100
Ground
Terrain.Terrain Layers > select ‘Ground 1-Terrain Layer’
Terrain.Brush Size = ~100
Links
Unity Manual / World Building / Terrain / Terrain Tools / Paint Texture
https://docs.unity3d.com/2022.3/Documentation/Manual/class-TerrainLayer.html
Sculpt Terrain
YouTube
Hierarchy view > select Terrain
Inspector view > Terrain.Terrain.Paint Terrain
.Paint Terrain mode = Set Height
.Height = 5
Links
Unity Manual / World Building / Terrain / Terrain Tools / Set Height
https://docs.unity3d.com/2022.3/Documentation/Manual/terrain-SetHeight.html
Unity Manual / World Building / Terrain / Terrain Tools / Set Height / Raise or Lower Terrain
https://docs.unity3d.com/2022.3/Documentation/Manual/terrain-RaiseLowerTerrain.html
Add Trees to Terrain
YouTube
Hierarchy view > select Terrain
Trees
Inspector view > Terrain.Terrain.Paint Trees.Edit Trees.Add Tree
.Tree Prefab = Redwood 2.prefab
.Bend Factor = 1
Bushes
Inspector view > Terrain.Terrain.Paint Trees.Edit Trees.Add Tree
.Tree Prefab = Bush 1.prefab
.Bend Factor = 1
Links
World Building / Terrain / Trees – Unity Manual
https://docs.unity3d.com/2022.3/Documentation/Manual/terrain-Trees.html
Draw Trees on Terrain
YouTube
Draw Trees
Inspector view > Terrain.Terrain
.TerrainSettings.Tree & Detail Objects.Billboard Start = 100
.Paint Trees
.Trees.select Tree
.Settings.Brush Size = 10
.Tree Density = ~90
(Left mouse button to draw trees onto the terrain, shift + left mouse button to erase)
Links
Unity Manual / World Building / Terrain / Trees
https://docs.unity3d.com/2022.3/Documentation/Manual/terrain-Trees.html
Add Grass to Terrain
YouTube
Add Grass to Terrain
Hierarchy view > select Terrain
Inspector view > Terrain.Terrain.Paint Details.Paint Details Control.Preview.+
.Grass Texture
.Detail Texture = Grass Plant 4.png
.Min Width = ~0.1
.Max Width = ~1.5
.Min Height = ~0.1
.Max Height = ~1.5
.Noise Spread = ~0.02
.Detail density = ~2.5
.Healthy Color = RGBA 0-1 (0, 0.2, 0, 1)
.Dry Color = RGBA 0-1 (0.18, 0.18, 0, 1)
.Grass Texture
.Detail Texture = Grass Plant 2.png
.Min Width = ~0.4
.Max Width = ~2
.Min Height = ~0.4
.Max Height = ~2.2
.Noise Spread = ~0.1
.Detail density = ~1.75
.Healthy Color = RGBA 0-1 (0.4, 0.4, 0.2, 1)
.Dry Color = RGBA 0-1 (0.2, 0.2, 0.1, 1)
Links
Unity Manual / World Building / Terrain / Grass and other details
https://docs.unity3d.com/2022.3/Documentation/Manual/terrain-Grass.html
Draw Grass on Terrain
YouTube
Draw Grass
Inspector view > Terrain.Terrain
.Terrain Settings
.Tree & Detail Objects.Detail Distance = ~150
.Wind Settings for Grass
.Speed = 0.7
.Bending = 0.25
.Paint Details
.Brush Strength = 1
.Brush Size = 10
(Use left mouse button to draw and shift+left mouse button to erase)
Draw Details
(Use left mouse button to draw and shift+left mouse button to erase)
Install ‘Terrain Tools’ Package
YouTube
Unity Menu Bar > Window > Package Manager
> Package Manager Menu Bar > Packages: = Unity Registry
> Packages
> Terrain Tools > click Install
> Terrain Tools > Download Asset Samples from Asset Store (Optional)
(The Terrain Tools package adds a lot of extra functionality to the default Unity Terrain component and adds tools to generate realistic wind, water or heat erosion effects for the terrain, making it easier to create more natural, complex-looking terrain and also adds the option to use Brush Mask Filters, making it easier to, for instance, paint terrain textures based on the slope of the terrain, so you can choose to only draw grass on flat terrain areas and ground on steep terrain areas.
Keep in mind that after you’ve installed the Terrain Tools package the Unity Terrain Component will look different and will have a lot more options!)
Links
Unity Manual / Terrain Tools
https://docs.unity3d.com/Packages/com.unity.terrain-tools@5.0/manual/index.html
Create WindZone
YouTube
Create a WindZone GameObject
Unity Menu Bar > GameObject > 3D Object > WindZone
Inspector view > WindZone.WindZone
.Turbulence = ~0.2
.Pulse Magnitude = ~2
.Pulse Frequency = ~0.08
Enable Wind in Scene View
Scene view Menu Bar > Toggle Skybox, Fog and Various Other Effects > Always Refresh = true
(If you press Play then you will see the WindZone in action in the Game view but it is disabled by default in the Scene view so if you want to finetune the wind without having to enter Play mode then you have to set Always Refresh the Scene view to true.)
Notes
The Unity WindZone component animates the trees vertices along the length of the trees trunk and branches to simulate the effect of wind. Vertices at the bottom of the trunk will move less than the vertices at the top of the trees which will cause the trees to bend. There are two Modes on the WindZone component, one for directional wind, which is wind that blows in the same direction all across the map and the other setting is spherical, which is for wind that that blows around in sphere shape, like a tornado, inside a set radius. Spherical wind can be used to create the effect of a helicopter landing or for other local storm like wind effects. You could for instance add a spherical WindZone to a helicopter so when it hovers over trees the trees below the helicopter are affected by it of you could add it to a character and enable it while that character is casting a powerful magic spell for highly dramatic effects.
By tweaking the settings of the WindZone for Turbulence, Pulse Magnitude, and Pulse Frequency, you can create slow gentle breezy wind effects or violent fast moving stormy wind.
If you don’t want wind to always blow in the same direction then it is easy to write a small script that slowly (randomly) rotates a directional WindZone on the Y-axis.
If you use particle systems in your game that would normally be effected by wind, for instance for ground fog or dust motes flying around in the scene, then you can enable the ‘External Forces’ property on the particle system to have the particles move around with the same wind as the trees for even more added realism!
One thing that is not obvious with WindZones is that the wind of the grass that is drawn onto a Terrain is not controlled by the WindZone but by the Terrain component directly so if you want to enable/disable/adjust the wind of the grass then check the ‘Wind Settings for Grass’ in the Terrain settings of the Terrain component.
Links
Unity Manual / WindZone class
https://docs.unity3d.com/2022.3/Documentation/Manual/class-WindZone.html
Unity Scripting API / WindZone class
https://docs.unity3d.com/2022.3/Documentation/ScriptReference/WindZone.html
Create Water
YouTube
Create Empty GameObject (to store multiple water planes)
Unity Menu Bar > GamObject > Create Empty
Hierarchy view > rename ‘Empty’ to ‘Water’
Hierarchy view > select Water
Inspector view > Water.Transform.Position = (0, 0, 0)
Create Water Plane GameObject
Unity Menu Bar > GameObject > 3D > Plane
Hierarchy view
> rename ‘Plane’ to ‘WaterPlane (0)’
> select WaterPlane (0)
Inspector view > WaterPlane (0).right click Mesh Collider > Remove Component
Parent WaterPlane to Water
Hierarchy view > parent WaterPlane to Water
Notes
To parent one GameObject to another simply drag the GameObject onto the GameObject that you want to parent it to in the Hierarchy view in the same way as with files in folders. If done correctly, the Hierarchy should look like this:
▼Level 1
Main Camera
Sun
Terrain
▼Water
WaterPlane (0)
Position and Scale WaterPlane
Hierarchy view > select WaterPlane
Inspector view > WaterPlane
.Transform.Position = (0, 1, 0)
.Transform.Scale = (50, 50, 50)
Create New Water Material
Project view > Assets/MyGame/Materials
> Right Mouse Button > Create > Material
> rename ‘New Material.mat’ to ‘Water-Mat.mat’
Setup Water Material
Project view > Assets/MyGame/Materials/ > select Water-Mat.mat
Inspector view > Water-Mat (Material)
.Rendering Mode = Fade
.Main Maps
.Albedo = texture ‘water.psd’
.Albedo (color) = RGBA (0.6, 0.6, 0.6, 1)
.Metallic = ~1.0
.Smoothness = ~0.9
.Normal Map = texture ‘water pool.psd’
.Tiling = (50, 50)
.Advanced Options
.Render Queue = 2800 (Transparent -200)
(Sets Water Material Render Queue from transparant (3000) to 2800 so the water gets rendered before the tree LOD’s. This fixes an issue where the trees’ LOD’s in the distance are overlapped by the water plane.)
Assign Water Material to WaterPlane
Hierarchy view > select WaterPlane
Inspector view > WaterPlane.Mesh Renderer.Materials.Element 0 = Water-Mat.mat
Animate Water Surface
Hierarchy view > select WaterPlane
Inspector view > WaterPlane
.Add Component > Scripts > Scroll UV Water
.Scroll UV Water.Animate Rate = (0.02, 0.02)
(The Scroll UV Water script offsets the texture of the WaterPlanes’ water material during playmode. This is a very simple way to animate the water surface.)
Duplicate WaterPlanes
Hierarchy view
> right click WaterPlane (0) > Duplicate * 8
> select WaterPlane (0)
Inspector view
> WaterPlane (0).Transform.Position = (-500, 2, 0)
> WaterPlane (1).Transform.Position = (0, 2, 0)
> WaterPlane (2).Transform.Position = (500, 2, 0)
> WaterPlane (3).Transform.Position = (-500, 2, -500)
> WaterPlane (4).Transform.Position = (0, 2, -500)
> WaterPlane (5).Transform.Position = (500, 2, -500)
> WaterPlane (6).Transform.Position = (-500, 2, 500)
> WaterPlane (7).Transform.Position = (0, 2, 500)
> WaterPlane (8).Transform.Position = (500, 2, 500)
Notes
Duplicate the water plane 8 times to make a 3×3 grid of 9 planes in total.
The Hierarchy should now look like this:
▼Level 1
Main Camera
Sun
Terrain
▼Water
WaterPlane (0)
WaterPlane (1)
WaterPlane (2)
WaterPlane (3)
WaterPlane (4)
WaterPlane (5)
WaterPlane (6)
WaterPlane (7)
WaterPlane (8)
Add VR Player
YouTube
Add XR Interaction Setup.prefab prefab to Scene
Project view > Assets/Samples/XR Interaction Toolkit/2.4.3/Starter Assets/Prefabs > drag ‘XR Interaction Setup.prefab‘ to Hierarchy view
Reset XR Interaction Setup Position
Hierarchy view > select XR Interaction Setup
Inspector view > XR Interaction Setup.Transform.Position = (0, 0, 0)
Unpack XR Interaction Setup Prefab
Hierarchy view > right click XR Interaction Setup > Prefab > Unpack Completely
Rename Player GameObject
Hierarchy view > rename ‘XR Origin (XR Rig)’ to ‘VRPlayer’
Place VRPlayer on Terrain
Inspector view > VRPlayer.Transform.Position = (0, <Height of your Terrain>, 0)
(To make sure that the player doesn’t fall trough the map when the game starts, place the VRPlayer GameObject at the height of your sculpted terrain on the y-position. The special Character Controller collider component on the VRPlayer is what actually collides with the terrain, so make sure the bottom sits exactly on, or slightly above the height of your terrain.)
Remove Extra Camera from Scene
Hierarchy view > right click Main Camera > Delete
(Because the XR Origin player prefab comes with its own camera which is attached to the player’s head, and because you normally only need one camera in your scene, you can delete the default Main Camera GameObject which was already in your scene from the hierarchy.)
Setup VRPlayer
YouTube
Setup Tracking
Set Tracking Origin Mode to Floor
Hierarchy view > select ‘VRPlayer’
Inspector view > VRPlayer.XR Origin.Tracking Origin Mode = Floor
Notes
Select the VRPlayer GameObject in the Hierarchy and set the Tracking Origin Mode property of the XR Origin component to Floor. When the mode is floor, the position of tracked devices will be relative to the player’s real floor.
When the mode is set to Device, the position of tracked devices will be relative to a fixed position in space, such as the initial position of the HMD (Head Mounted Display) when started.
Setup Walking
Enable Smooth Turning Instead of Snap Turning
Hierarchy view > VRPlayer > Camera Offset > select Right Controller
Inspector View > Right Controller.Action Based Controller Manager.Locomotion Settings.Smooth Turn Enabled = True
Adjust Smooth Turn Speed
Hierarchy view > VRPlayer > Locomotion System > select Turn
Inspector view > Turn.Continuous Turn Provider.Turn Speed = 90
Notes
Select the VRPlayer’s Right Controller GameObject in the Hierarchy view and set the Smooth Turn variable of the Action Based Controller Manager component to true in the Inspector view, to enable smooth turning when the player pushes the right controller’s thumbstick to the left or right, instead of snapping the rotation angle to set increments. Incremental or Snap turning is enabled by default because it decreases the chance of getting motion sickness from camera motion not caused by the player moving its head, but I find it to be a lot harder to rotate and move in exactly the direction that I want, when I can only turn in set increments.
Because we don’t want the player to be able to move around using thumb sticks while riding the roller coaster we will disable turning and moving for the player entirely in later steps but for testing purposes it is nice to have the option to move around.
Setup Grabbing
Setup Left Controller Grabbing
Hierarchy view > VRPlayer > Camera Offset > Left Controller > select Ray Interactor
Inspector view > Ray Interactor.XR Ray Interactor
.Force Grab = true
.Anchor Control = false
.Attach Transform = Hierarchy view > VRPlayer > Camera Offset > Left Controller (Transform)
Setup Right Controller Grabbing
Hierarchy view > VRPlayer > Camera Offset > Right Controller > select Ray Interactor
Inspector view > Ray Interactor.XR Ray Interactor
.Force Grab = true
.Anchor Control = false
.Attach Transform = Hierarchy view > VRPlayer > Camera Offset > Right Controller (Transform)
Notes
Select the Ray Interactor GameObject, inside of VRPlayer > Camera Offset > Left Controller in the Hierarchy view.
Set ‘Force Grab’ on the XR Ray Interactor component to true, to force XR Interactable objects (like the VRGun that we’re going to create) to be snapped to the position of the controller instantly when grabbed, instead of allowing the player to manipulate the position and rotation of grabbed GameObjects in the distance by using the controller’s thumb sticks, which the default setup lets us do so that we don’t have to bend down to pick things up.
Set ‘Anchor Control’ to false to disable the option for the player to rotate grabbed objects by using the thumb sticks entirely.
Change ‘Attach Transform’ from Left Controller Stabilized (Transform) to the normal Left Controller (Transform) by dragging the Left Controller GameObject from the Hierarchy view, into the Attach Transform variable’s reference slot in the Inspector view.
The Left Controller Stabilized GameObject simply follows the normal Left Controller GameObject during Play mode but it is a smoothed out/stabilized movement, meant to make the motion of grabbed objects look smoother but when you quickly want to move grabbed objects to a precise position, like when aiming with a grabbed rifle, then we don’t want the movement to lag behind, so setting the Attach Transform to the Left Controller transform will make moving grabbed objects feel more precise.
Repeat these steps for the VRPlayer > Camera Offset > Right Controller to setup the Right Controller as well.
Disable Teleport Locomotion
Setup Left and Right Controllers Action Based Controller Manager component
Hierarchy view > VRPlayer > Camera Offset > select Left Controller
Inspector view > Left Controller.Action Based Controller Manager
.Teleport Interactor = None (XR Ray Interactor)
.Teleport Mode Activate = None (Input Action Reference)
.Teleport Mode Cancel = None (Input Action Reference)
Hierarchy view > VRPlayer > Camera Offset > select Right Controller
Inspector view > Right Controller.Action Based Controller Manager
.Teleport Interactor = None (XR Ray Interactor)
.Teleport Mode Activate = None (Input Action Reference)
.Teleport Mode Cancel = None (Input Action Reference)
Deactivate Left and Right Controllers Teleport Interactor GameObjects
Hierarchy view > VRPlayer > Camera Offset > Left Controller > select Teleport Interactor
Inspector view > deactivate Teleport Interactor GameObject
(You can also activate/deactivate a GameObject by right clicking on it in the Hiearchy view and selecting ‘Toggle Active State’)
Hierarchy view > VRPlayer > Camera Offset > Right Controller > select Teleport Interactor
Inspector view > deactivate Teleport Interactor
Deactivate Locomotion System’s Teleportation Provider
Hierarchy view > VRPlayer > Locomotion System > deactivate Teleportation GameObject
Notes
Deactivate the Left and Right Controller’s Teleport Interactor GameObjects by unchecking the so called ‘activeState’ bool on the GameObjects in the Inspector view.
Each GameObject in the Hierarchy view can be deactivated by unchecking its active status bool, that you see in the top left of the Inspector view, to the left of the name of the GameObject that is selected:

By deactivating a GameObject we also disable each individual component that is on the GameObject that we deactivate.
In Unity, GameObjects can be ‘active’ or ‘inactive’ and components can be ‘enabled’ or ‘disabled’ individually.
(I guess calling them both active or enabled would be even more confusing!)
To deactivate a GameObject from script we can use the GameObject.SetActive(false) function and pass in a bool as argument like in the example below:
using System.Collections;
using System.Collections.Generic;
using UnityEngine;

public class GameObjectSetActiveExample : MonoBehaviour
{
    public GameObject otherGameObject;

    // Start is called before the first frame update
    void Start()
    {
        // Turn off the GameObject that this script is attached to.
        gameObject.SetActive(false);

        // Turn off some other GameObject that is assigned
        // to the public GameObject otherGameObject variable in the inspector.
        otherGameObject.SetActive(false);

        // Deactivate a GameObject in the scene by searching for it by name.
        GameObject.Find("VRPlayer").SetActive(false);

        // Deactivate a GameObject in the scene by searching for it by tag.
        GameObject.FindWithTag("Player").SetActive(false);
    }
}
To disable a component that is on a GameObject from script we can set the ‘enabled’ bool variable of a component to false by ‘getting’ the component first and then setting it disabled like in the example below. Keep in mind that scripts are components so to disable any script added to a GameObject we can use the GetComponent<>() function:
using System.Collections;
using System.Collections.Generic;
using UnityEngine;

public class EnableComponentExample: MonoBehaviour
{
    public GameObject otherGameObject;

    // Start is called before the first frame update
    void Start()
    {
        //Get the BoxCollider component that is attached to this GameObject and disable it.
        gameObject.GetComponent<BoxCollider>().enabled = false;

        //Get the BoxCollider component that is attached to otherGameObject and disable it.
        otherGameObject.GetComponent<BoxCollider>().enabled = false;

        // Get the EnableComponentExample component (this script)
        // that is attached to this GameObject and disable it.
        gameObject.GetComponent<EnableComponentExample>().enabled = false;

        // To set 'this' script/component's enabled bool to false, like in line 20, we don't
        // have to 'get' it first because we can access its enabled bool directly.
        enabled = false;
    }
}
Disable movement Tunneling Vignette effect on player camera
Hierarchy view > VRPlayer > Main Camera > deactivate TunnelingVignette GameObject
Links
Unity Manual / GameObject class
https://docs.unity3d.com/Manual/class-GameObject.html
Unity Scripting API / GameObject class
https://docs.unity3d.com/ScriptReference/GameObject.html
Unity Scripting API / GameObject.SetActive() function
https://docs.unity3d.com/ScriptReference/GameObject.SetActive.html
Unity Scripting API / GameObject.Find() function
https://docs.unity3d.com/ScriptReference/GameObject.Find.html
Unity Scripting API / GameObject.FindWithTag() function
https://docs.unity3d.com/ScriptReference/GameObject.FindWithTag.html
Unity Scripting API / Behaviour.enabled variable
https://docs.unity3d.com/ScriptReference/Behaviour-enabled.html
Create a New VRPlayer Script
YouTube
Create New VRPlayer Script
Project view /Assets/MyGame/Scripts
> right click > Create > C# Script > name ‘VRPlayer.cs’
> open VRPlayer.cs
Check if VRPlayer.cs file name matches class name
> Visual Studio Code > VRPlayer.cs > edit Highlighted Code
using System.Collections;
using System.Collections.Generic;
using UnityEngine;

public class VRPlayer: MonoBehaviour
{
    // Start is called before the first frame update
    void Start()
    {

    }

    // Update is called once per frame
    void Update()
    {

    }
}
Save VRPlayer.cs script
Visual Studio Code > VRPlayer.cs > (Ctrl + S) or (Cmd + S)
Add VRPlayer Script Component to VRPlayer GameObject
Inspector view > VRPlayer.AddComponent > Scripts > VRPlayer.cs
Notes
Note
Links
Link
Link
Testing VR in Unity Editor Play Mode
YouTube
Download & Install the Oculus Rift App
https://www.oculus.com/Setup/ > Download Oculus Rift Software
Setup Oculus Link (cable or wireless)
Cable (recommended for better frame-rates)
Enable Unknown Sources (Allow apps that have not been reviewed by Oculus to run.)
Oculus app > Settings > General > Unknown Sources = true
Enable Pass-Through over Oculus Link
Oculus app > Settings > Beta > Pass-through over Oculus Link = true
(Enables Quest front cameras pass trough when stepping out of the VR play area. Just so that you don’t accidently run into a wall while playtesting..)
Playtest Your Game
Unity Editor > press Play button
Your Body > Head > wear Quest
Notes
To test your game in VR in the Unity Editor during Play Mode you first have to turn on your Quest headset and connect it to your computer with the USB link cable. Then you have to launch the Oculus App on your computer and make sure your headset shows up as connected in the Oculus App > Devices window. Then when you put on the Quest headset you should see a pop up window asking if you want to enable Oculus Link and a pop up window asking if you want to enable USB debugging, press yes on both pop ups.
When Oculus Link is enabled you will see the Oculus Dashboard instead of the regular Stand alone Quest dashboard environment.
(If you didn’t get the pop-up message then you can still enable Oculus link manually on the Quest, in the Quest’s Quick Settings window.)
When you are in the Oculus dashboard on your Quest then you can press Play in Unity on your computer. Your scene will load and you can playtest it in VR!
Install Splines Package
YouTube
Download the Splines package
Unity Menu Bar > Window > Package Manager
Package Manager
> Package Manager Menu Bar > switch Packages: In Project to Packages: Unity Registry
> Packages > Splines > click Install
Download the Spline Examples sample
Unity Menu Bar > Window > Package Manager
Package Manager
> Package Manager Menu Bar > switch Packages: In Project to Packages: Unity Registry
> Packages > Splines > Samples > Spline Examples > Import
Create Roller Coaster Track Shaped Spline Template
YouTube
Create New Spline GameObject
Unity Menu Bar > GameObject > Spline > Square
Setup Spline
Hierarchy view > rename ‘Spline’ to ‘RollerCoasterSpline’
Hierarchy view > select RollerCoasterSpline
Inspector view > RollerCoasterSpline.Transform.Position = (0, <YourTerrainHeight>, 0)
Setup Spline Knots
Hierarchy view > select RollerCoasterSpline
Scene view > Tools > select Spline Edit Mode ![]()
Scene view > Tools > select Move Tool
Scene view Menu Bar > switch Toggle Tool Handle Rotation from Global/Local to Element
(This will make the Move Tool arrows show the local rotation and local direction of the selected spline knot elements)
Inspector view > RollerCoasterSpline.Spline.Spline 0.Closed = false;
(It is easier to start creating the track with an open ended spline than with a closed spline so set Closed to false for now but switch it back to true when you’re done positioning the final knot of the spline.)
Setup the First Four Knots
Inspector view > RollerCoasterSpline.Spline.Spline 0
.Knot [0]
.Position = (0, 0, 0)
.Rotation = (0, 0, 0)
.Tangent Mode = Bezier
.Bezier = Mirrored
.Tangent Length = 5
.Knot [1]
.Position = (0, 0, 10)
.Rotation = (0, 0, 0)
.Tangent Mode = Bezier
.Bezier = Mirrored
.Tangent Length = 5
.Knot [2]
.Position = (0, 0, 30)
.Rotation = (0, 0, 0)
.Tangent Mode = Bezier
.Bezier = Mirrored
.Tangent Length = 5
.Knot [3]
.Position = (0, 0, 50)
.Rotation = (0, 0, 0)
.Tangent Mode = Bezier
.Bezier = Mirrored
.Tangent Length = 5
.+ (select the last Knot (Knot [3]) and then click on the plus button to create new Knots)
Notes
The objective here is to create a simple/generic roller coaster track spline shape that can easily be duplicated and modified later on, to create many different roller coaster track designs.
Of course you don’t have to recreate the exact same shape by copying all of the Knot positions, rotations and tangents exactly, but it is advised to do so.
If you look at the example image and the first Knot positions up to the first bend in the track, you can probably figure out the pattern that is used for all the other Knot positions easily.
Think of this shape as a primitive roller coaster track loop shape that can be duplicated and transformed into many other different track shapes. Also, it’s probably an ideal shape for the first easy (tutorial) level of the game!
To make the positioning and rotating of those tiny spline knots and their handles a little easier to see you can create a quad or a plane GameObject with a material that has a grid texture to use as a temporary floor while creating the spline. After scaling a plane to a larger size you can adjust the size of the grid texture until it matches the 1 unit/meter large default Unity ‘unit’ cube by adjusting the texture tiling property of the grid material which is what you sea in the YouTube video.
To see the directions that the spline knots are pointing in make sure to first select the RollerCoasterSpline in the Hierarchy, then click on the Spline Edit Mode Tool button ![]() in the top left corner of the Scene view to see the individual spline knots in the Scene view.
in the top left corner of the Scene view to see the individual spline knots in the Scene view.
Then select the normal Move tool ![]() and switch the Handle Rotation to Element instead of Global/Local:
and switch the Handle Rotation to Element instead of Global/Local:

Now the blue gizmo arrow of the selected spline knot will point in the forward direction of that selected spline knot, instead of in the forward direction of the Global game world, (think North). When you rotate a spline knot now you will also see the blue move tool gizmo arrow rotate in the Scene view, like you normally see when you’ve rotated a normal GameObject with the Handle Rotation set to Local.
So setting the handle rotation for the spline knots to Element is the same as setting it to Local for normal GameObjects.
This is something that you will have to get used to a little bit, but keep repeating the steps until it becomes easy.
Setup the Rest of the Knots
Inspector view > RollerCoasterSpline.Spline.Spline 0
.Knot [4]
.Position = (0, 0, 70)
.Rotation = (0, 0, 0)
.Tangent Mode = Bezier
.Bezier = Mirrored
.Tangent Length = 5
.Knot [5]
.Position = (0, 0, 90)
.Rotation = (0, 0, 0)
.Tangent Mode = Bezier
.Bezier = Mirrored
.Tangent Length = 5
.Knot [6]
.Position = (-10, 0, 100)
.Rotation = (0, 270, 0)
.Tangent Mode = Bezier
.Bezier = Mirrored
.Tangent Length = 5
.Knot [7]
.Position = (-30, 0, 100)
.Rotation = (0, 270, 0)
.Tangent Mode = Bezier
.Bezier = Mirrored
.Tangent Length = 5
.Knot [8]
.Position = (-50, 0, 100)
.Rotation = (0, 270, 0)
.Tangent Mode = Bezier
.Bezier = Mirrored
.Tangent Length = 5
.Knot [9]
.Position = (-70, 0, 100)
.Rotation = (0, 270, 0)
.Tangent Mode = Bezier
.Bezier = Mirrored
.Tangent Length = 5
.Knot [10]
.Position = (-90, 0, 100)
.Rotation = (0, 270, 0)
.Tangent Mode = Bezier
.Bezier = Mirrored
.Tangent Length = 5
.Knot [11]
.Position = (-100, 0, 90)
.Rotation = (0, 180, 0)
.Tangent Mode = Bezier
.Bezier = Mirrored
.Tangent Length = 5
.Knot [12]
.Position = (-100, 0, 70)
.Rotation = (0, 180, 0)
.Tangent Mode = Bezier
.Bezier = Mirrored
.Tangent Length = 5
.Knot [13]
.Position = (-100, 0, 50)
.Rotation = (0, 180, 0)
.Tangent Mode = Bezier
.Bezier = Mirrored
.Tangent Length = 5
.Knot [14]
.Position = (-100, 0, 30)
.Rotation = (0, 180, 0)
.Tangent Mode = Bezier
.Bezier = Mirrored
.Tangent Length = 5
.Knot [15]
.Position = (-100, 0, 10)
.Rotation = (0, 180, 0)
.Tangent Mode = Bezier
.Bezier = Mirrored
.Tangent Length = 5
.Knot [16]
.Position = (-90, 0, 0)
.Rotation = (0, 90, 0)
.Tangent Mode = Bezier
.Bezier = Mirrored
.Tangent Length = 5
.Knot [17]
.Position = (-70, 0, 0)
.Rotation = (0, 90, 0)
.Tangent Mode = Bezier
.Bezier = Mirrored
.Tangent Length = 5
.Knot [18]
.Position = (-50, 0, 0)
.Rotation = (0, 90, 0)
.Tangent Mode = Bezier
.Bezier = Mirrored
.Tangent Length = 5
.Knot [19]
.Position = (-30, 0, 0)
.Rotation = (0, 90, 0)
.Tangent Mode = Bezier
.Bezier = Mirrored
.Tangent Length = 5
.Knot [20]
.Position = (-10, 0, 0)
.Rotation = (0, 90, 0)
.Tangent Mode = Bezier
.Bezier = Mirrored
.Tangent Length = 5
.Knot [21]
.Position = (10, 0, 0)
.Rotation = (0, 90, 0)
.Tangent Mode = Bezier
.Bezier = Mirrored
.Tangent Length = 5
.Knot [22]
.Position = (30, 0, 0)
.Rotation = (0, 90, 0)
.Tangent Mode = Bezier
.Bezier = Mirrored
.Tangent Length = 5
.Knot [23]
.Position = (50, 0, 0)
.Rotation = (0, 90, 0)
.Tangent Mode = Bezier
.Bezier = Mirrored
.Tangent Length = 5
.Knot [24]
.Position = (70, 0, 0)
.Rotation = (0, 90, 0)
.Tangent Mode = Bezier
.Bezier = Mirrored
.Tangent Length = 5
.Knot [25]
.Position = (90, 0, 0)
.Rotation = (0, 90, 0)
.Tangent Mode = Bezier
.Bezier = Mirrored
.Tangent Length = 5
.Knot [26]
.Position = (100, 0, -10)
.Rotation = (0, 180, 0)
.Tangent Mode = Bezier
.Bezier = Mirrored
.Tangent Length = 5
.Knot [27]
.Position = (100, 0, -30)
.Rotation = (0, 180, 0)
.Tangent Mode = Bezier
.Bezier = Mirrored
.Tangent Length = 5
.Knot [28]
.Position = (100, 0, -50)
.Rotation = (0, 180, 0)
.Tangent Mode = Bezier
.Bezier = Mirrored
.Tangent Length = 5
.Knot [29]
.Position = (100, 0, -70)
.Rotation = (0, 180, 0)
.Tangent Mode = Bezier
.Bezier = Mirrored
.Tangent Length = 5
.Knot [30]
.Position = (100, 0, -90)
.Rotation = (0, 180, 0)
.Tangent Mode = Bezier
.Bezier = Mirrored
.Tangent Length = 5
.Knot [31]
.Position = (90, 0, -100)
.Rotation = (0, 270, 0)
.Tangent Mode = Bezier
.Bezier = Mirrored
.Tangent Length = 5
.Knot [32]
.Position = (70, 0, -100)
.Rotation = (0, 270, 0)
.Tangent Mode = Bezier
.Bezier = Mirrored
.Tangent Length = 5
.Knot [33]
.Position = (50, 0, -100)
.Rotation = (0, 270, 0)
.Tangent Mode = Bezier
.Bezier = Mirrored
.Tangent Length = 5
.Knot [34]
.Position = (30, 0, -100)
.Rotation = (0, 270, 0)
.Tangent Mode = Bezier
.Bezier = Mirrored
.Tangent Length = 5
.Knot [35]
.Position = (10, 0, -100)
.Rotation = (0, 270, 0)
.Tangent Mode = Bezier
.Bezier = Mirrored
.Tangent Length = 5
.Knot [36]
.Position = (0, 0, -90)
.Rotation = (0, 0, 0)
.Tangent Mode = Bezier
.Bezier = Mirrored
.Tangent Length = 5
.Knot [37]
.Position = (0, 0, -70)
.Rotation = (0, 0, 0)
.Tangent Mode = Bezier
.Bezier = Mirrored
.Tangent Length = 5
.Knot [38]
.Position = (0, 0, -50)
.Rotation = (0, 0, 0)
.Tangent Mode = Bezier
.Bezier = Mirrored
.Tangent Length = 5
.Knot [39]
.Position = (0, 0, -30)
.Rotation = (0, 0, 0)
.Tangent Mode = Bezier
.Bezier = Mirrored
.Tangent Length = 5
.Knot [40]
.Position = (0, 0, -10)
.Rotation = (0, 0, 0)
.Tangent Mode = Bezier
.Bezier = Mirrored
.Tangent Length = 5
Inspector view > RollerCoasterSpline.Spline.Spline 0.Closed = true;
Links
Unity Manual / Splines / About Splines
https://docs.unity3d.com/Packages/com.unity.splines@2.4/manual/index.html
Unity Manual / Splines / Create a Spline
https://docs.unity3d.com/Packages/com.unity.splines@2.4/manual/create-a-spline.html
Unity Manual / Splines / Manipulate Splines
https://docs.unity3d.com/Packages/com.unity.splines@2.4/manual/manipulate-splines.html
Generate Rollercoaster Track Mesh
YouTube
Create a Single Roller Coaster Track Part Prefab
Create new Empty GameObjects
Unity Menu Bar > GameObject > Create Empty * 2
Hierarchy view
> rename Empty (0) ‘GameObject’ to ‘TrackPart-Prefab’
> select TrackPart-Prefab
Inspector view > TrackPart-Prefab.Transform.Position = (0, 0, 0)
Hierarchy view
> rename Empty (1) ‘GameObject’ to ‘Mesh’
> parent Mesh to TrackPart-Prefab
> TrackPart-Prefab > select Mesh
Inspector view > Mesh.Transform.Position = (0, 0, 0)
Create New Primitive 3D GameObjects
Unity Menu Bar > GameObject > 3D Object
> Cube
> Cylinder * 2
Hierarchy view > select Cube
Inspector view > Cube.Transform
.Position = (0, 0, 0)
.Scale = (1, 0.1, 0.1)
Hierarchy view > select Cylinder (0)
Inspector view > Cylinder (0).Transform
.Position = (-0.5, 0, 0)
.Rotation = (90, 0, 0)
.Scale = (0.1, 0.5, 0.1)
Hierarchy view > select Cylinder (1)
Inspector view > Cylinder (1).Transform
.Position = (0.5, 0, 0)
.Rotation = (90, 0, 0)
.Scale = (0.1, 0.5, 0.1)
Parent Primitives to Mesh GameObject
Hierarchy view > drag and drop Cube, Cylinder (0) and Cylinder (1) onto TrackPart-Prefab > Mesh
Create the Prefab
Hierarchy view > drag and drop TrackPart-Prefab from the Hierarchy view to the Project view into folder Assets/MyGame/Prefabs
(This will save the TrackPart-Prefab GameObject to your project folder as a .prefab file so you can delete it from your scene’s hierarchy, since it will be spawned in by the Spline Instantiate component that will be added to the RollerCoasterSpline GameObject next.)
Hierarchy view > right click TrackPart-Prefab > Delete
Spawn TrackPart-Prefab GameObjects along the length of the Spline
Add Spline Instantiate Component to RollerCoasterSpline
Hierarchy view > select RollerCoasterSpline
Inspector view > RollerCoasterSpline.AddComponent > Splines > Spline Instantiate
Setup Spline Instantiate Component
Hierarchy view > select RollerCoasterSpline
Inspector view > RollerCoasterSpline.Spline Instantiate
.Items to Instantiate.press + to add Item
.Items to Instantiate = Project view > Assets/MyGame/Prefabs/TrackPart-Prefab.asset
.Instantiation.Spacing (Spline) = ~0.85
Links
Unity Manual / Splines / Spline Instantiate Component Reference
https://docs.unity3d.com/Packages/com.unity.splines@2.4/manual/instantiate-component.html
Create Primitive Roller Coaster Train 3D-Model
YouTube
Create Empty RollerCoasterTrain GameObject
Unity Menu Bar > GameObject > Create Empty
Hierarchy view
> rename ‘Empty’ to ‘RollerCoasterTrain’
> select RollerCoasterTrain
Inspector view > RollerCoasterTrain.Transform.Position = (0, 0, 0)
Create Empty Mesh GameObject
Unity Menu Bar > GameObject > Create Empty
Hierarchy view
> rename ‘Empty’ to ‘Mesh’
> parent Mesh to RollerCoasterTrain
Inspector view > Mesh.Transform.Position = (0, 0, 0)
Construct RollerCoasterTrain Mesh out of 3D primitives
Unity Menu Bar > GameObject > 3D Object
> Cube * 7
> Cylinder * 6
Hierarchy view
> parent Cubes (0-6) to RollerCoasterTrain > Mesh
> parent Cylinders (0-5) to RollerCoasterTrain > Mesh
Inspector view
> Cube (0).Transform
.Position = (0, 0.6, 0)
.Scale = (1.8, 0.5, 2)
> Cube (1).Transform
.Position = (0, 1.25, 0.8)
.Scale = (1.8, 0.8, 0.4)
> Cube (2).Transform
.Position = (0, 1.25, -0.9)
.Scale = (1.8, 0.8, 0.2)
> Cube (3).Transform
.Position = (-0.8, 1.25, -0.1)
.Scale = (0.2, 0.8, 1.4)
> Cube (4).Transform
.Position = (0.8, 1.25, -0.1)
.Scale = (0.2, 0.8, 1.4)
> Cube (5).Transform
.Position = (0, 0.25, 0)
.Scale = (0.5, 0.2, 1.6)
> Cube (6).Transform
.Position = (0, 1.275, -0.55)
.Scale = (1.4, 0.05, 0.5)
> Cylinder(0).Transform
.Position = (0, 0.18, 0.6)
.Rotation = (90. 90, 0)
.Scale = (0.1, 0.4, 0.1)
> Cylinder(1).Transform
.Position = (0, 0.18, -0.6)
.Rotation = (90. 90, 0)
.Scale = (0.1, 0.4, 0.1)
> Cylinder(2).Transform
.Position = (-0.5, 0.18, 0.6)
.Rotation = (90. 90, 0)
.Scale = (0.25, 0.1, 0.25)
> Cylinder(3).Transform
.Position = (0.5, 0.18, 0.6)
.Rotation = (90. 90, 0)
.Scale = (0.25, 0.1, 0.25)
> Cylinder(4).Transform
.Position = (-0.5, 0.18, -0.6)
.Rotation = (90. 90, 0)
.Scale = (0.25, 0.1, 0.25)
> Cylinder(5).Transform
.Position = (0.5, 0.18, -0.6)
.Rotation = (90. 90, 0)
.Scale = (0.25, 0.1, 0.25)
Remove Capsule Collider Component from Cylinders
Hierarchy view > shift select Cylinder (0-5)
Inspector view > Cylinder (0-5).right click Capsule Collider > Remove Component
Create new RollerCoasterTrain Material
Project view > /Assets/MyGame/Materials/
> richt click > Create > Material
> rename ‘New Material.mat‘ to ‘RollerCoasterTrain-Mat.mat‘
> select RollerCoasterTrain-Mat
Inspector view > RollerCoasterTrain-Mat (Material).Main Maps
.Albedo (color) = RGB 0-1.0 (0.4, 0.3, 0.15)
.Albedo (Texture2D) = Assets/TextMesh Pro/Examples & Extras/Textures/Small Crate_diffuse.jpg
.Normal Map (Texture 2D) = Assets/TextMesh Pro/Examples & Extras/Textures/Small Crate_normal.jpg
.Metallic = 0.95
.Smoothness = 0.85
Apply RollerCoasterTrain-Mat Material to Mesh GameObjects
Hierarchy view > RollerCoasterSpline > RollerCoasterTrain > Mesh > shift select Cube (0-6)
Inspector view > Cube (0-6).Mesh Renderer.Materials.Element 0 = Project view > MyGame/Materials/Red-Mat.mat
Hierarchy view > RollerCoasterSpline > RollerCoasterTrain > Mesh > shift select Cylinder (0-5)
Inspector view > Cylinder (0-5).Mesh Renderer.Materials.Element 0 = Project view > Assets/MyGame/Materials/Red-Mat.mat
Create Audio Source GameObject
Unity Menu Bar > GameObject > Audio > Audio Source
Hierarchy view > parent Audio Source to RollerCoasterTrain
Inspector view > Audio Source
.Transform.Position = (0, 0, 0)
.Audio Source
.AudioClip = Project View > Assets/MyGame/Audio/SoundFX/351382__wmquincy101__minecart.wav
.Play On Awake = false
.Loop = true
.Spatial Blend = 1
.3D Sound Settings.Max Distance = 150
Parent RollerCoasterTrain to RollerCoasterSpline
Hierarchy view
> parent RollerCoasterTrain to RollerCoasterSpline
> select RollerCoasterTrain
Inspector view > RollerCoasterTrain.Transform.Position = (0, 0, 0)
Save changes made to the scene
Unity > (Ctrl + S) or Unity Menu Bar > File > Save
(Save your scene regularly to avoid losing your progress in case of a crash either by going to File > Save in the Unity menu bar or by pressing Control + S on your keyboard. You can see if there are any changes made to the scene that still need to be saved if there is a star * character displayed right after the name of your scene in the Hierarchy view.)
Notes
The goal here is to create a very simple ‘box’ out of primitive cubes, with small cylinder wheels, that has about the size of a roller coaster train cart, so just big enough for two persons to sit next to each other. Just as with the VRGun model we create a basic template shape to find the right scale and for easy debugging first.
In later steps we will replace the basic cube model for a better looking roller coaster train cart 3D Model.
In the meantime, to give the roller coaster train a nice temporary wooden construction style look, we can use the ‘Small Crate’ texture that accidentally came for free to our project with the TextMesh Pro Examples that we’ve downloaded.
Right now because our rollercoaster train mostly travels with the same speed we can get away with a short repeating sound loop of a real wooden rollercoaster but later when we give our train variable speeds then we will adjust the pitch of the audio source trough scripting to make the audio sound faster or slower.
Setup Rollercoaster Train
YouTube
Add Spline Animate Component to Train
Hierarchy view > RollerCoasterSpline > select RollerCoasterTrain
Inspector view
> RollerCoasterTrain.Add Component > Splines > Spline Animate
> RollerCoasterTrain.Spline Animate
.Spline = Hierarchy view > RollerCoasterSpline
.Movement
.Play On Awake = false
.Method = Speed
.Speed = ~5
.Loop Mode = Once
Parent VRPlayer to RollerCoasterTrain
Hierarchy view
> parent VRPlayer to RollerCoasterSpline > RollerCoasterTrain
> select VRPlayer
Inspector view > VRPlayer.Transform.Position = (0, 0.8, 0)
Create a New RollerCoasterTrain Script
Project view > Assets/MyGame/Scripts > right click > Create > C# Script > name RollerCoasterTrain.cs
Add RollerCoasterTrain component to RollerCoasterTrain GameObject
Inspector view > RollerCoasterTrain.Add Component > Scripts > RollerCoasterTrain.cs
Save changes made to the scene
Unity > (Ctrl + S) or Unity Menu Bar > File > Save
(Save your scene regularly to avoid losing your progress in case of a crash either by going to File > Save in the Unity menu bar or by pressing Control + S on your keyboard. You can see if there are any changes made to the scene that still need to be saved if there is a star * character displayed right after the name of your scene in the Hierarchy view.)
Links
Unity Manual / Splines / Animate along a Spline / Animate a GameObject along a Spline
https://docs.unity3d.com/Packages/com.unity.splines@2.4/manual/animate-spline.html
Create Primitive VR Gun Model
YouTube
Create new Empty VRGun GameObject
Unity Menu Bar > GameObject > Create Empty
Hierarchy view
> rename ‘Empty’ GameObject to ‘VRGun’
> select VRGun
Inspector view > VRGun.Transform.Position = (0, 0, 0)
Create new Empty Mesh GameObject
Unity Menu Bar > GameObject > Create Empty
Hierarchy view
> rename ‘Empty’ GameObject to ‘Mesh’
> parent Mesh to VRGun
Construct VRGun Mesh out of 3D primitives
Unity Menu Bar > GameObject > Sphere * 4
Hierarchy view > parent Sphere (0-3) to Mesh
Inspector view
> Sphere (0).Transform
.Position = (0, 0, 0)
.Scale = (0.05, 0.05, 0.05)
> Sphere (1).Transform
.Position = (0, 0, 0.5)
.Scale = (0.05, 0.05, 0.05)
> Sphere (2).Transform
.Position = (0, -0.115, -0.16)
.Scale = (0.05, 0.05, 0.05)
> Sphere (3).Transform
.Position = (0, -0.115, 0.336)
.Scale = (0.05, 0.05, 0.05)
Unity Menu Bar > GameObject > Cylinder* 4
Hierarchy view > parent Cylinder (0-3) to Mesh
Inspector view
> Cylinder (0).Transform
.Position = (0, 0, 0.25)
.Rotation = (90, 0, 0)
.Scale = (0.04, 0.25, 0.04)
> Cylinder (1).Transform
.Position = (0, -0.114, 0.09)
.Rotation = (90, 0, 0)
.Scale = (0.04, 0.25, 0.04)
> Cylinder (2).Transform
.Position = (0, -0.057, -0.082)
.Rotation = (55, 0, 0)
.Scale = (0.04, 0.1, 0.04)
> Cylinder (3).Transform
.Position = (0, -0.057, 0.418)
.Rotation = (55, 0, 0)
.Scale = (0.04, 0.1, 0.04)
Create new red debug Material
Project view > /Assets/MyGame/Materials/
> richt click > Create > Material
> rename ‘New Material.mat‘ to ‘Red-Mat.mat‘
> select Red-Mat
Inspector view > Red-Mat (Material).Main Maps
.Albedo (color) = RGB 0-1.0 (1.0, 0.0, 0.0)
.Metallic = 0.5
.Smoothness = 0.5
Apply Red-Mat material to VRGun Mesh GameObjects
Hierarchy view > VRGun > Mesh > shift select Sphere (0-3)
Inspector view > Cube (0-3).Mesh Renderer.Materials.Element 0 = Project view > MyGame/Materials/Red-Mat.mat
Hierarchy view > VRGun > Mesh > shift select Cylinder (0-3)
Inspector view > Cylinder (0-3).Mesh Renderer.Materials.Element 0 = Project view > Assets/MyGame/Materials/Red-Mat.mat
Create new Empty BulletSpawnTransform GameObject
Unity Menu Bar > GameObject > Create Empty
Hierarchy view
> rename ‘Empty’ GameObject to ‘BulletSpawnTransform’
> parent BulletSpawnTransform to VRGun
> select BulletSpawnTransform
Inspector view > BulletSpawnTransform.Transform.Position = (0, 0, 0.55)
Create new gun firing Particle System and Audio Source GameObjects
Unity Menu Bar > GameObject > Effects > Particle System
Hierarchy view
> parent Particle System to VRGun
> select Particle System
Inspector view > Particle System.Transform
.Position = (0, 0, 0.5)
.Rotation = (0, 0, 0)
Unity Menu Bar > GameObject > Audio > Audio Source
Hierarchy view
> parent Audio Source to VRGun
> select Audio Source
Inspector view > Audio Source.Transform.Position = (0, 0, 0.5)
Save changes made to the scene
Unity > (Ctrl + S) or Unity Menu Bar > File > Save
(Save your scene regularly to avoid losing your progress in case of a crash either by going to File > Save in the Unity menu bar or by pressing Control + S on your keyboard. You can see if there are any changes made to the scene that still need to be saved if there is a star * character displayed right after the name of your scene in the Hierarchy view.)
Notes
Before we start using ‘real’ 3D models for our weapon it is a good idea to create a basic prototype/template style 3D-model using only Unity primitives as a placeholder first, so that we can use it as a prefab to easily create different types of weapons, with different types of good looking 3D models later.
A model like this with only spheres and cylinders is an easy shape to place the more sculpted 3D-models ‘around’ and it is easier to debug the VR grabbing system and the bullets firing system when the shapes are still relatively simple.
In later steps we will download much better looking 3D-models for the weapons and for other things in the game, like for the targets and the roller coaster train.
Links
Unity Manual / Audio Source
https://docs.unity3d.com/Manual/class-AudioSource.html
Unity Scripting API / Audio Source
https://docs.unity3d.com/ScriptReference/AudioSource.html
Unity Manual / Particle System
https://docs.unity3d.com/Manual/class-ParticleSystem.html
Unity Scripting API / Particle System
https://docs.unity3d.com/ScriptReference/ParticleSystem.html
Setup VRGun Particle System & Audio Source
YouTube
Setup Particle System
Hierarchy view > VRGun > select Particle System
Inspector view > Particle System.Particle System
.Particle System
.Duration = 0.05
.Looping = false
.Start Lifetime = 0.8
.Start Speed = 25
.Start Size = 0.1
.Start Color = RGBA 0-1.0 (1, 0.8, 0.3, 1)
.Simulation Space = World
.Play on Awake = false
.Emission
.Rate over Time = 0
.Bursts = + 1 (click Plus Button once)
.Shape
.Shape = Cone
.Angle = 10
.Radius = 0.05
.Size over Lifetime = true
.Size.
.Key 1 = TimeValue (0, 1)
.Key 2 = TimeValue (1, 0)
Notes
To setup the Particle System’s Size over Lifetime behavior first click on the boolean checkmark to enable the Size over Lifetime module.
Then click on the AnimationCurve that you see below the Seperate Axes bool variable in the Size over Lifetime module, (think 2D spline/bezier curve but used for animations and things) and set the first Key to time/value (0,1) instead of (0,0) by right clicking on it and selecting Edit Key.
Set the second Key to (1, 0) and reset both keys ‘tangent mode’ to Auto instead of Free Smooth and Flat in the same right click menu to create a linear diagonal line that goes from high to low instead of low to high.
This will make the particles shrink over the duration of their lifetime instead of increase.
Another fine example of how we can use those fancy smooth curved lines to bend the universe to our will! 😈
Setup Audio Source
Hierarchy view > VRGun > select Audio Source
Inspector view > Audio Source.Audio Source.AudioClip = Assets/Samples/XR Interaction Toolkit/2.4.3/Starter Assets/Audio/Button Pop.wav
Save changes made to the scene
Unity > (Ctrl + S) or Unity Menu Bar > File > Save
(Save your scene regularly to avoid losing your progress in case of a crash either by going to File > Save in the Unity menu bar or by pressing Control + S on your keyboard. You can see if there are any changes made to the scene that still need to be saved if there is a star * character displayed right after the name of your scene in the Hierarchy view.)
Notes
In this step we’ve setup the VRGun firing Particle System with some simple but slightly better default values to create the effect of some small sparks flying out of the VRGun barrel when a bullet is fired and we’ve setup the Audio Source with a simple placeholder audio clip so that it is ready to play any audioclip that we want when we fire the gun from scipt.
In Phase 2 of this tutorial we will add some cool particle systems and better sound effects to our game, including gun firing and explosion sound effects, but for now the simple Button Pop audio clip that came to our project with the XR Interaction Toolkit Starter Assets samples will do fine as a temporary placeholder, so that we can test if the Audio Source’s clip playback works when the VRGun is fired by the player.
If you cannot wait for phase two to add better sound effects then feel free to download whichever pistol firing audio clip that you can find in the Unity Asset Store or elsewhere and use it instead!
The same goes for particle systems and also feel free to mess around with all the particle system properties to get a feel for what they do and remember that there is always undo (Ctrl+Z) and redo (Ctrl+Y) for when you make mistakes.
Links
Unity Manual / Graphics / Visual effects / Particle Systems
https://docs.unity3d.com/Manual/ParticleSystems.html
Unity Manual / Graphics / Visual Effects / Particle systems / Built-in Particle System
https://docs.unity3d.com/Manual/Built-inParticleSystem.html
Unity Manual / Graphics / Visual Effects / Particle systems / Built-in Particle System / Using the Built-in Particle System
https://docs.unity3d.com/Manual/PartSysUsage.html
Unity Manual / Graphics / Visual Effects / Particle systems / Built-in Particle System / Components and Modules / Particle System
https://docs.unity3d.com/Manual/class-ParticleSystem.html
Unity Manual / Graphics / Visual Effects / Particle systems / Built-in Particle System / Components and Modules / Particle System modules
https://docs.unity3d.com/Manual/ParticleSystemModules.html
Unity Manual / Graphics / Visual Effects / Particle systems / Built-in Particle System / Components and Modules / Particle System modules / Main module
https://docs.unity3d.com/Manual/PartSysMainModule.html
Unity Manual / Graphics / Visual Effects / Particle systems / Built-in Particle System / Components and Modules / Particle System modules / Emission module
https://docs.unity3d.com/Manual/PartSysEmissionModule.html
Unity Manual / Graphics / Visual Effects / Particle systems / Built-in Particle System / Components and Modules / Particle System modules / Shape module
https://docs.unity3d.com/Manual/PartSysShapeModule.html
Unity Manual / Graphics / Visual Effects / Particle systems / Built-in Particle System / Components and Modules / Particle System modules / Size over Lifetime module
https://docs.unity3d.com/Manual/PartSysSizeOverLifeModule.html
Attach VRGun to the front of the RollerCoasterTrain
YouTube
Attach the VRGun to RollerCoasterTrain
Create a new Empty VRGunHolder GameObject
Unity Menu Bar > GameObject > Create Empty
Hierarchy view
> rename ‘Empty’ GameObject to ‘VRGunHolder’
> parent VRGunHolder to RollerCoasterTrain
> select VRGunHolder
Inspector view > VRGunHolder.Transform.Position = (0, 1.65, 0.8)
Create a new Empty VRGunHolder Mesh GameObject
Unity Menu Bar > GameObject > Create Empty
Hierarchy view
> rename ‘Empty’ GameObject to ‘Mesh’
> parent Mesh to VRGunHolder
> select Mesh
Inspector view > Mesh.Transform.Position = (0, 0, 0)
Create a primitive VRGunHolder Mesh 3D-Model
Unity Menu Bar > GameObject > 3D Object > Cylinder
Hierarchy view
> parent ‘Cylinder’ to ‘Mesh’
> select Cylinder
Inspector view > Cylinder.Transform
.Position = (0, 0.05, 0)
.Scale = (0.2, 0.05, 0.2)
Create new blue debug Material
Project view > /Assets/MyGame/Materials/
> richt click > Create > Material
> rename ‘New Material.mat‘ to ‘Blue-Mat.mat‘
> select Blue-Mat
Inspector view > Blue-Mat (Material).Main Maps
.Albedo (color) = RGB 0-1.0 (0.0, 0.0, 1.0)
.Metallic = 0.5
.Smoothness = 0.5
Apply blue debug material to VRGunHolder Mesh GameObjects
Hierarchy view > VRGunHolder > Mesh > select Cylinder
Inspector view > Cylinder.Mesh Renderer.Materials.Element 0 = Project view > MyGame/Materials/Blue-Mat.mat
Create a new Empty VRGunSnapTransform GameObject
Unity Menu Bar > GameObject > Create Empty
Hierarchy view
> rename ‘Empty’ GameObject to ‘VRGunSnapTransform’
> parent VRGunSnapTransform to VRGunHolder
> select VRGunSnapTransform
Inspector view > VRGunSnapTransform.Transform.Position = (0, 0.25, 0)
Attach VRGun to VRGunSnapTransform
Hierarchy view > parent VRGun to VRGunSnapTransform
Inspector view > VRGun.Transform.Position = (0, 0, 0)
Save changes made to the scene
Unity > (Ctrl + S) or Unity Menu Bar > File > Save
(Save your scene regularly to avoid losing your progress in case of a crash either by going to File > Save in the Unity menu bar or by pressing Control + S on your keyboard. You can see if there are any changes made to the scene that still need to be saved if there is a star * character displayed right after the name of your scene in the Hierarchy view.)
Notes
Because we want the player to be able to grab the VRGun from a fixed attach point while driving the roller coaster train it is necessary to create some sort of gun holder on the roller coaster train to hold the gun in place in front of the player before he or she picks it up.
Because we don’t want the player to lose the VRGun when he or she accidentally drops the VRGun outside of the RollerCoasterTrain, (that would mean the player would have to restart the ride or finish it without being able to fire at the targets) it is also necessary to respawn, or in this case just reposition, the gun back to the starting position when the player drops/releases the VRGun, by releasing the grab button on the Quest controller. We can use the position of the VRGunSnapTransform which is placed 25cm above the cylinder shaped ‘pedestal’, from script, to position the VRGun back in place when that happens.
But before we can release/drop/un-grab the VRGun, we first have to make the VRGun a grabbable GameObject..
Links
…
Make VRGun a Grabbable GameObject
YouTube
Make VRGun a Grabbable GameObject
Reposition VRGun Mesh GameObject
Hierarchy view > VRGun > select Mesh
Inspector view > Mesh.Transform.Position = (0, 0, -0.05)
(The 5cm added offset on the z-axis places the mesh a bit more in the center of the player’s controller instead of at the front tip of the controller, when the VRGun is grabbed.)
Create Grab Attach Point
Unity Menu Bar > GameObject > Create Empty
Hierarchy view
> rename ‘Empty’ GameObject to ‘GrabAttachTransform’
> parent GrabAttachTransform to VRGun
> select GrabAttachTransform
Inspector view > GrabAttachTransform.Transform.Position = (0, 0, 0.05)
Add XR Grab Interactable Component to VRGun
Hierarchy view > select VRGun
Inspector view > VRGun.Add Component > XR > XR Grab Interactable
(this will automatically add a Rigidbody component to the Gun because the XR Grab Interactable component depends on it)
Setup Rigidbody Component
Hierarchy view > select VRGun
Inspector view > VRGun.Rigidbody
.Use Gravity = false
.Is Kinematic = true
Setup XR Grab Interactable Component
Hierarchy view > select VRGun
Inspector view > VRGun.XR Grab Interactable
.Interaction Manager = Hierarchy view > XR Interaction Setup > XR Interaction Manager
.Throw On Detach = false
.Attach Transform = GrabAttachTransform
.Attach Ease in Time = 0
Save changes made to the scene
Unity > (Ctrl + S) or Unity Menu Bar > File > Save
(Save your scene regularly to avoid losing your progress in case of a crash either by going to File > Save in the Unity menu bar or by pressing Control + S on your keyboard. You can see if there are any changes made to the scene that still need to be saved if there is a star * character displayed right after the name of your scene in the Hierarchy view.)
Links
Unity Manual / Important Classes
https://docs.unity3d.com/Manual/ScriptingImportantClasses.html
Unity Manual / Debug class
https://docs.unity3d.com/Manual/class-Debug.html
Unity Scripting API / Debug.Log() function/method
https://docs.unity3d.com/ScriptReference/Debug.Log.html
Unity Manual / GameObject class
https://docs.unity3d.com/Manual/class-GameObject.html
Unity Scripting API / GameObject.GetComponent<>() function/method
https://docs.unity3d.com/ScriptReference/GameObject.GetComponent.html
Unity Manual / Transform class
https://docs.unity3d.com/Manual/class-Transform.html
Unity Scripting API / Transform class
https://docs.unity3d.com/ScriptReference/Transform.html
Unity Manual / XR Interaction Toolkit Package
https://docs.unity3d.com/Packages/com.unity.xr.interaction.toolkit@2.0/manual/index.html
Unity Manual / XR Interaction Toolkit.Interactable Events
https://docs.unity3d.com/Packages/com.unity.xr.interaction.toolkit@2.0/manual/interactable-events.html
Snap VRGun back to VRGunHolder when dropped by the player
YouTube
Snap VRGun back to GunHolder when released by the player
Create a new VRGun.cs Script
Project view > /Assets/MyGame/Scripts > right click > Create > C# Script > name VRGun.cs
Create OnGrab() and OnRelease() Functions/Methods
Open VRGun.cs
Project view > /Assets/MyGame/Scripts/ > open VRGun.cs
Edit VRGun.cs
Visual Studio Code > VRGun.cs > add Highlighted Code
using System.Collections;
using System.Collections.Generic;
using UnityEngine;

public class VRGun: MonoBehaviour
{
    public Transform gunSnapTransform;

    // Start is called before the first frame update
    void Start()
    {

    }

    // Update is called once per frame
    void Update()
    {

    }

    // Called by Gun.XRGrabInteractable.InteractableEvents.FirstSelectEntered, when the gun is grabbed
    public void OnGrab()
    {
        Debug.Log("Gun is Grabbed!!!");
    }

    // Called by Gun.XRGrabInteractable.InteractableEvents.LastSelectExited, when the gun is released
    public void OnRelease()
    {
        Debug.Log("Gun is Dropped!!!");

        transform.position = gunSnapTransform.position;
        transform.rotation = gunSnapTransform.rotation;

        GetComponent<Rigidbody>().isKinematic = true;
    }
}
Save VRGun.cs Script
Visual Studio Code > VRGun.cs > (Ctrl + S) or (Cmd + S)
Add VRGun Component to VRGun GameObject
Inspector view > VRGun.Add Component > Scripts > VRGun.cs
Setup VRGun Component
Inspector view > VRGun.VRGun.Gun Snap Transform = Hierarchy view > GunSnapTransform
Call VRGun.OnGrab() and VRGun.OnRelease() from VRGun.XR Grab Interactable Component
Inspector view > VRGun.XR Grab Interactable.Interactable Events
.First Select Entered.+
.None (Object) = Hierarchy view > VRGun
.No Function = VRGun.OnGrab ()
.Last Select Exited.+
.None (Object) = Hierarchy view > VRGun
.No Function = VRGun.OnRelease ()
Save changes made to the scene
Unity > (Ctrl + S) or Unity Menu Bar > File > Save
(Save your scene regularly to avoid losing your progress in case of a crash either by going to File > Save in the Unity menu bar or by pressing Control + S on your keyboard. You can see if there are any changes made to the scene that still need to be saved if there is a star * character displayed right after the name of your scene in the Hierarchy view.)
Links
Unity Manual / Important Classes
https://docs.unity3d.com/Manual/ScriptingImportantClasses.html
Unity Manual / Debug class
https://docs.unity3d.com/Manual/class-Debug.html
Unity Scripting API / Debug.Log() function/method
https://docs.unity3d.com/ScriptReference/Debug.Log.html
Unity Manual / GameObject class
https://docs.unity3d.com/Manual/class-GameObject.html
Unity Scripting API / GameObject.GetComponent<>() function/method
https://docs.unity3d.com/ScriptReference/GameObject.GetComponent.html
Unity Manual / Transform class
https://docs.unity3d.com/Manual/class-Transform.html
Unity Scripting API / Transform class
https://docs.unity3d.com/ScriptReference/Transform.html
Unity Manual / XR Interaction Toolkit Package
https://docs.unity3d.com/Packages/com.unity.xr.interaction.toolkit@2.0/manual/index.html
Unity Manual / XR Interaction Toolkit.Interactable Events
https://docs.unity3d.com/Packages/com.unity.xr.interaction.toolkit@2.0/manual/interactable-events.html
Create Primitive Bullet 3D-Model
YouTube
Create Bullet GameObject
Unity Menu Bar > GameObject > 3D Object > Sphere
Hierarchy view
> rename ‘Sphere’ to ‘Bullet-Prefab’
> select Bullet-Prefab
Inspector view > Bullet-Prefab.Transform
.Position = (0, 0, 0)
.Scale = (0.05, 0.05, 0.05)
Create Bullet Particle System
Unity Menu Bar > GameObject > Effects > Particle System
Hierarchy view
> parent Particle System to Bullet-Prefab
> select Particle System
Inspector view
> Particle System.Transform
.Position = (0, 0, 0)
.Scale = (1, 1, 1)
Create Bullet Audio Source
Unity Menu Bar > GameObject > Audio > Audio Source
Hierarchy view
> parent Audio Source to Bullet-Prefab
> select Audio Source
Inspector view > Audio Source.Transform
.Position = (0, 0, 0)
.Scale = (1, 1, 1)
Apply Red-Mat material to Bullet Mesh GameObject
Hierarchy view > Bullet > Mesh > select Sphere
Inspector view > Sphere.Mesh Renderer.Materials.Element 0 = Project view > MyGame/Materials/Red-Mat.mat
Save changes made to the scene
Unity > (Ctrl + S) or Unity Menu Bar > File > Save
(Save your scene regularly to avoid losing your progress in case of a crash either by going to File > Save in the Unity menu bar or by pressing Control + S on your keyboard. You can see if there are any changes made to the scene that still need to be saved if there is a star * character displayed right after the name of your scene in the Hierarchy view.)
Setup Bullet
YouTube
Setup bullet Particle System
Inspector view > Particle System.Particle System
.Particle System
.Duration = 1
.Looping = false
.Start Lifetime = 2
.Start Speed = 8
.Start Size = 0.1
.Gravity Modifier = 1
.Simulation Space = World
.Play on Awake = false
.Emission
.Rate over Time = 0
.Bursts.+
.Shape
.Shape = Sphere
.Radius = 0.15
.Size over Lifetime = true
.Size.
.Key 1 = (0, 1)
.Key 2 = (1, 0)
.Collision = true
.Type = World
.Dampen = 0.2
.Lifetime Loss = 0.5
.Collision Quality = low
Notes
To setup the Particle System’s Size over Lifetime behavior first click on the boolean checkmark to enable the Size over Lifetime module.
Then click on the AnimationCurve that you see below the Seperate Axes bool variable in the Size over Lifetime module, (think 2D spline/bezier curve but used for animations and things) and set the first Key to time/value (0,1) instead of (0,0) by right clicking on it and selecting Edit Key.
Set the second Key to (1, 0) and reset both keys ‘tangent mode’ to Auto instead of Free Smooth and Flat in the same right click menu to create a linear diagonal line that goes from high to low instead of low to high.
This will make the particles shrink in size over the duration of their lifetime instead of increase in size.
Setup bullet Audio Source
Inspector view > Audio Source.Audio Source.AudioClip = Button Pop.wav (XR Interaction Toolkit Starter Assets)
Add Rigidbody Component
Hierarchy view > select Bullet-Prefab
Inspector view > Bullet-Prefab
.Add Component > Physics > Rigidbody
.Use Gravity = false;
.Rigidbody.Collision Detection = Continuous Dynamic
(Continuous Dynamic collision detection is a more ‘expensive’ type of collision detection than Discrete but works better for fast traveling objects.)
Create and Add New Bullet Script
Project view > /Assets/MyGame/Scripts
> Right Mouse Button > Create > C# Script
> rename ‘NewBehaviourScript.cs‘ to ‘Bullet.cs‘
Inspector view > Bullet-Prefab.Add Component > Scripts > Bullet.cs
Add ParticleSystem and Audio Source Variables/References to Bullet.cs
Visual Studio Code > Bullet.cs > add Highlighted Code
using System.Collections;
using System.Collections.Generic;
using UnityEngine;

public class Bullet : MonoBehaviour
{
    public ParticleSystem explosionParticleSystem;
    public AudioSource explosionAudioSource;

    // Start is called before the first frame update
    void Start()
    {

    }

    // Update is called once per frame
    void Update()
    {

    }
}
Add OnCollisionEnter() Method to Bullet.cs
Visual Studio Code > Bullet.cs > add Highlighted Code
using System.Collections;
using System.Collections.Generic;
using UnityEngine;

public class Bullet : MonoBehaviour
{
    public ParticleSystem explosionParticleSystem;
    public AudioSource explosionAudioSource;

    // Start is called before the first frame update
    void Start()
    {

    }

    // Update is called once per frame
    void Update()
    {

    }

    // OnCollisionEnter is called when this collider/rigidbody
    // has begun touching another rigidbody/collider.
    public IEnumerator OnCollisionEnter(Collision collider)
    {
        Debug.Log("Bullet HIT!!!");

        yield return null;
    }
}
Add OnCollisionEnter() Logic
Visual Studio Code > Bullet.cs > add Highlighted Code
using System.Collections;
using System.Collections.Generic;
using UnityEngine;

public class Bullet : MonoBehaviour
{
    public ParticleSystem explosionParticleSystem;
    public AudioSource explosionAudioSource;

    // Start is called before the first frame update
    void Start()
    {

    }

    // Update is called once per frame
    void Update()
    {

    }

    // OnCollisionEnter is called when this collider/rigidbody
    // has begun touching another rigidbody/collider.
    public IEnumerator OnCollisionEnter(Collision collider)
    {
        Debug.Log("Bullet HIT!!!");

        explosionParticleSystem.Play();
        explosionAudioSource.Play();

        GetComponent<SphereCollider>().enabled = false;
        GetComponent<MeshRenderer>().enabled = false;

        yield return null;
    }
}
Save changes made to Bullet.cs
Visual Studio Code > Bullet.cs > (Ctrl+s)
Setup Bullet Component
Inspector view > Bullet-Prefab.Bullet
.Explosion Particles = Hierarchy view > Bullet-Prefab > Particle System
.Explosoin Audio = Hierarchy view > Bullet-Prefab > Audio Source
Create bullet prefab file
Hierarchy view
> drag Bullet-Prefab to Project view > Assets/MyGame/Prefabs
> delete Bullet-Prefab from the Scene Hierarchy
Save changes made to the scene
Unity > (Ctrl + S) or Unity Menu Bar > File > Save
(Save your scene regularly to avoid losing your progress in case of a crash either by going to File > Save in the Unity menu bar or by pressing Control + S on your keyboard. You can see if there are any changes made to the scene that still need to be saved if there is a star * character displayed right after the name of your scene in the Hierarchy view.)
Links
Rigidbody class – Unity Manual
https://docs.unity3d.com/Manual/class-Rigidbody.html
Rigidbody class – Unity Scripting API
https://docs.unity3d.com/ScriptReference/Rigidbody.html
SphereCollider class – Unity Manual
https://docs.unity3d.com/Manual/class-SphereCollider.html
SphereCollider class – Unity Scripting API
https://docs.unity3d.com/ScriptReference/SphereCollider.html
MeshRenderer class – Unity Manual
https://docs.unity3d.com/Manual/class-MeshRenderer.html
MeshRenderer class – Unity Scripting API
https://docs.unity3d.com/ScriptReference/MeshRenderer.html
MonoBehaviour Unity Scripting API
https://docs.unity3d.com/ScriptReference/MonoBehaviour.html
MonoBehaviour.OnCollisionEnter() Unity Scripting API
https://docs.unity3d.com/ScriptReference/MonoBehaviour.OnCollisionEnter.html
Working in Unity / Create Gameplay / Prefabs – Unity Manual
https://docs.unity3d.com/Manual/Prefabs.html
Working in Unity / Create Gameplay / Prefabs / Creating Prefabs – Unity Manual
https://docs.unity3d.com/Manual/CreatingPrefabs.html
Working in Unity / Create Gameplay / Prefabs / Editing a Prefab in Prefab Mode – Unity Manual
https://docs.unity3d.com/Manual/EditingInPrefabMode.html
Working in Unity / Create Gameplay / Prefabs / Instance overrides – Unity Manual
https://docs.unity3d.com/Manual/PrefabInstanceOverrides.html
Working in Unity / Create Gameplay / Prefabs / Editing a Prefab via its instances – Unity Manual
https://docs.unity3d.com/Manual/EditingPrefabViaInstance.html
Working in Unity / Create Gameplay / Prefabs / Unpacking Prefab instances – Unity Manual
https://docs.unity3d.com/Manual/UnpackingPrefabInstances.html
Fire VRGun
YouTube
Add new public variables to VRGun class
Project view > Assets/MyGame/Scripts > open VRGun.cs
Visual Studio Code > VRGun.cs > add Highlighted Code
using System.Collections;
using System.Collections.Generic;
using UnityEngine;

public class VRGun: MonoBehaviour
{
    public Transform gunSnapTransform;
    public Transform bulletSpawnTransform;
    public GameObject bulletPrefab;
    public ParticleSystem gunFireParticleSystem;
    public AudioSource gunFireAudioSource;

    public float fireSpeed = 125.0f;

    // Start is called before the first frame update
    void Start()
    {

    }

    // Update is called once per frame
    void Update()
    {

    }

    // Called by Gun.XRGrabInteractable.InteractableEvents.FirstSelectEntered, when the gun is grabbed.
    public void OnGrab()
    {
        Debug.Log("Gun is Grabbed!!!");
    }

    // Called by Gun.XRGrabInteractable.InteractableEvents.LastSelectExited, when the gun is released.
    public void OnRelease()
    {
        Debug.Log("Gun is Dropped!!!");

        transform.position = gunSnapTransform.position;
        transform.rotation = gunSnapTransform.rotation;

        GetComponent<RigidBody>().isKinematic = true;
    }
}
Notes
Add new public variables to the VRGun class to store references in to the bulletSpawnTransform Transform component, the bulletPrefab GameObject, the gunFireParticleSystem ParticleSystem component and the gunFireAudioSource component, so that we can assign those to the VRGun component in the inspector.
The bullet is going to be spawned at the bulletSpawnTransform’s position which is attached to the tip of the VRGun barrel so we need a reference to that.
We also need a reference to the Bullet-Prefab.prefab file in our Assets/MyGame/Prefabs folder that we’re going to spawn, so we create a type GameObject variable for that.
When we fire the gun we also want to Play() the gunFireParticleSystem ParticleSystem and the gunFireAudioSource AudioSource components that are attached to child GameObjects of the gun, so we also create references to those.
Finally we create a float gunFireSpeed variable to store the fire spreed value in, instead of hardcoding the fire speed directly in code, so that we can easily adjust it from the Unity Inspector.
Add new public FireBullet() function to VRGun class
Visual Studio Code > VRGun.cs > add Highlighted Code
using System.Collections;
using System.Collections.Generic;
using UnityEngine;

public class VRGun: MonoBehaviour
{
    public Transform gunSnapTransform;
    public Transform bulletSpawnTransform;
    public GameObject bulletPrefab;
    public ParticleSystem gunFireParticleSystem;
    public AudioSource gunFireAudioSource;

    public float fireSpeed = 125.0f;

    // Start is called before the first frame update
    void Start()
    {

    }

    // Update is called once per frame
    void Update()
    {

    }

    // Called by Gun.XRGrabInteractable.InteractableEvents.Activated, when the gun is fired.
    public void FireBullet()
    {
        Debug.Log("Gun is Fired!!!");
    }

    // Called by Gun.XRGrabInteractable.InteractableEvents.FirstSelectEntered, when the gun is grabbed.
    public void OnGrab()
    {
        Debug.Log("Gun is Grabbed!!!");
    }

    // Called by Gun.XRGrabInteractable.Interactable Events.LastSelectExited, when the gun is released.
    public void OnRelease()
    {
        Debug.Log("Gun is Dropped!!!");

        transform.position = gunSnapTransform.position;
        transform.rotation = gunSnapTransform.rotation;

        GetComponent<Rigidbody>().isKinematic = true;
    }
}
Add bullet firing logic to FireBullet() function
Visual Studio Code > VRGun.cs > add Highlighted Code
using System.Collections;
using System.Collections.Generic;
using UnityEngine;

public class VRGun: MonoBehaviour
{
    public Transform gunSnapTransform;
    public Transform bulletSpawnTransform;
    public GameObject bulletPrefab;
    public ParticleSystem gunFireParticleSystem;
    public AudioSource gunFireAudioSource;

    public float fireSpeed = 125.0f;

    // Start is called before the first frame update
    void Start()
    {

    }

    // Update is called once per frame
    void Update()
    {

    }

    // Called by Gun.XRGrabInteractable.InteractableEvents.Activated, when the gun is fired.
    public void FireBullet()
    {
        Debug.Log("Gun is Fired!!!");

        // Play the gunFireParticleSystem and the gunFireAudioSource
        gunFireParticleSystem.Play();
        gunFireAudioSource.Play();

        // Spawn/Instantiate a clone of the bulletPrefab and store
        // a reference to it in the GameObject spawnedBullet variable.
        GameObject spawnedBullet = Instantiate(bulletPrefab);

        // Position the spawnedBullet at the tip of the gun at the bulletSpawnTransform.position.
        spawnedBullet.transform.position = bulletSpawnTransform.position;
        // Rotate the spawnedBullet in the direction of the bulletSpawnTransform
        spawnedBullet.transform.rotation = bulletSpawnTransform.rotation;

        // Get the spawned bullet's Rigidbody component and set its velocity
        // to the forward direction of the bullet multiplied by the fireSpeed.
        spawnedBullet.GetComponent<Rigidbody>().velocity = spawnedBullet.transform.forward * fireSpeed;
    }

    // Called by Gun.XRGrabInteractable.InteractableEvents.FirstSelectEntered, when the gun is grabbed.
    public void OnGrab()
    {
        Debug.Log("Gun is Grabbed!!!");
    }

    // Called by Gun.XRGrabInteractable.Interactable Events.LastSelectExited, when the gun is released.
    public void OnRelease()
    {
        Debug.Log("Gun is Dropped!!!");

        transform.position = gunSnapTransform.position;
        transform.rotation = gunSnapTransform.rotation;

        GetComponent<Rigidbody>().isKinematic = true;
    }
}
Save VRGun.cs Script
Visual Studio Code > VRGun.cs > (Ctrl + S) or (Cmd + S)
Setup Gun Firing
Assign BulletSpawnTransform, Bullet-Prefab, Particle System and AudioSource to VRGun component
Inspector view > VRGun.VRGun
.Bullet Spawn Transform = Hierarchy view > VRGun > BulletSpawnTransform
.Bullet Prefab = Project view > /Assets/MyGame/Prefabs/Bullet-Prefab.prefab
.Gun Fire ParticleSystem = Hierarchy view > VRGun > Particle System
.Gun Fire AudioSource = Hierarchy view > VRGun > Audio Source
Call VRGun.FireBullet() Function from VRGun.XR Grab Interactable Component
Inspector view > VRGun.XR Grab Interactable.Interactable Events.Activated.+
.None (Object) = Hierarchy view > VRGun
.No Function = VRGun.FireBullet ()
Save changes made to the scene
Unity > (Ctrl + S) or Unity Menu Bar > File > Save
(Save your scene regularly to avoid losing your progress in case of a crash either by going to File > Save in the Unity menu bar or by pressing Control + S on your keyboard. You can see if there are any changes made to the scene that still need to be saved if there is a star * character displayed right after the name of your scene in the Hierarchy view.)
Notes
Great so we have a grabbable and firing VRGun! But once you start shooting with it while walking fast or when firing from a fast moving vehicle like a train then you’ll start to notice that the bullets aren’t always spawned correctly (this is because we’re not adding the velocity of the player to the velocity of the bullet yet) and that sometimes they fly off in different random directions (this is because they can still collide with the gun that they’re fired from).
So in the next steps we will fix a bunch of issues with this basic firing mechanism to make the firing of this ‘physics’ style gun a lot more accurate.
Physics guns Vs. Raycast guns
Basically there are two types of guns that most games use, and most shooters use both types, Physics guns, guns that use added physics forces and added velocity to make Rigidbody bullets fly, like the gun that we’re making, and Ray Casting guns.
Physics guns are used for guns that fire relatively slow projectiles like rocket launchers, paint balls, nerf darts, and projectiles that might bounce on impact like grenade launchers or just thrown grenades.
The other type are ray casting guns, which use ray casting to check with a ray if the gun hits something. A ray is a line specified with, a point of origin, a direction and optionally a maximum length, so we say where it starts, in what direction it goes and how long it can be, instead of a regular ‘line’ that is drawn by saying where it starts (point a), and where it ends (point b).
The ray is ‘fired’ from the gun barrel tip and at the position where that ray hits a collider, a quad with a bullet hole texture, and some bullet hit particle system can be instantiated/spawned. When the ray hits a collider on the player, damage can be dealt to the player in the same way as when a physics bullet hits the player with the difference that a ray will hit and deal damage immediately while a moving physics bullet takes a certain time to travel and hit something.
In code a basic ray cast with only a origin and a direction argument looks like this:
using System.Collections;
using System.Collections.Generic;
using UnityEngine;

public class RaycastingExample1 : MonoBehaviour {

    void FixedUpdate(){

        // Check if a ray fired from the object's position into
        // the object's forward direction hits something.

        if(Physics.Raycast(transform.position, transform.forward) == true)
        {
            print("There is something in front of the object!");
        }
    }
}
An example of a ray cast with a origin, direction and max length argument:
using System.Collections;
using System.Collections.Generic;
using UnityEngine;

public class RaycastingExample2 : MonoBehaviour {

    void FixedUpdate(){

        // Fire a ray from the object's position into the object's forward direction
        // and stop at 100 units distance.
        if(Physics.Raycast(transform.position, transform.forward, 100))
        {
            print("There is something in front of the object!");
        }
    }
}
An example of a ray cast using an ‘out’ parameter to store information on what was hit (Out parameters can be used for functions that return multiple values. In this case the Physics.Raycast() function already returns a boolean value for if the ray hit something or not so the extra out hit parameter is used to return the hit information with, which is then stored in the RaycastHit hit variable):
using System.Collections;
using System.Collections.Generic;
using UnityEngine;

public class RaycastingExample3 : MonoBehaviour {

    void FixedUpdate(){

        // Create a variable to store hit information coming from the out parameter in.
        RaycastHit hit;

        // Fire a ray and store information on what it hits in the hit variable.
        if (Physics.Raycast(transform.position, transform.forward, out hit))
        {
            // print the distance of the object that was hit.
            print("Found an object - distance: " + hit.distance);

            // print the name of the object that was hit.
            print("Found an object - name : " + hit.transform.gameObject.name);

            // print the tag of the object that was hit.
            print("Found an object - tag : " + hit.transform.gameObject.tag);
        }
    }
}
An example on how to use the Debug.DrawLine() function to visualize rays in the Scene view:
using System.Collections;
using System.Collections.Generic;
using UnityEngine;

public class RaycastingExample4 : MonoBehaviour {

    void FixedUpdate(){

        RaycastHit hit;

        if (Physics.Raycast(transform.position, transform.forward, out hit, 10))
        {
            print("Hit an object at position : " + hit.point);

            // Draw a green line from this object's position to the point where the ray hit.
            Debug.DrawLine(transform.position, hit.point, Color.green);
        }
        else
        {
            // Draw a red line starting from this object's position to 10 units in
            // the forward direction when the ray doesn't hit anyting.
            Debug.DrawLine(transform.position, transform.position + transform.forward * 10, Color.red);
        }
    }
}
There are many ways in which ray casts can be used and there are a lot of use cases for them. Apart from being used to fire bullets etcetera they are also often used to check if two objects are touching or close to each other. For example most player controller scripts use a ray cast to check if the player is touching the ground before allowing the player to jump again so that the player cannot jump when already hovering in the air from the precious jump (lets not talk about double jumps because those are just ridiculous).
Another common use case for ray casts is for ‘vision’ systems for enemies/NPC’s where ray casts are used to check if the enemy can spot the player when he/she is close, or if the player is hiding behind a wall or some other object. When a ray fired from the enemy’s position in the direction of the player hits the player then we know the player is in ‘sight’ and then we can start the chase. More on ray casts later in Phase 2 of this tutorial when we create a ray cast type gun!
Links
Unity Manual / Instantiating Prefabs
https://docs.unity3d.com/Manual/InstantiatingPrefabs.html
Unity Scripting API / Object.Instantiate() function
https://docs.unity3d.com/ScriptReference/Object.Instantiate.html
Unity Scripting API / Object.Destroy() function
https://docs.unity3d.com/ScriptReference/Object.Destroy.html
Unity Scripting API / Physics class
https://docs.unity3d.com/ScriptReference/Physics.html
Unity Scripting API / Physics / Raycast function
https://docs.unity3d.com/ScriptReference/Physics.Raycast.html
Microsoft C# Language Reference / Keywords / Out parameter modifier
https://learn.microsoft.com/en-us/dotnet/csharp/language-reference/keywords/method-parameters#out-parameter-modifier
Testing the VRGun grabbing and bullet firing mechanisms
YouTube
Notes
Be sure to test all the changes that you make to your game as often as possible by putting on your Quest headset and running your game in the Unity Editor with Quest Link enabled and the Oculus app running on your PC, so that you can spot errors that only come up during play mode early on, and also to learn from all of the effects of all of the small changes that we make to the code and to the components in the inspector.
Now that we have implemented a very basic firing mechanism and also a gun grabbing and releasing mechanism it is a good idea to make sure that everything is working before we make things more complicated.
Usually code is written in layers of increasing complexity. When the first layer is working correctly then we can build another layer on top of it, but each layer complicates the code further, so it is usually easier to write code than it is to read it, especially if it isn’t code that you haven’t written/built-up yourself.
So test your game often and after adding each ‘layer’ to make sure that everything works before you go on to the next step, that way you won’t get a bunch of errors stacking up in the Console view because of one small mistake that was made somewhere in the long long ago!
Download & Install the Oculus Rift App
https://www.oculus.com/Setup/ > Download Oculus Rift Software
Setup Oculus Link (cable or wireless)
Cable (recommended for better frame-rates)
Enable Unknown Sources (Allow apps that have not been reviewed by Oculus to run.)
Oculus app > Settings > General > Unknown Sources = true
Enable Pass-Through over Oculus Link
Oculus app > Settings > Beta > Pass-through over Oculus Link = true
(Enables Quest front cameras pass trough when stepping out of the VR play area. Just so that you don’t accidently run into a wall while playtesting..)
Playtest Your Game
Unity Editor > press Play button
Your Body > Head > wear Quest
Notes
To test your game in VR in the Unity Editor during Play Mode you first have to turn on your Quest headset and connect it to your computer with the USB link cable. Then you have to launch the Oculus App on your computer and make sure your headset shows up as connected in the Oculus App > Devices window. Then when you put on the Quest headset you should see a pop up window asking if you want to enable Oculus Link and a pop up window asking if you want to enable USB debugging, press yes on both pop ups.
When Oculus Link is enabled you will see the Oculus Dashboard instead of the regular Stand alone Quest dashboard environment.
(If you didn’t get the pop-up message then you can still enable Oculus link manually on the Quest, in the Quest’s Quick Settings window.)
When you are in the Oculus PC dashboard on your Quest then you can press the Play button in the Unity Editor on your computer. Your scene will load and you can playtest it in VR!
Make VRGun grabbable by two hands simultaneously
YouTube
Make VRGun grabbable by two hands simultaneously
Hierarchy view > select VRGun
Inspector view > VRGun.XR Grab Interactable.Select Mode = Multiple
Notes
As you may have noticed during play testing the gun can be grabbed by either the left controller or the right controller and if the gun is grabbed from one hand by the other hand, then it will switch to the other hand. Which is great when the gun would be something like a handgun that is supposed to be held by one hand only, but since we’re creating some kind of a two-handed hunting or assault rifle it would make more sense if we could grab the grip of the gun with one hand and the front of the gun with the other hand so we can use both hands to aim more precisely.
Luckily, getting this behavior only requires us to change the Select Mode on the XR Grab Interactable component of the VRGun from Single to Multiple. Now when the player grabs the gun it will still snap to the first hand like it already did, but the gun can also be grabbed by the second hand at any position along the gun’s colliders, without switching to the other hand entirely.
This behavior is not fully 100% realistic when not using a two-handed rifle shaped controller for both hands but two separate controllers for each hand instead, but it is pretty close to feeling like aiming a real two-handed rifle realistically!
There are rifle shaped controller attachments available on the market which are awesome when playing VR shooters that mostly use two-handed assault and sniper rifles etcetera because then the rotation of your controllers and the position of your hands on the controllers can match the virtual rifle exactly:

The ‘design’ of the VRGun mesh was actually inspired by the DualShock Aim controller, a controller specifically designed for VR first person shooters, with which I’ve played the VR Shooter game Farpoint. Having the virtual rifle follow the exact same position and rotation of the real Aim controller made it a really great and realistic feeling VR experience and is in my opinion the best way to play any kind of first person shooter:

Destroy spawned bullets automatically after seconds
YouTube
Destroy spawned bullets after five seconds using the Object.Destroy() function
Call the Object.Destroy() function from the VRGun.FireBullet() function
Visual Studio Code > VRGun.cs > add Highlighted Code
using System.Collections;
using System.Collections.Generic;
using UnityEngine;

public class VRGun: MonoBehaviour
{
    public Transform gunSnapTransform;
    public Transform bulletSpawnTransform;
    public GameObject bulletPrefab;
    public ParticleSystem gunFireParticleSystem;
    public AudioSource gunFireAudioSource;
    public Collider[] gunColliders;

    public float fireSpeed = 125.0f;

    // Start is called before the first frame update
    void Start()
    {

    }

    // Update is called once per frame
    void Update()
    {

    }

    // Called by Gun.XRGrabInteractable.InteractableEvents.Activated, when the gun is fired.
    public void FireBullet()
    {
        Debug.Log("Gun is Fired!!!");

        // Play the gunFireParticleSystem and the gunFireAudioSource
        gunFireParticleSystem.Play();
        gunFireAudioSource.Play();

        // Spawn/Instantiate a clone of the bulletPrefab and store
        // a reference to it in the GameObject spawnedBullet variable.
        GameObject spawnedBullet = Instantiate(bulletPrefab);

        // Position the spawnedBullet at the tip of the gun at the bulletSpawnTransform.position.
        spawnedBullet.transform.position = bulletSpawnTransform.position;
        // Rotate the spawnedBullet in the direction of the bulletSpawnTransform
        spawnedBullet.transform.rotation = bulletSpawnTransform.rotation;

        // Get the spawned bullet's Rigidbody component and set its velocity
        // to the forward direction of the bullet multiplied by the fireSpeed.
        spawnedBullet.GetComponent<Rigidbody>().velocity = spawnedBullet.transform.forward * fireSpeed;

        // Destroy the spawned bullet after five seconds.
        Destroy(spawnedBullet, 5);
    }

    // Called by Gun.XRGrabInteractable.InteractableEvents.FirstSelectEntered, when the gun is grabbed
    public void OnGrab()
    {
        Debug.Log("Gun is Grabbed!!!");
    }

    // Called by Gun.XRGrabInteractable.Interactable Events.LastSelectExited, when the gun is released
    public void OnRelease()
    {
        Debug.Log("Gun is Dropped!!!");

        transform.position = gunSnapTransform.position;
        transform.rotation = gunSnapTransform.rotation;

        GetComponent<Rigidbody>().isKinematic = true;
    }
}
Save VRGun.cs Script
Visual Studio Code > VRGun.cs > (Ctrl + S)
Notes
Here we set the spawned bullets to be destroyed automatically by using the Object.Destroy() function which takes in two arguments, the first is for a reference to the Object that we want to be destroyed and the second argument is for the amount of time in seconds to delay before destroying that object. (Since Unity’s GameObject class inherits from the base Object class we can use the Object.Destroy() function directly without having to reference the Object class. So in code just writing Destroy() is enough to call it, but we could also write Object.Destroy() if we were so inclined..)
If we don’t destroy the spawned/cloned bullets from the Hierarchy they will remain in our Scene for the entire duration of the game and eventually when enough bullets are fired they will start to eat away on our precious random access memory,.. So even if we destroy all the bullets when they hit an object or target then we still have to destroy the bullets that are fired straight up in the air by the player and will never hit something, so destroying all bullets that hit or miss automatically after a max amount of time will take care of that problem.
Know that all this spawning and destroying bullets is a relatively expensive operation for computers to perform because every time you instantiate a GameObject it has to be loaded into memory, which takes time, and when it is destroyed that memory has to be freed again by the C# garbage collection system, which happens in the background automatically, but also takes time. A way to drastically optimize the efficiency of the bullet firing mechanism is to use what is called object pooling. Object pooling is a design pattern in which you pre-instantiate all the objects you’ll need before the gameplay starts so there is no need to create new objects or destroy old ones while the game is running. Object pools are primarily used for performance and can significantly improve performance when a game is creating and destroying the same GameObject repeatedly in rapid succession like with the firing of bullets. Object pooling works by creating a fixed amount of inactive GameObjects before the gameplay starts and simply activates or deactivates the required GameObjects, effectively just recycling the GameObjects without destroying them.
For now I don’t think that we need a bullet spawn pool system but it is something that can easily be implemented later to further optimize our game.
Links
Unity Scripting API / Object class
https://docs.unity3d.com/ScriptReference/Object.html
Unity Scripting API / Object : GameObject class
https://docs.unity3d.com/ScriptReference/GameObject.html
Unity Learn / Intermediate Scripting Tutorials
https://learn.unity.com/project/intermediate-gameplay-scripting
Unity Learn / Intermediate Scripting Tutorials / Inheritance
https://learn.unity.com/tutorial/inheritance?uv=2019.3&projectId=5c88f2c1edbc2a001f873ea5#
Unity Learn / Introduction to Object Pooling
https://learn.unity.com/tutorial/introduction-to-object-pooling
Prevent bullets from colliding with the gun barrel
YouTube
Prevent bullets from colliding with the gun barrel
Add Collider[] gunColliders variable array to VRGun class
Visual Studio Code > VRGun.cs > add Highlighted Code
using System.Collections;
using System.Collections.Generic;
using UnityEngine;

public class VRGun: MonoBehaviour
{
    public Transform gunSnapTransform;
    public Transform bulletSpawnTransform;
    public GameObject bulletPrefab;
    public ParticleSystem gunFireParticleSystem;
    public AudioSource gunFireAudioSource;
    public Collider[] gunColliders;

    public float fireSpeed = 125.0f;

    // Start is called before the first frame update
    void Start()
    {

    }

    // Update is called once per frame
    void Update()
    {

    }

    // Called by Gun.XRGrabInteractable.InteractableEvents.Activated, when the gun is fired.
    public void FireBullet()
    {
        Debug.Log("Gun is Fired!!!");

        // Play the gunFireParticleSystem and the gunFireAudioSource
        gunFireParticleSystem.Play();
        gunFireAudioSource.Play();

        // Spawn/Instantiate a clone of the bulletPrefab and store
        // a reference to it in the GameObject spawnedBullet variable.
        GameObject spawnedBullet = Instantiate(bulletPrefab);

        // Position the spawnedBullet at the tip of the gun at the bulletSpawnTransform.position.
        spawnedBullet.transform.position = bulletSpawnTransform.position;
        // Rotate the spawnedBullet in the direction of the bulletSpawnTransform
        spawnedBullet.transform.rotation = bulletSpawnTransform.rotation;

        // Get the spawned bullet's Rigidbody component and set its velocity
        // to the forward direction of the bullet multiplied by the fireSpeed.
        spawnedBullet.GetComponent<Rigidbody>().velocity = spawnedBullet.transform.forward * fireSpeed;

        // Destroy the spawned bullet after five seconds.
        Destroy(spawnedBullet, 5);
    }

    // Called by Gun.XRGrabInteractable.InteractableEvents.FirstSelectEntered, when the gun is grabbed
    public void OnGrab()
    {
        Debug.Log("Gun is Grabbed!!!");
    }

    // Called by Gun.XRGrabInteractable.Interactable Events.LastSelectExited, when the gun is released
    public void OnRelease()
    {
        Debug.Log("Gun is Dropped!!!");

        transform.position = gunSnapTransform.position;
        transform.rotation = gunSnapTransform.rotation;

        GetComponent<Rigidbody>().isKinematic = true;
    }
}
Get the SphereCollider component on the spawnedBullet GameObject and store a reference to it
Visual Studio Code > VRGun.cs > add Highlighted Code
using System.Collections;
using System.Collections.Generic;
using UnityEngine;

public class VRGun: MonoBehaviour
{
    public Transform gunSnapTransform;
    public Transform bulletSpawnTransform;
    public GameObject bulletPrefab;
    public ParticleSystem gunFireParticleSystem;
    public AudioSource gunFireAudioSource;
    public Collider[] gunColliders;

    public float fireSpeed = 125.0f;

    // Start is called before the first frame update
    void Start()
    {

    }

    // Update is called once per frame
    void Update()
    {

    }

    // Called by Gun.XRGrabInteractable.InteractableEvents.Activated, when the gun is fired.
    public void FireBullet()
    {
        Debug.Log("Gun is Fired!!!");

        // Play the gunFireParticleSystem and the gunFireAudioSource
        gunFireParticleSystem.Play();
        gunFireAudioSource.Play();

        // Spawn/Instantiate a clone of the bulletPrefab and store
        // a reference to it in the GameObject spawnedBullet variable.
        GameObject spawnedBullet = Instantiate(bulletPrefab);

        // Position the spawnedBullet at the tip of the gun at the bulletSpawnTransform.position.
        spawnedBullet.transform.position = bulletSpawnTransform.position;
        // Rotate the spawnedBullet in the direction of the bulletSpawnTransform
        spawnedBullet.transform.rotation = bulletSpawnTransform.rotation;

        // Get the spawned bullet's Rigidbody component and set its velocity
        // to the forward direction of the bullet multiplied by the fireSpeed.
        spawnedBullet.GetComponent<Rigidbody>().velocity = spawnedBullet.transform.forward * fireSpeed;

        // Get the SphereCollider component on the spawnedBullet and
        // store a reference to it in the SphereCollider spawnedBulletCollider variable.
        SphereCollider spawnedBulletCollider = spawnedBullet.GetComponent<SphereCollider>();

        // Destroy the spawned bullet after five seconds.
        Destroy(spawnedBullet, 5);
    }

    // Called by Gun.XRGrabInteractable.InteractableEvents.FirstSelectEntered, when the gun is grabbed.
    public void OnGrab()
    {
        Debug.Log("Gun is Grabbed!!!");
    }

    // Called by Gun.XRGrabInteractable.Interactable Events.LastSelectExited, when the gun is released.
    public void OnRelease()
    {
        Debug.Log("Gun is Dropped!!!");

        transform.position = gunSnapTransform.position;
        transform.rotation = gunSnapTransform.rotation;

        GetComponent<Rigidbody>().isKinematic = true;
    }
}
Loop trough the array of gunColliders and setup IgnoreCollision between the gun colliders and the bullet collider
Visual Studio Code > VRGun.cs > add Highlighted Code
using System.Collections;
using System.Collections.Generic;
using UnityEngine;

public class VRGun: MonoBehaviour
{
    public Transform gunSnapTransform;
    public Transform bulletSpawnTransform;
    public GameObject bulletPrefab;
    public ParticleSystem gunFireParticleSystem;
    public AudioSource gunFireAudioSource;
    public Collider[] gunColliders;

    public float fireSpeed = 125.0f;

    // Start is called before the first frame update
    void Start()
    {

    }

    // Update is called once per frame
    void Update()
    {

    }

    // Called by Gun.XRGrabInteractable.InteractableEvents.Activated, when the gun is fired.
    public void FireBullet()
    {
        Debug.Log("Gun is Fired!!!");

        // Play the gunFireParticleSystem and the gunFireAudioSource
        gunFireParticleSystem.Play();
        gunFireAudioSource.Play();

        // Spawn/Instantiate a clone of the bulletPrefab and store
        // a reference to it in the GameObject spawnedBullet variable.
        GameObject spawnedBullet = Instantiate(bulletPrefab);

        // Position the spawnedBullet at the tip of the gun at the bulletSpawnTransform.position.
        spawnedBullet.transform.position = bulletSpawnTransform.position;
        // Rotate the spawnedBullet in the direction of the bulletSpawnTransform
        spawnedBullet.transform.rotation = bulletSpawnTransform.rotation;

        // Get the spawned bullet's Rigidbody component and set its velocity
        // to the forward direction of the bullet multiplied by the fireSpeed.
        spawnedBullet.GetComponent<Rigidbody>().velocity = spawnedBullet.transform.forward * fireSpeed;

        // Get the SphereCollider component on the spawnedBullet and
        // store a reference to it in the SphereCollider spawnedBulletCollider variable.
        SphereCollider spawnedBulletCollider = spawnedBullet.GetComponent<SphereCollider>();

        // Loop trough the gunColliders array and set IgnoreCollision
        // between the gunColliders and the spawnedBulletCollider to true.
        for(int i=0; i<gunColliders.Length; i++)
        {
            Physics.IgnoreCollision(spawnedBulletCollider, gunColliders[i], true);
        }

        // Destroy the spawned bullet after five seconds.
        Destroy(spawnedBullet, 5);
    }

    // Called by Gun.XRGrabInteractable.InteractableEvents.FirstSelectEntered, when the gun is grabbed.
    public void OnGrab()
    {
        Debug.Log("Gun is Grabbed!!!");
    }

    // Called by Gun.XRGrabInteractable.Interactable Events.LastSelectExited, when the gun is released.
    public void OnRelease()
    {
        Debug.Log("Gun is Dropped!!!");

        transform.position = gunSnapTransform.position;
        transform.rotation = gunSnapTransform.rotation;

        GetComponent<Rigidbody>().isKinematic = true;
    }
}
Save VRGun.cs Script
Visual Studio Code > VRGun.cs > (Ctrl + S) or (Cmd + S)
Setup VRGun component on VRGun GameObject
Add VRGun colliders to the VRGun.gunColliders variable array
Hierarchy view > RollerCoasterSpline > RollerCoasterTrain > VRGunHolder > GunSnapTransform > select VRGun
Inspector view > VRGun.VRGun.Gun Colliders = Hierarchy view > RollerCoasterSpline > RollerCoasterTrain > VRGunHolder > GunSnapTransform > VRGun > Mesh > Sphere (0-3) + Cylinder (0-3)
Save changes made to the scene
Unity > (Ctrl + S) or Unity Menu Bar > File > Save
(Save your scene regularly to avoid losing your progress in case of a crash either by going to File > Save in the Unity menu bar or by pressing Control + S on your keyboard. You can see if there are any changes made to the scene that still need to be saved if there is a star * character displayed right after the name of your scene in the Hierarchy view.)
Notes
As mentioned before, the basic physics bullet firing mechanism that we have now is enough to send some bullets flying when we pull the trigger but it is not very acurate yet. The first thing that needs to be improved is the bullet spawning, which happens at the tip of the VRGun barrel at the BulletSpawnTransform position, close to the VRGun’s colliders, so some of the bullets that are fired collide with the VRGun immediately on instantiation and this causes the bullets to bounce and fly of into unexpected directions. We could fix this partially by increasing the distance between the BulletSpawnTransform and the VRGun barrel but then the bullets are fired unrealistically far in front of the VRGun which just looks wrong. A better way to fix this problem is by making sure that the bullets simply cannot collide with the gun. This can be done in two ways. The first way is to disable collisions between GameObjects by putting the Bullets and the VRGun GameObjects on separate Layers and disabling collision between those Layers in the Project’s physics settings collision matrix. Which is a perfectly fine way to do it, and we will probably use this method in later Phases, but to show you the other way, we use the second method for this step.
The second method to disable collisions between GameObjects is to disable the collision between single specific colliders directly from C# script, by using the Physics.IgnoreCollision() function.
Links
Unity Learn / Beginner Scripting Tutorials
https://learn.unity.com/project/beginner-gameplay-scripting
Unity Learn / Beginner Scripting Tutorials / Arrays
https://learn.unity.com/tutorial/arrays-9o?uv=2021.3&projectId=5c8920b4edbc2a113b6bc26a
Unity Learn / Beginner Scripting Tutorials / Loops
https://learn.unity.com/tutorial/loops-z2b?projectId=5c8920b4edbc2a113b6bc26a&uv=2021.3
Unity Manual / Working in Unity / Create Gameplay / Layers
https://docs.unity3d.com/Manual/Layers.html
Unity Manual / Working in Unity / Create Gameplay / Layers / Layer-based collision detection
https://docs.unity3d.com/Manual/LayerBasedCollision.html
Unity Manual / Physics / Built-in 3D Physics / Collision
https://docs.unity3d.com/Manual/collision-section.html
Unity Manual / Physics / Built-in 3D Physics / Collision
Unity Scripting API / Physics class
https://docs.unity3d.com/ScriptReference/Physics.html
Unity Scripting API / Physics / IgnoreCollision function
https://docs.unity3d.com/ScriptReference/Physics.IgnoreCollision.html
Add player movement velocity to bullet velocity
YouTube
Add player movement velocity to initial bullet velocity
Add private Vector3 gunVelocity and Vector3 previousPosition variables to VRGun class
Visual Studio Code > VRGun.cs > add Highlighted Code
using System.Collections;
using System.Collections.Generic;
using UnityEngine;

public class VRGun: MonoBehaviour
{
    public Transform gunSnapTransform;
    public Transform bulletSpawnTransform;
    public GameObject bulletPrefab;
    public ParticleSystem gunFireParticleSystem;
    public AudioSource gunFireAudioSource;
    public Collider[] gunColliders;

    public float fireSpeed = 125.0f;

    private Vector3 gunVelocity;
    private Vector3 previousPosition;

    // Start is called before the first frame update
    void Start()
    {

    }

    // Update is called once per frame
    void Update()
    {

    }

    // Called by Gun.XRGrabInteractable.InteractableEvents.Activated, when the gun is fired.
    public void FireBullet()
    {
        Debug.Log("Gun is Fired!!!");

        // Play the gunFireParticleSystem and the gunFireAudioSource
        gunFireParticleSystem.Play();
        gunFireAudioSource.Play();

        // Spawn/Instantiate a clone of the bulletPrefab and store
        // a reference to it in the GameObject spawnedBullet variable.
        GameObject spawnedBullet = Instantiate(bulletPrefab);

        // Position the spawnedBullet at the tip of the gun at the bulletSpawnTransform.position.
        spawnedBullet.transform.position = bulletSpawnTransform.position;
        // Rotate the spawnedBullet in the direction of the bulletSpawnTransform
        spawnedBullet.transform.rotation = bulletSpawnTransform.rotation;

        // Get the spawned bullet's Rigidbody component and set its velocity
        // to the forward direction of the bullet multiplied by the fireSpeed.
        spawnedBullet.GetComponent<Rigidbody>().velocity = spawnedBullet.transform.forward * fireSpeed;

        // Destroy the spawned bullet after five seconds.
        Destroy(spawnedBullet,5);

        // Get the SphereCollider component on the spawnedBullet and
        // store a reference to it in the SphereCollider spawnedBulletCollider variable.
        SphereCollider spawnedBulletCollider = spawnedBullet.GetComponent<SphereCollider>();

        // Loop trough the gunColliders array and set IgnoreCollision
        // between the gunColliders and the spawnedBulletCollider to true.
        for(int i=0; i<gunColliders.Length; i++)
        {
            Physics.IgnoreCollision(spawnedBulletCollider, gunColliders[i], true);
        }
    }

    // Called by Gun.XRGrabInteractable.InteractableEvents.FirstSelectEntered, when the gun is grabbed
    public void OnGrab()
    {
        Debug.Log("Gun is Grabbed!!!");
    }

    // Called by Gun.XRGrabInteractable.Interactable Events.LastSelectExited, when the gun is released
    public void OnRelease()
    {
        Debug.Log("Gun is Dropped!!!");

        transform.position = gunSnapTransform.position;
        transform.rotation = gunSnapTransform.rotation;

        GetComponent<Rigidbody>().isKinematic = true;
    }
}
Calculate gunVelocity and store current position in previousPosition variable on Update()
Visual Studio Code > VRGun.cs > add Highlighted Code
using System.Collections;
using System.Collections.Generic;
using UnityEngine;

public class VRGun: MonoBehaviour
{
    public Transform gunSnapTransform;
    public Transform bulletSpawnTransform;
    public GameObject bulletPrefab;
    public ParticleSystem gunFireParticleSystem;
    public AudioSource gunFireAudioSource;
    public Collider[] gunColliders;

    public float fireSpeed = 125.0f;

    private Vector3 gunVelocity;
    private Vector3 previousPosition;

    // Start is called before the first frame update
    void Start()
    {

    }

    // Update is called once per frame
    void Update()
    {
        // Velocity is distance between current position and previous position divided by time.
        gunVelocity = (bulletSpawnTransform.position - previousPosition) / Time.deltaTime;

        // Store the position at the end of the Update() function for the next frame.
        previousPosition = bulletSpawnTransform.position;
    }

    // Called by Gun.XRGrabInteractable.InteractableEvents.Activated, when the gun is fired.
    public void FireBullet()
    {
        Debug.Log("Gun is Fired!!!");

        // Play the gunFireParticleSystem and the gunFireAudioSource
        gunFireParticleSystem.Play();
        gunFireAudioSource.Play();

        // Spawn/Instantiate a clone of the bulletPrefab and store
        // a reference to it in the GameObject spawnedBullet variable.
        GameObject spawnedBullet = Instantiate(bulletPrefab);

        // Position the spawnedBullet at the tip of the gun at the bulletSpawnTransform.position.
        spawnedBullet.transform.position = bulletSpawnTransform.position;
        // Rotate the spawnedBullet in the direction of the bulletSpawnTransform
        spawnedBullet.transform.rotation = bulletSpawnTransform.rotation;

        // Get the spawned bullet's Rigidbody component and set its velocity
        // to the forward direction of the bullet multiplied by the fireSpeed.
        spawnedBullet.GetComponent<Rigidbody>().velocity = spawnedBullet.transform.forward * fireSpeed;

        // Destroy the spawned bullet after five seconds.
        Destroy(spawnedBullet,5);

        // Get the SphereCollider component on the spawnedBullet and
        // store a reference to it in the SphereCollider spawnedBulletCollider variable.
        SphereCollider spawnedBulletCollider = spawnedBullet.GetComponent<SphereCollider>();

        // Loop trough the gunColliders array and set IgnoreCollision
        // between the gunColliders and the spawnedBulletCollider to true.
        for(int i=0; i<gunColliders.Length; i++)
        {
            Physics.IgnoreCollision(spawnedBulletCollider, gunColliders[i], true);
        }
    }

    // Called by Gun.XRGrabInteractable.InteractableEvents.FirstSelectEntered, when the gun is grabbed.
    public void OnGrab()
    {
        Debug.Log("Gun is Grabbed!!!");
    }

    // Called by Gun.XRGrabInteractable.Interactable Events.LastSelectExited, when the gun is released.
    public void OnRelease()
    {
        Debug.Log("Gun is Dropped!!!");

        transform.position = gunSnapTransform.position;
        transform.rotation = gunSnapTransform.rotation;

        GetComponent<Rigidbody>().isKinematic = true;
    }
}
Add the gunVelocity to the bullet velocity in the FireBullet() function
Visual Studio Code > VRGun.cs > modify Highlighted Code
using System.Collections;
using System.Collections.Generic;
using UnityEngine;

public class VRGun: MonoBehaviour
{
    public Transform gunSnapTransform;
    public Transform bulletSpawnTransform;
    public GameObject bulletPrefab;
    public ParticleSystem gunFireParticleSystem;
    public AudioSource gunFireAudioSource;
    public Collider[] gunColliders;

    public float fireSpeed = 125.0f;

    private Vector3 gunVelocity;
    private Vector3 previousPosition;

    // Start is called before the first frame update
    void Start()
    {

    }

    // Update is called once per frame
    void Update()
    {
        // Velocity is distance between current position and previous position divided by time.
        gunVelocity = (bulletSpawnTransform.position - previousPosition) / Time.deltaTime;

        // Store the position at the end of the Update() function for the next frame.
        previousPosition = bulletSpawnTransform.position;
    }

    // Called by Gun.XRGrabInteractable.InteractableEvents.Activated, when the gun is fired.
    public void FireBullet()
    {
        Debug.Log("Gun is Fired!!!");

        // Play the gunFireParticleSystem and the gunFireAudioSource
        gunFireParticleSystem.Play();
        gunFireAudioSource.Play();

        // Spawn/Instantiate a clone of the bulletPrefab and store
        // a reference to it in the GameObject spawnedBullet variable.
        GameObject spawnedBullet = Instantiate(bulletPrefab);

        // Position the spawnedBullet at the tip of the gun at the bulletSpawnTransform.position.
        spawnedBullet.transform.position = bulletSpawnTransform.position;
        // Rotate the spawnedBullet in the direction of the bulletSpawnTransform
        spawnedBullet.transform.rotation = bulletSpawnTransform.rotation;

        // Get the spawnedBullet's Rigidbody component and set its velocity
        // to the velocity of the gun plus the forward direction
        // of the bullet multiplied by the firespeed.
        spawnedBullet.GetComponent<Rigidbody>().velocity = gunVelocity + (spawnedBullet.transform.forward * fireSpeed);

        // Destroy the spawned bullet after five seconds.
        Destroy(spawnedBullet,5);

        // Get the SphereCollider component on the spawnedBullet and
        // store a reference to it in the SphereCollider spawnedBulletCollider variable.
        SphereCollider spawnedBulletCollider = spawnedBullet.GetComponent<SphereCollider>();

        // Loop trough the gunColliders array and set IgnoreCollision
        // between the gunColliders and the spawnedBulletCollider to true.
        for(int i=0; i<gunColliders.Length; i++)
        {
            Physics.IgnoreCollision(spawnedBulletCollider, gunColliders[i], true);
        }
    }

    // Called by Gun.XRGrabInteractable.InteractableEvents.FirstSelectEntered, when the gun is grabbed.
    public void OnGrab()
    {
        Debug.Log("Gun is Grabbed!!!");
    }

    // Called by Gun.XRGrabInteractable.Interactable Events.LastSelectExited, when the gun is released.
    public void OnRelease()
    {
        Debug.Log("Gun is Dropped!!!");

        transform.position = gunSnapTransform.position;
        transform.rotation = gunSnapTransform.rotation;

        GetComponent<Rigidbody>().isKinematic = true;
    }
}
Save VRGun.cs Script
Visual Studio Code > VRGun.cs > (Ctrl + S)
Save changes made to the scene
Unity > (Ctrl + S) or Unity Menu Bar > File > Save
(Save your scene regularly to avoid losing your progress in case of a crash either by going to File > Save in the Unity menu bar or by pressing Control + S on your keyboard. You can see if there are any changes made to the scene that still need to be saved if there is a star * character displayed right after the name of your scene in the Hierarchy view.)
Notes
Imagine being a passenger on a train traveling north at a 100 kilometers per hour.
Now imagine holding a ball. What speed is the ball traveling with?.. Exactly, 100 kilometers per hour in the northwards direction, so if you were to throw the ball outside of the window in the east direction with 50 kilometers per hour than the initial velocity of that ball would be 100 km/h in the north direction and also 50 km/h in the east direction.
So if we want to get an accurate bullet velocity even when the player is traveling fast then we should add the velocity at which the player is moving (or to be even more precise, the velocity at which the tip of the gun barrel is moving) and add it to the velocity that we fire the bullet with.
To do this we can simply add those two velocities together when we fire the gun but then we need to get the velocity of the bulletSpawnTransform somehow first.
This would be easy if we were moving the player and the gun using physics only, because then we could get the velocity from the Rigidbody component’s Rigidbody.velocity variable, but since the Transform of the VRGun is moved directly and not by adding physics forces to its Rigidbody we have to calculate the velocity of the bulletSpawnTransform ourselves.
Luckily we can do this by simply subtracting the position of the bulletSpawnTransform from the previous frame from the position of the bulletSpawnTransform in the current frame (this gets us the distance between them) and divide it by the time between the last two frames. (We can also use the Vector3.Distance() function to get the distance between to positions, but since it is a simple calculation I think it is best not to use a function for it, so that it is more plain to see what happens.)
In code we calculate this in Update() first and then at the end of the Update() function we store the current possition in a variable named previousPosition so it can be used again at the start of the Update() function in the next frame.
Links
Unity Scripting API / Vector3 class
https://docs.unity3d.com/ScriptReference/Vector3.html
Unity Scripting API / Vector3 / Distance function
https://docs.unity3d.com/ScriptReference/Vector3.Distance.html
Unity Scripting API / Rigidbody class
https://docs.unity3d.com/ScriptReference/Rigidbody.html
Unity Scripting API / Rigidbody / velocity variable
https://docs.unity3d.com/ScriptReference/Rigidbody-velocity.html
Fire physics gun from FixedUpdate to stay in sync with the physics engine
YouTube
Call VRGun.FireGun() from FixedUpdate() instead of Update() to stay in sync with the physics engine
Add private bool fireFlag variable to VRGun class
Visual Studio Code > VRGun.cs > add Highlighted Code
using System.Collections;
using System.Collections.Generic;
using UnityEngine;

public class VRGun: MonoBehaviour
{
    public Transform gunSnapTransform;
    public Transform bulletSpawnTransform;
    public GameObject bulletPrefab;
    public ParticleSystem gunFireParticleSystem;
    public AudioSource gunFireAudioSource;
    public Collider[] gunColliders;

    public float fireSpeed = 125.0f;

    private Vector3 gunVelocity;
    private Vector3 previousPosition;
    private bool fireFlag = false;

    // Start is called before the first frame update
    void Start()
    {

    }

    // Update is called once per frame
    void Update()
    {
        // Velocity is distance between current position and previous position divided by time.
        gunVelocity = (bulletSpawnTransform.position - previousPosition) / Time.deltaTime;

        // Store the position at the end of the Update() function for the next frame.
        previousPosition = bulletSpawnTransform.position;
    }

    // Called by Gun.XRGrabInteractable.InteractableEvents.Activated, when the gun is fired.
    public void FireBullet()
    {
        Debug.Log("Gun is Fired!!!");

        // Play the gunFireParticleSystem and the gunFireAudioSource
        gunFireParticleSystem.Play();
        gunFireAudioSource.Play();

        // Spawn/Instantiate a clone of the bulletPrefab and store
        // a reference to it in the GameObject spawnedBullet variable.
        GameObject spawnedBullet = Instantiate(bulletPrefab);

        // Position the spawnedBullet at the tip of the gun at the bulletSpawnTransform.position.
        spawnedBullet.transform.position = bulletSpawnTransform.position;
        // Rotate the spawnedBullet in the direction of the bulletSpawnTransform
        spawnedBullet.transform.rotation = bulletSpawnTransform.rotation;

        // Get the spawnedBullet's Rigidbody component and set its velocity
        // to the velocity of the gun plus the forward direction
        // of the bullet multiplied by the firespeed.
        spawnedBullet.GetComponent<Rigidbody>().velocity = gunVelocity + (spawnedBullet.transform.forward * fireSpeed);

        // Destroy the spawned bullet after five seconds.
        Destroy(spawnedBullet,5);

        // Get the SphereCollider component on the spawnedBullet and
        // store a reference to it in the SphereCollider spawnedBulletCollider variable.
        SphereCollider spawnedBulletCollider = spawnedBullet.GetComponent<SphereCollider>();

        // Loop trough the gunColliders array and set IgnoreCollision
        // between the gunColliders and the spawnedBulletCollider to true.
        for(int i=0; i<gunColliders.Length; i++)
        {
            Physics.IgnoreCollision(spawnedBulletCollider, gunColliders[i], true);
        }
    }

    // Called by Gun.XRGrabInteractable.InteractableEvents.FirstSelectEntered, when the gun is grabbed.
    public void OnGrab()
    {
        Debug.Log("Gun is Grabbed!!!");
    }

    // Called by Gun.XRGrabInteractable.Interactable Events.LastSelectExited, when the gun is released.
    public void OnRelease()
    {
        Debug.Log("Gun is Dropped!!!");

        transform.position = gunSnapTransform.position;
        transform.rotation = gunSnapTransform.rotation;

        GetComponent<Rigidbody>().isKinematic = true;
    }
}
Rename current FireBullet() function to Fire() and add new FireBullet() function above it
Visual Studio Code > VRGun.cs > add and modify Highlighted Code
using System.Collections;
using System.Collections.Generic;
using UnityEngine;

public class VRGun: MonoBehaviour
{
    public Transform gunSnapTransform;
    public Transform bulletSpawnTransform;
    public GameObject bulletPrefab;
    public ParticleSystem gunFireParticleSystem;
    public AudioSource gunFireAudioSource;
    public Collider[] gunColliders;

    public float fireSpeed = 125.0f;

    private Vector3 gunVelocity;
    private Vector3 previousPosition;
    private bool fireFlag = false;

    // Start is called before the first frame update
    void Start()
    {

    }

    // Update is called once per frame
    void Update()
    {
        // Velocity is distance between current position and previous position divided by time.
        gunVelocity = (bulletSpawnTransform.position - previousPosition) / Time.deltaTime;

        // Store the position at the end of the Update() function for the next frame.
        previousPosition = bulletSpawnTransform.position;
    }

    // Called by Gun.XRGrabInteractable.InteractableEvents.Activated, when the gun is fired.
    public void FireBullet()
    {
        // Set the boolean fireFlag variable to true so that in the next
        // FixedUpdate loop iteration the Fire() function can be called.
        fireFlag = true;
    }

    public void Fire()
    {
        Debug.Log("Gun is Fired!!!");

        // Play the gunFireParticleSystem and the gunFireAudioSource
        gunFireParticleSystem.Play();
        gunFireAudioSource.Play();

        // Spawn/Instantiate a clone of the bulletPrefab and store
        // a reference to it in the GameObject spawnedBullet variable.
        GameObject spawnedBullet = Instantiate(bulletPrefab);

        // Position the spawnedBullet at the tip of the gun at the bulletSpawnTransform.position.
        spawnedBullet.transform.position = bulletSpawnTransform.position;
        // Rotate the spawnedBullet in the direction of the bulletSpawnTransform
        spawnedBullet.transform.rotation = bulletSpawnTransform.rotation;

        // Get the spawnedBullet's Rigidbody component and set its velocity
        // to the velocity of the gun plus the forward direction
        // of the bullet multiplied by the firespeed.
        spawnedBullet.GetComponent<Rigidbody>().velocity = gunVelocity + (spawnedBullet.transform.forward * fireSpeed);

        // Destroy the spawned bullet after five seconds.
        Destroy(spawnedBullet,5);

        // Get the SphereCollider component on the spawnedBullet and
        // store a reference to it in the SphereCollider spawnedBulletCollider variable.
        SphereCollider spawnedBulletCollider = spawnedBullet.GetComponent<SphereCollider>();

        // Loop trough the gunColliders array and set IgnoreCollision
        // between the gunColliders and the spawnedBulletCollider to true.
        for(int i=0; i<gunColliders.Length; i++)
        {
            Physics.IgnoreCollision(spawnedBulletCollider, gunColliders[i], true);
        }
    }

    // Called by Gun.XRGrabInteractable.InteractableEvents.FirstSelectEntered, when the gun is grabbed.
    public void OnGrab()
    {
        Debug.Log("Gun is Grabbed!!!");
    }

    // Called by Gun.XRGrabInteractable.Interactable Events.LastSelectExited, when the gun is released.
    public void OnRelease()
    {
        Debug.Log("Gun is Dropped!!!");

        transform.position = gunSnapTransform.position;
        transform.rotation = gunSnapTransform.rotation;

        GetComponent<Rigidbody>().isKinematic = true;
    }
}
Add Unity MonoBehaviour.FixedUpdate() function to VRGun class
Visual Studio Code > VRGun.cs > add and modify Highlighted Code
using System.Collections;
using System.Collections.Generic;
using UnityEngine;

public class VRGun: MonoBehaviour
{
    public Transform gunSnapTransform;
    public Transform bulletSpawnTransform;
    public GameObject bulletPrefab;
    public ParticleSystem gunFireParticleSystem;
    public AudioSource gunFireAudioSource;
    public Collider[] gunColliders;

    public float fireSpeed = 125.0f;

    private Vector3 gunVelocity;
    private Vector3 previousPosition;
    private bool fireFlag = false;

    // Start is called before the first frame update
    void Start()
    {

    }

    // Update is called once per frame
    void Update()
    {
        // Velocity is distance between current position and previous position divided by time.
        gunVelocity = (bulletSpawnTransform.position - previousPosition) / Time.deltaTime;

        // Store the position at the end of the Update() function for the next frame.
        previousPosition = bulletSpawnTransform.position;
    }

    // FixedUpdate is called every fixed frame-rate frame
    void FixedUpdate()
    {
        // If the fireFlag boolean was set to true during Update()
        // call the Fire() function and set the fireFlag back to false.
        if(fireFlag == true)
        {
            fireFlag = false;
            Fire();
        }
    }

    // Called by Gun.XRGrabInteractable.InteractableEvents.Activated, when the gun is fired.
    public void FireBullet()
    {
        // Set the boolean fireFlag variable to true so that in the next
        // FixedUpdate loop iteration the Fire() function can be called.
        fireFlag = true;
    }

    public void Fire()
    {
        Debug.Log("Gun is Fired!!!");

        // Play the gunFireParticleSystem and the gunFireAudioSource
        gunFireParticleSystem.Play();
        gunFireAudioSource.Play();

        // Spawn/Instantiate a clone of the bulletPrefab and store
        // a reference to it in the GameObject spawnedBullet variable.
        GameObject spawnedBullet = Instantiate(bulletPrefab);

        // Position the spawnedBullet at the tip of the gun at the bulletSpawnTransform.position.
        spawnedBullet.transform.position = bulletSpawnTransform.position;
        // Rotate the spawnedBullet in the direction of the bulletSpawnTransform
        spawnedBullet.transform.rotation = bulletSpawnTransform.rotation;

        // Get the spawnedBullet's Rigidbody component and set its velocity
        // to the velocity of the gun plus the forward direction
        // of the bullet multiplied by the firespeed.
        spawnedBullet.GetComponent<Rigidbody>().velocity = gunVelocity + (spawnedBullet.transform.forward * fireSpeed);

        // Destroy the spawned bullet after five seconds.
        Destroy(spawnedBullet,5);

        // Get the SphereCollider component on the spawnedBullet and
        // store a reference to it in the SphereCollider spawnedBulletCollider variable.
        SphereCollider spawnedBulletCollider = spawnedBullet.GetComponent<SphereCollider>();

        // Loop trough the gunColliders array and set IgnoreCollision
        // between the gunColliders and the spawnedBulletCollider to true.
        for(int i=0; i<gunColliders.Length; i++)
        {
            Physics.IgnoreCollision(spawnedBulletCollider, gunColliders[i], true);
        }
    }

    // Called by Gun.XRGrabInteractable.InteractableEvents.FirstSelectEntered, when the gun is grabbed.
    public void OnGrab()
    {
        Debug.Log("Gun is Grabbed!!!");
    }

    // Called by Gun.XRGrabInteractable.Interactable Events.LastSelectExited, when the gun is released.
    public void OnRelease()
    {
        Debug.Log("Gun is Dropped!!!");

        transform.position = gunSnapTransform.position;
        transform.rotation = gunSnapTransform.rotation;

        GetComponent<Rigidbody>().isKinematic = true;
    }
}
Save VRGun.cs Script
Visual Studio Code > VRGun.cs > (Ctrl + S)
Save changes made to the scene
Unity > (Ctrl + S) or Unity Menu Bar > File > Save
(Save your scene regularly to avoid losing your progress in case of a crash either by going to File > Save in the Unity menu bar or by pressing Control + S on your keyboard. You can see if there are any changes made to the scene that still need to be saved if there is a star * character displayed right after the name of your scene in the Hierarchy view.)
Notes
Because we usually check for player input (button presses etcetera) in the Update() function and then call the FireBullet() function, the FireBullet() function also gets executed during the regular Update() function. This is fine for stuff that doesn’t use the Unity physics engine but since we’re moving the bullet by setting the velocity on the Rigidbody component attached to the bullet, we are actually moving the bullet using physics, during the fixed physics engine update loop, which runs independently from the regular Update() cycle with regular intervals, instead of irregular fluctuating intervals like with the normal Update() loop.
Because of this we should also call our fire function in sync with the physics engine by calling it from FixedUpdate().
The way we can fix this (haha) is by setting a boolean ‘flag’ inside the Update() function (or in this case the function that is called during Update() by the XR Grab Interactable component on the VRGun) to true when we receive the button press during Update() and then check in FixedUpdate() if that boolean flag is true.
Then if it is true we call the Fire() function from FixedUpdate() so that it runs in sync with the physics engine and we also reset the boolean flag for the next firing round.
This way we won’t have the bullets spawning with a little bit of offset from the bulletSpawnTransform’s position depending on how fast and in which direction we are moving.
Links
Unity Manual / Scripting / Important Classes / MonoBehaviour
https://docs.unity3d.com/Manual/class-MonoBehaviour.html
Unity Scripting API / MonoBehaviour class
https://docs.unity3d.com/ScriptReference/MonoBehaviour.html
Unity Scripting API / MonoBehaviour / Update function
https://docs.unity3d.com/ScriptReference/MonoBehaviour.Update.html
Unity Scripting API / MonoBehaviour / FixedUpdate function
https://docs.unity3d.com/ScriptReference/MonoBehaviour.FixedUpdate.html
Unity Learn / Beginner Scripting
https://learn.unity.com/project/beginner-gameplay-scripting
Unity Learn / Beginner Scripting / Update and FixedUpdate
https://learn.unity.com/tutorial/update-and-fixedupdate?uv=2019.3&projectId=5c8920b4edbc2a113b6bc26a
Click on the button below to go to part two of the tutorial:
