Create a UI Canvas.
Create an enemy radar display on the UI canvas.
Display enemies and NPC’s on the radar as blips.
Use a UI mask to hide the edges of the radar blips.
0. Introduction
In this Unity enemy radar tutorial we will create a basic UI enemy radar display on a UI canvas that will show different types of entities like enemies and NPC’s with different colored radar blips.
This tutorial was made with Unity 2019.3.6f1

tutorial
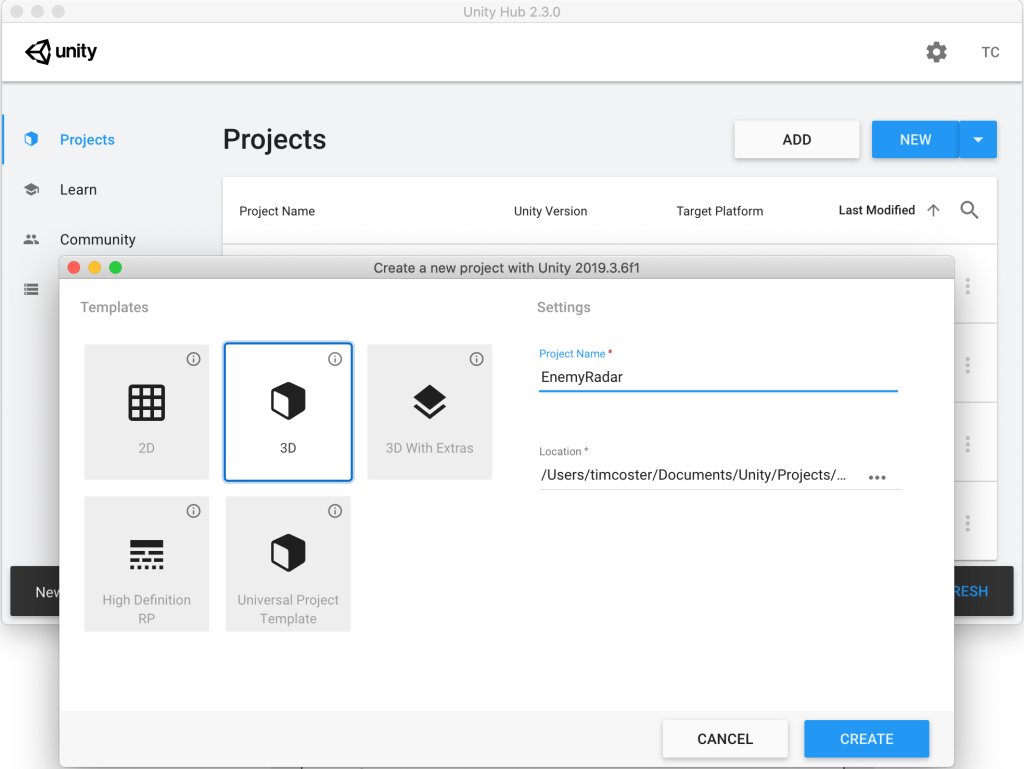
1. Create a new Unity project
For this tutorial I’ve used Unity 2019.3.6f1 with a standard 3D project template but this tutorial should work with any recent Unity version and with every available rendering pipeline:
2. Import Standard Assets and radar textures
Open the Asset Store window with Window > Asset Store, search for ‘Unity Standard Assets’ and import the package into your project.
Alternatively you can use the link below to download the Standard Assets from the Asset Store in your web browser:
https://assetstore.unity.com/packages/essentials/asset-packs/standard-assets-for-unity-2017-3-32351
The only asset from the Standard Assets that we really need for this tutorial is the FPSController prefab but the script that it uses has some other dependencies.
(If you get errors about GUITexture being obsolete after importing the Standard Assets you can delete the ForcedReset.cs and SimpleActivatorMenu.cs files, since we don’t need those anyway.)
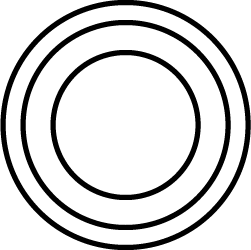
Download the three textures below by right-clicking on them and import them into your Unity project. After importing them select the radar and blip textures in the Project view and make sure ‘Alpha is Transparency’ is checked in the Inspector:

3. Create a testing environment
3.1 Creating a floor
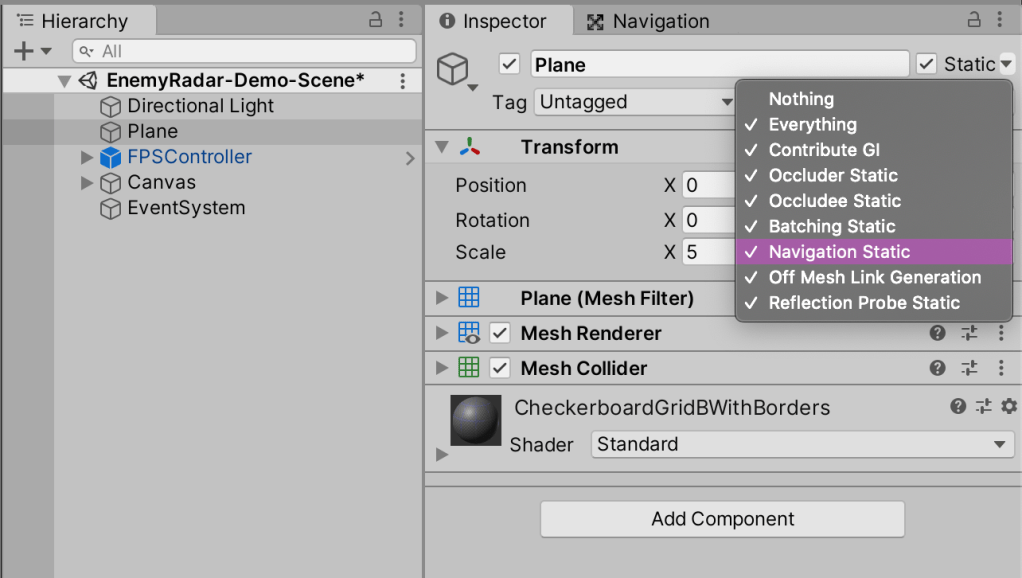
Create a floor plane for the player to walk on with GameObject > 3D Object > Plane.
Select the Plane and mark it as navigation static in the Inspector so it will be baked into the NavMesh later on.
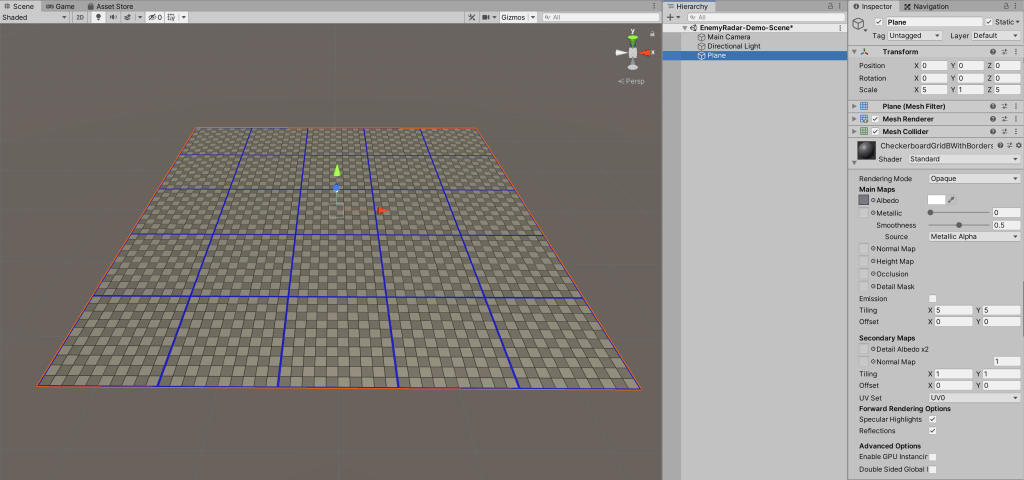
Scale the plane up to 5 on the x and z axes in the Transform component to make it larger.
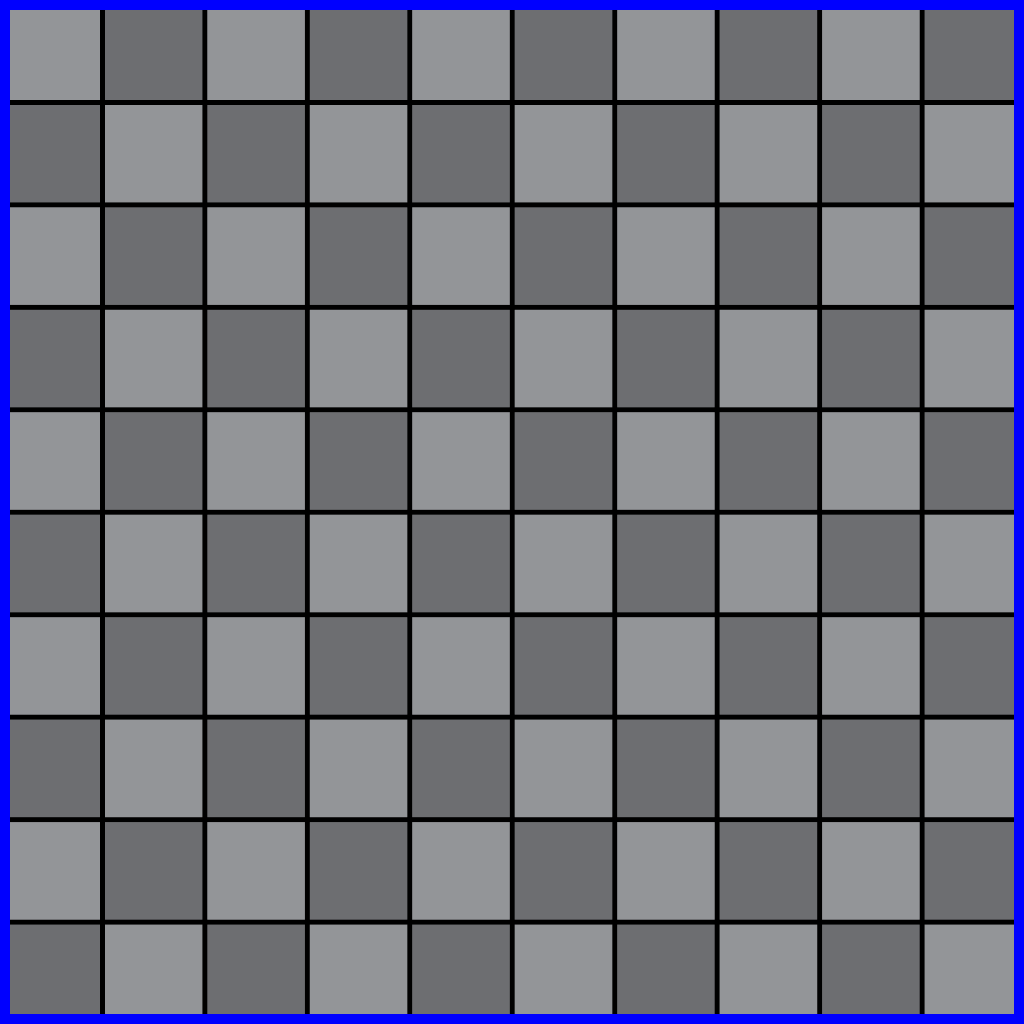
Drag the floor grid texture from the Project view onto the plane in the Scene view. A new material with the texture applied will automatically be created inside of a folder named Materials.
Change the texture tiling from the grid material to 5 on the x and y axes in the Inspector, to match the scale of the plane:
3.2 The First Person Shooter Controller
From the project view, drag the FPSController prefab from the Standard Assets/Characters/FirstPersonCharacter/Prefabs folder onto the floor plane in the Scene view and make sure it sits above the floor by setting the Transform position on the y-axis to 1 or higher in the Inspector.
Delete the default Main Camera from the Hierarchy because the FPSController has its own camera attached:

3.3 Random Walking Enemies and NPC’s
Create two capsules with GameObject > 3D Object > Capsule, these will serve as placeholders for enemies and NPC’s so name one of them enemy and the other NPC. Color the enemy capsule red by making a new red material in the Project view with right click and Create > Material.
Drag the red material on the enemy in the Scene view to apply it.
Do the same with a new green material for the NPC capsule.
Select the red capsule and tag it with a new tag ‘Enemy’ in the top left of the Inspector. Tag the green capsule ‘NPC’:
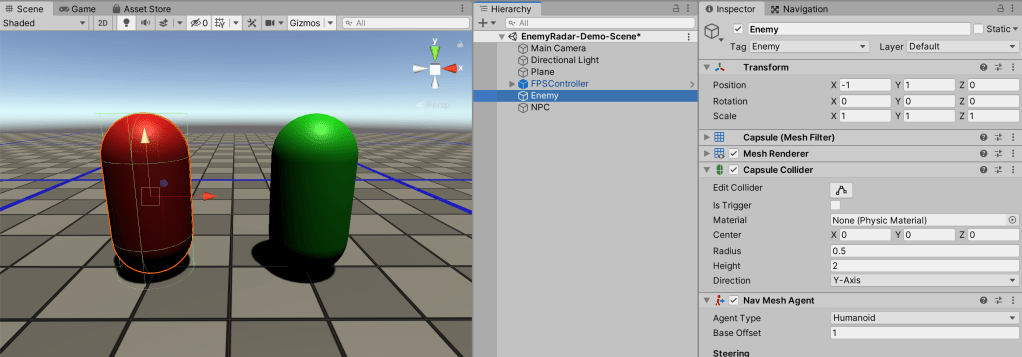
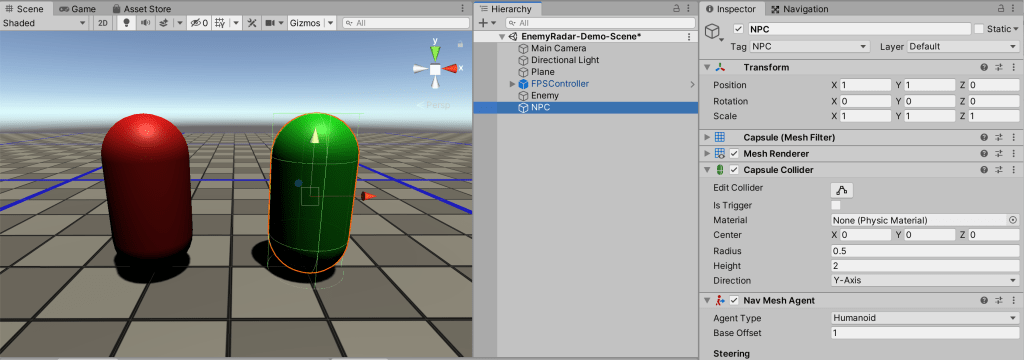
Select both capsules in the Hierarchy and add a Nav Mesh Agent component to them with the Add Component button in the Inspector.

With both still selected press Add Component again and type RandomWalk into the search field. After typing it in press on New script and then Create and Add:

Double click on the newly created script in the Project view to open it, make sure it contains the following code and then save the script:
//using System.Collections;
//using System.Collections.Generic;
using UnityEngine;
using UnityEngine.AI;

// Walk to a random position and repeat
[RequireComponent(typeof(NavMeshAgent))]
public class RandomWalk : MonoBehaviour
{
    public float m_Range = 25.0f;
    NavMeshAgent m_agent;

    void Start()
    {
        m_agent = GetComponent<NavMeshAgent>();
    }

    void Update()
    {
        if (m_agent.pathPending || m_agent.remainingDistance > 0.1f)
            return;

        Vector2 randomPos = Random.insideUnitCircle;
        m_agent.destination = m_Range * new Vector3(randomPos.x,0,randomPos.y);
    }
}
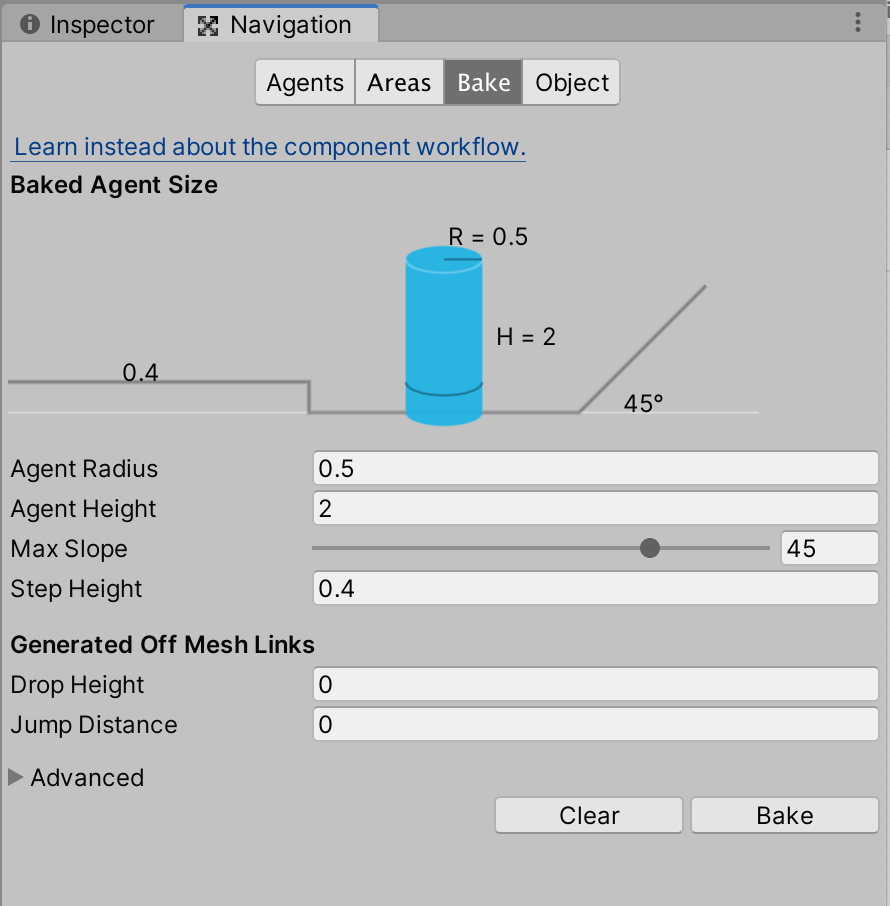
Open the Navigation window with Window > AI > Navigation. Select the Bake tab and click on the Bake button to generate a NavMesh for our Enemy and NPC NavMeshAgents to walk on.
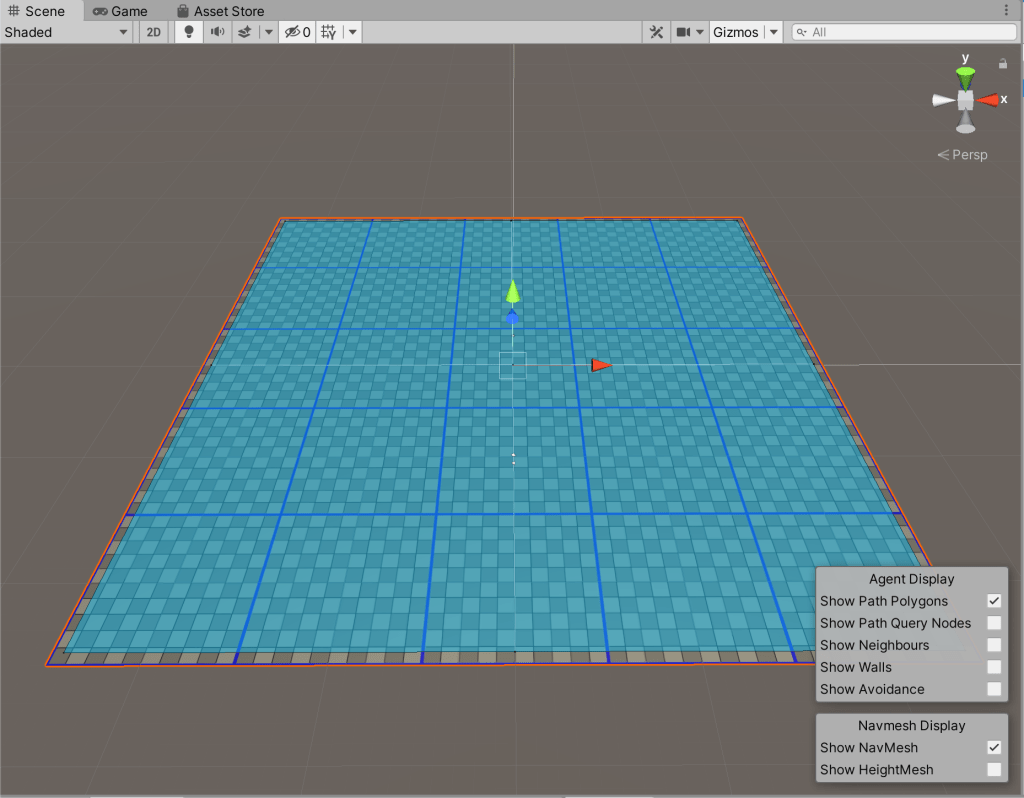
After baking you should see the created NavMesh displayed in blue, on top of the floor in the Scene view. If you don’t see the blue NavMesh then make sure that you’ve marked the floor plane GameObject as navigation static by selecting the plane in the Hierarchy and then clicking on the Static checkbox in the inspector:
If you press play now you can walk around using the WASD keys and your mouse. You will also see that the enemy and NPC placeholders walk around randomly across the floor plane,.. Purrfect for testing radars!:

Tip: For a detailed manual and overview of Unity’s built-in navigation system see this documentation page and the menu on the left side of the page:
https://docs.unity3d.com/2018.3/Documentation/Manual/Navigation.html
For the navigation scripting API, see the classes in the UnityEngine.AI namespace:
https://docs.unity3d.com/2018.3/Documentation/ScriptReference/AI.NavMesh.html
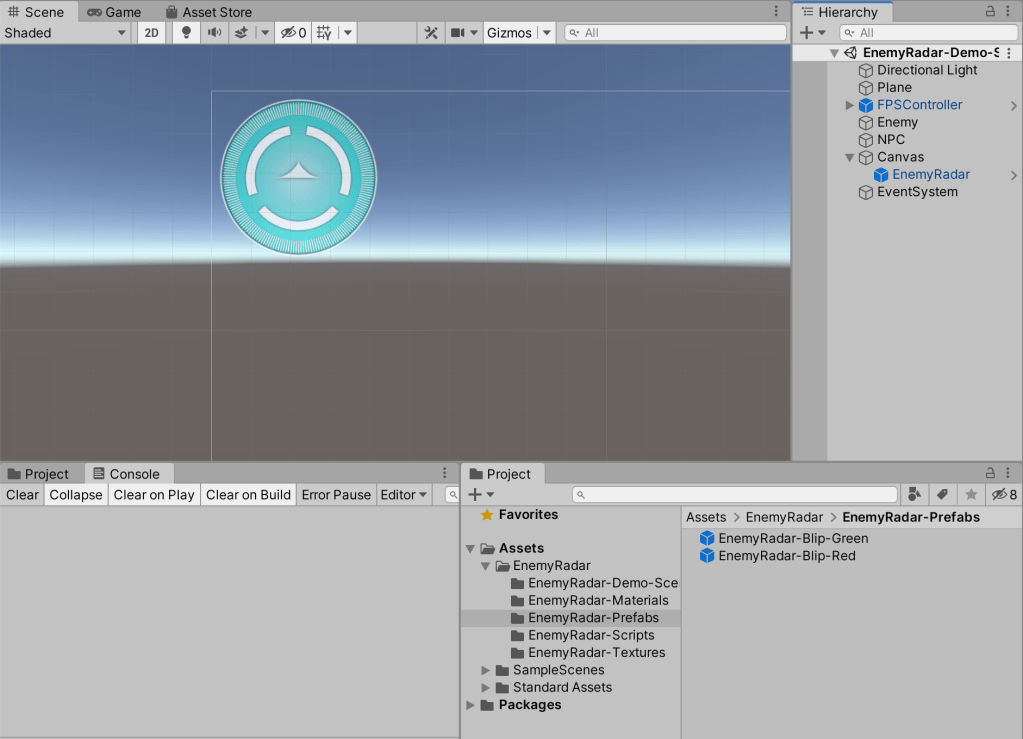
4. Create a UI Canvas and Radar
4.1 The Radar Background Image
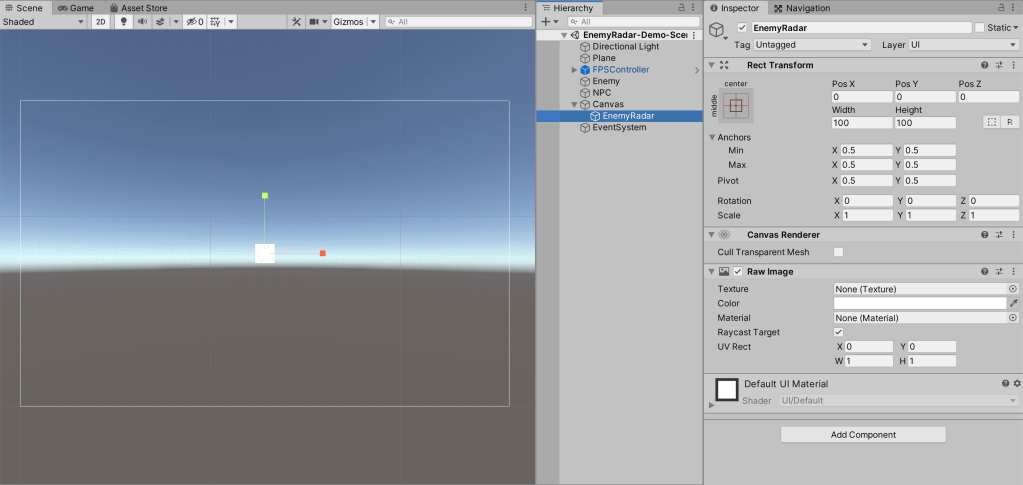
Right click in the Hierarchy and create a UI > RawImage. A new Canvas GameObject will be created with the RawImage as a child. Change the name from the RawImage to EnemyRadar:
Tip: When working with UI Canvasses it is usually best to enable 2D view mode in the Scene view with the 2D button. Then if you zoom out quite a bit in the scene view, you can get a good overview of the canvas.
To move and scale 2D canvas elements it is often easiest to use the special Rect Tool from the tool bar:

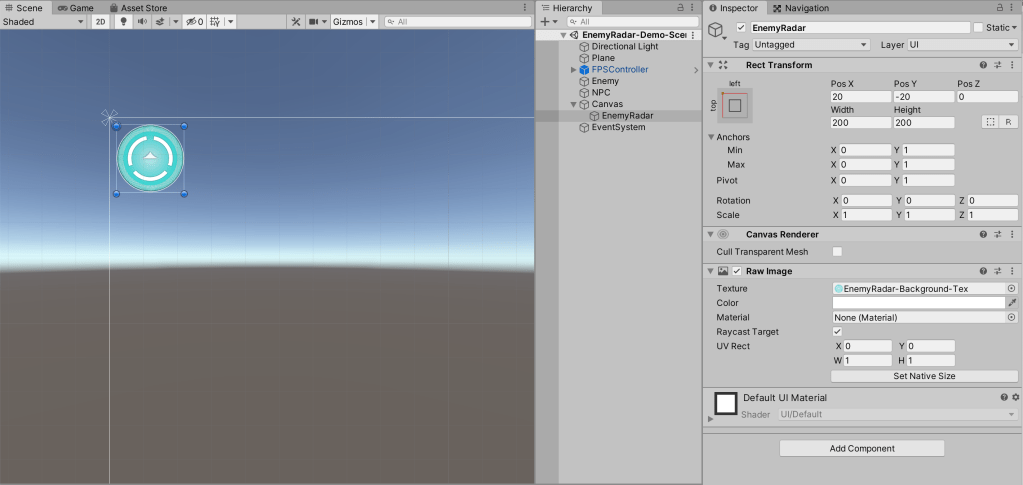
In the Rect Transform, position and anchor the radar image by clicking on the top-left anchor preset while holding both Shift and Alt:

Set the width and height in the Rect Transform to 200.
Select the EnemyRadar GameObject in the Hierarchy panel and drag the EnemyRadar-Background-Tex image from the Project view into the Texture property of the Raw Image component:
Tip: A canvas can be thought of as a flat sheet of glass in front of the camera where images, buttons, scrollbars and text etcetera can be placed on. You’re not limited to using only one canvas and you’re also not limited to having it sit flat in front of the camera. If you switch the canvas Render Mode from Screen Space – Overlay to Screen Space – Camera then you can rotate the canvas in ‘camera space’ which means that it will still move with the camera like if it were a child object of the camera, but with its own position and rotation relative to the camera. The third Render Mode is World Space which will make the Canvas behave like any other 3D GameObject, with a scale, rotation and a position, so that it can be placed anywhere in the world. This way canvasses can also be used for something like speech boxes above characters in a RPG, billboards or many other things (even entire games can be made on a canvas). World space canvasses are also used a lot in VR games where it is often much better to not have menu screens close in front of the player’s face but more like flat screens in the real world. Keep in mind that when using a world space canvas the Width and Height in the Rect Transform are in pixels and every pixel is 1 unit large in world space. So if you want a canvas with a high-ish resolution of 2000 pixels but with a size of 2 units in world space then you have to set the world-space canvas’s Width and Height to 2000 and the scale to 0.001 in the Rect Transform..
4.2 Radar -Blips-
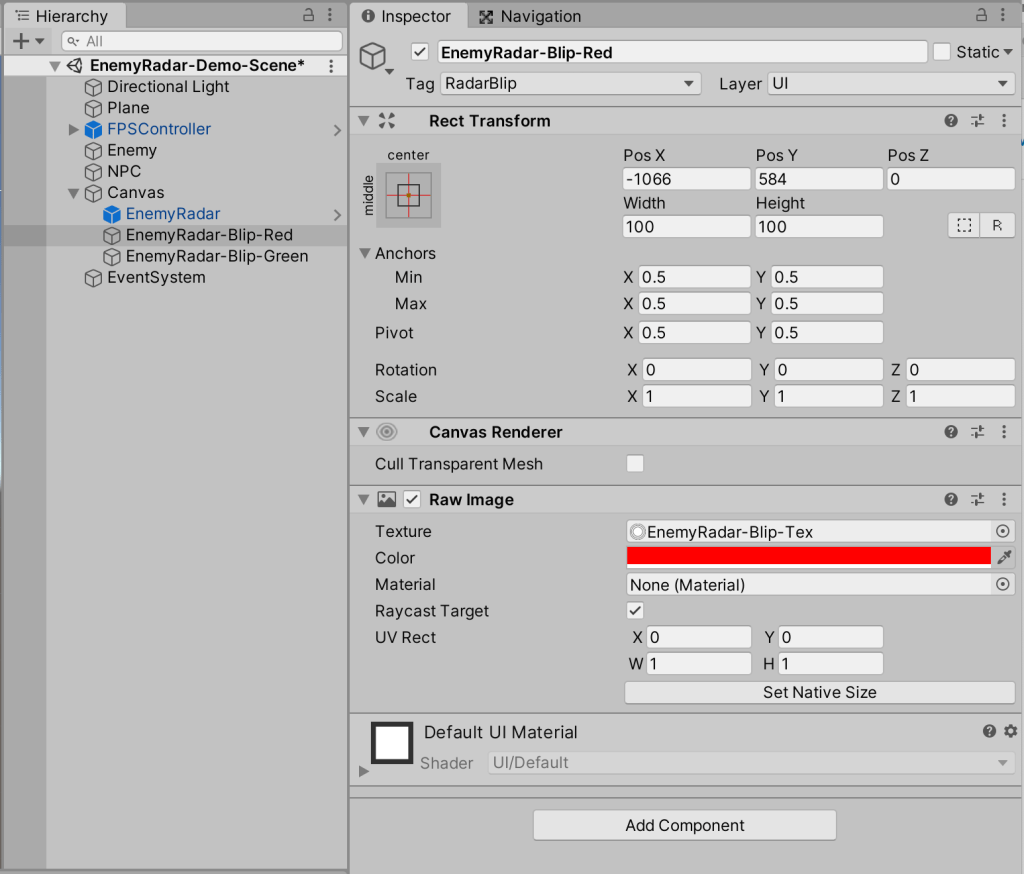
Create another RawImage in the Hierarchy, name it EnemyRadar-Blip-Red and assign the RadarBlip texture to the RawImage’s Texture property.
Set the RawImage color to red:
Tag the EnemyRadar-Blip-Red GameObject with a new tag ‘RadarBlip’.
Duplicate EnemyRadar-Blip-Red in the Hierarchy and rename it to EnemyRadar-Blip-Green. Also Change the color to green:
Drag EnemyRadar-Blip-Red from the Hierarchy into the Project view to create a new Prefab and do the same with the green blip:
Not really necessary, but we can delete the red and green blips from the Hierarchy because they will be spawned in (and destroyed) by the radar script during play mode anyway.
4.3 The Radar Script
Create a new C# script called EnemyRadar, make sure it contains the following code and save the script:
//using System.Collections;
//using System.Collections.Generic;
using UnityEngine;
using UnityEngine.UI;

public class EnemyRadar : MonoBehaviour
{
    public float radarDistance = 20, blipSize = 15;
    public bool usePlayerDirection = true;
    public Transform player;
    public GameObject blipRedPrefab,blipGreenPrefab;
    public string redBlipTag = "Enemy", greenBlipTag = "NPC";

    private float radarWidth, radarHeight, blipWidth, blipHeight;

    void Start() {
        radarWidth  = GetComponent<RectTransform>().rect.width;
        radarHeight = GetComponent<RectTransform>().rect.height;
        blipHeight  = radarHeight * blipSize/100;
        blipWidth   = radarWidth * blipSize/100;
    }

    void Update() {
        RemoveAllBlips();
        DisplayBlips(redBlipTag, blipRedPrefab);
        DisplayBlips(greenBlipTag, blipGreenPrefab);
    }

    private void DisplayBlips(string tag, GameObject prefabBlip) {
        Vector3 playerPos = player.position;
        GameObject[] targets = GameObject.FindGameObjectsWithTag(tag);

        foreach (GameObject target in targets) {
            Vector3 targetPos = target.transform.position;
            float distanceToTarget = Vector3.Distance(targetPos, playerPos);

            if(distanceToTarget <= radarDistance) {

                Vector3 normalisedTargetPosition = NormalisedPosition(playerPos, targetPos);
                Vector2 blipPosition = CalculateBlipPosition(normalisedTargetPosition);
                DrawBlip(blipPosition, prefabBlip);
            }
        }
    }

    private void RemoveAllBlips() {
        GameObject[] blips = GameObject.FindGameObjectsWithTag("RadarBlip");
        foreach (GameObject blip in blips)
            Destroy(blip);
    }

    private Vector3 NormalisedPosition(Vector3 playerPos, Vector3 targetPos) {
        float normalisedTargetX = (targetPos.x - playerPos.x)/radarDistance;
        float normalisedTargetZ = (targetPos.z - playerPos.z)/radarDistance;

        return new Vector3(normalisedTargetX, 0, normalisedTargetZ);
    }

    private Vector2 CalculateBlipPosition(Vector3 targetPos) {
        // find the angle from the player to the target.
        float angleToTarget = Mathf.Atan2(targetPos.x,targetPos.z) * Mathf.Rad2Deg;

        // The direction the player is facing.
        float anglePlayer = usePlayerDirection? player.eulerAngles.y : 0;

        // Subtract the player angle, to get the relative angle to the object. Subtract 90
        // so 0 degrees (the same direction as the player) is Up.
        float angleRadarDegrees = angleToTarget - anglePlayer - 90;

        // Calculate the xy position given the angle and the distance.
        float normalisedDistanceToTarget = targetPos.magnitude;
        float angleRadians = angleRadarDegrees * Mathf.Deg2Rad;
        float blipX = normalisedDistanceToTarget * Mathf.Cos(angleRadians);
        float blipY = normalisedDistanceToTarget * Mathf.Sin(angleRadians);

        // Scale the blip position according to the radar size.
        blipX *= radarWidth*.5f;
        blipY *= radarHeight*.5f;

        // Offset the blip position relative to the radar center
        blipX += (radarWidth*.5f) - blipWidth*.5f;
        blipY += (radarHeight*.5f) - blipHeight*.5f;

        return new Vector2(blipX, blipY);
    }

    private void DrawBlip(Vector2 pos, GameObject blipPrefab) {
        GameObject blip = (GameObject) Instantiate(blipPrefab);
        blip.transform.SetParent(transform);
        RectTransform rt = blip.GetComponent<RectTransform>();
        rt.SetInsetAndSizeFromParentEdge(RectTransform.Edge.Left,pos.x, blipWidth);
        rt.SetInsetAndSizeFromParentEdge(RectTransform.Edge.Top,pos.y, blipHeight);
    }
}
Add the script to the EnemyRadar GameObject in the Hierarchy by dragging it onto it or with the Add Component button.
Select EnemyRadar in the Hierarchy and drag the FPSController from the Hierarchy into the Player property of the Enemy Radar script in the Inspector.
Drag the EnemyRadar-Blip-Red and EnemyRadar-Blip-Green prefabs from the Project view into the Blip Red and Blip Green properties of the Enemy Radar script in the Inspector:
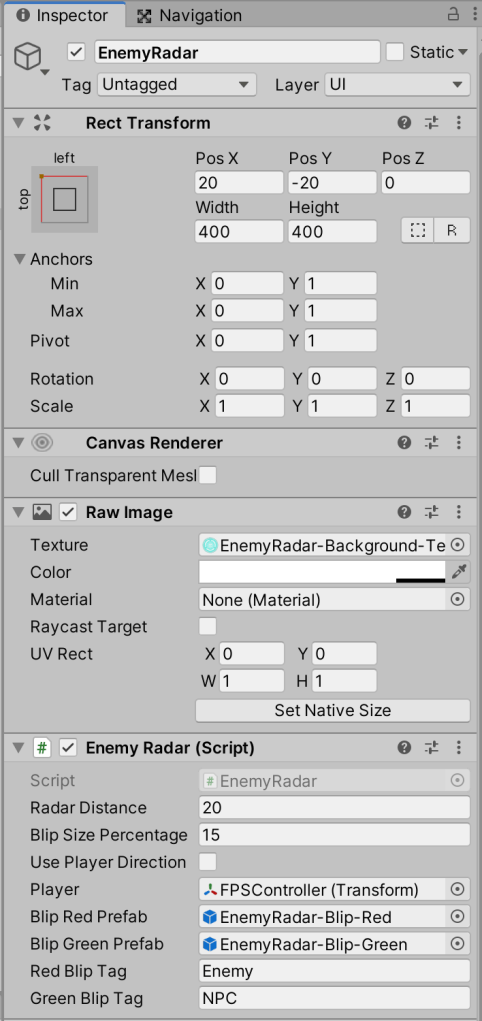
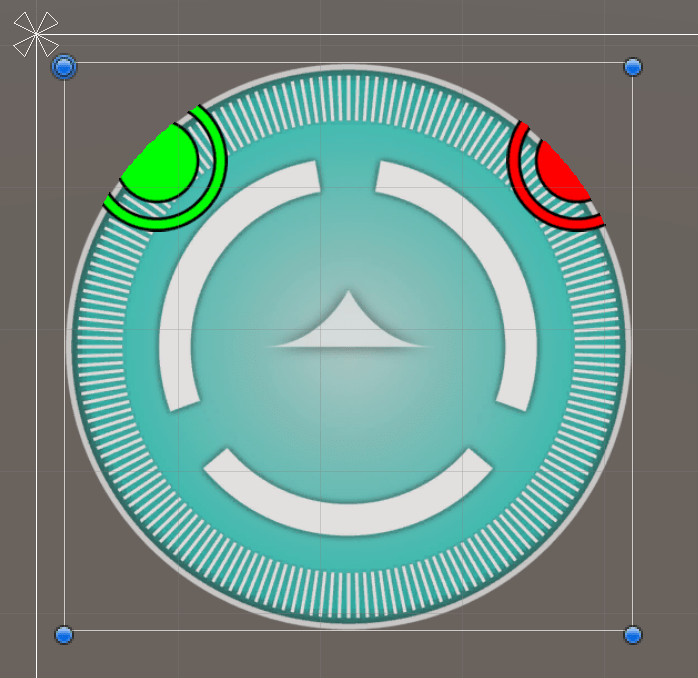
Finally, add a Mask component to the EnemyRadar GameObject with Add Component > UI > Mask in the Inspector.
The mask component uses the RawImage of the radar as the mask and will hide the areas of the blips that are outside of the radar circle when the blips are near the edge.:
Tip: We don’t have to use the radar background texture as the mask. We could also use a differently shaped mask texture if we used a separate raw image for the mask graphic. In that case we can hide the mask graphic with the ‘Show Mask Graphic’ property of the Mask component. The only rule with masks is that the mask always needs to be a parent of the masked objects.
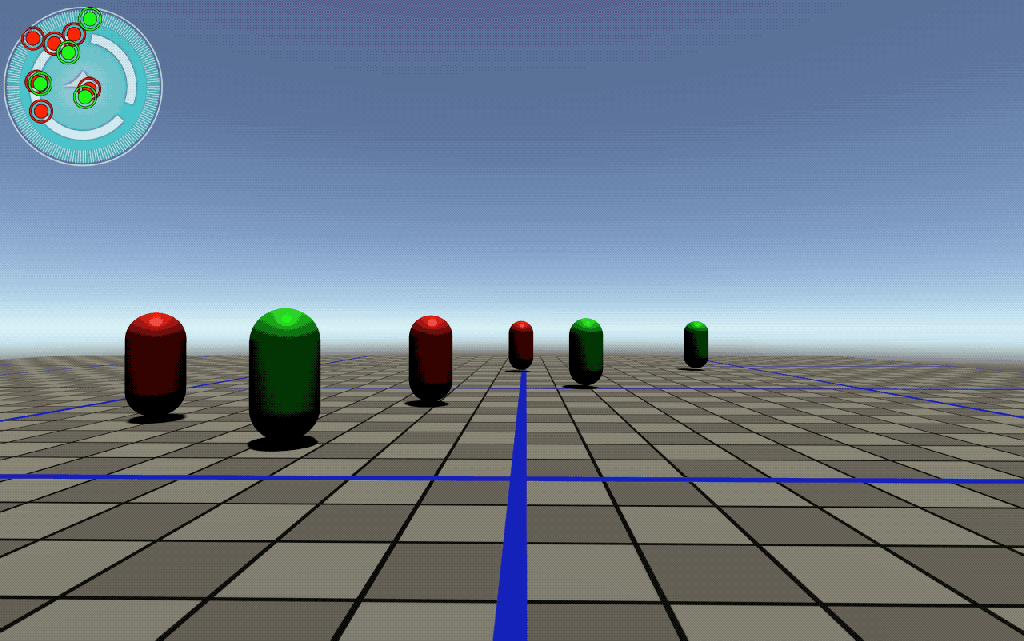
5. Play Testing
If you press play now and walk around with the WASD keys you will see the blips on the radar being displayed at the relative positions of the enemies and the NPC’s, and if you move far enough away the blips will disappear!:
6. How the radar script works
A radar background texture is displayed on the screen by using a RawImage and a UI Canvas. The center of the radar background image represents the position of the player. We also created two prefabs, one to represent the green NPC’s and one to represent the red enemies. When an enemy or NPC comes within the radar distance a blip is spawned (instantiated) on top of the background image and when it exits, the blip is destroyed..
Inside the EnemyRadar C# script that we attached to the radar background image there are eight public variables defined:
radarDistance: This is the maximum distance an entity or object can be before it disappears from the radar.
blipSize: This is the size in percentages the blips will be in relation to the size of the radar background image.
usePlayerDirection: When disabled the radar doesn’t take the camera’s direction into account which may be better for third person games.
player: Stores a reference to the player’s transform in the scene, this allows the scripted object to get the position of the player each frame.
blipRedPrefab and blipGreenPrefab: Store references to the blip prefabs so they can be spawned.
redBlipTag and greenBlipTag: The tag names from the GameObjects that the radar blips represent.
After the public and private variables the script defines seven methods which will be explained in separate sections:
Start() : The width and the height of the radar background image is stored so the relative positions for the blips can be calculated based on the size of the image. After that the size of the blips is calculated using the blipSize variable.
Update() : Inside the update method that happens every frame, we call the RemoveAllBlips() method to remove any old blip GameObjects that might be displayed.
Then the DisplayBlips() method is called two times. First for the red blip tagged GameObjects to be displayed on the radar and second for the green blip tagged GameObjects to be displayed on the radar.
Most of the important work that is done by the enemy radar script is done by the DisplayBlips() method.
DisplayBlips() : The method has two input parameters, the string tag parameter for the objects to search for and the GameObject prefabBlip parameter for the prefab that we want to display on the radar for all the objects that have the tag from parameter one:void DisplayBlips(string tag, GameObject prefabBlip)
Inside DisplayBlips() we first get the position of the player from the cached player transform variable: Vector3 playerPos = player.position;
Then We use the FindGameObjectsWithTag() method from the GameObject class to get all the objects with the tag we provide. Because FindGameObjectsWithTag returns an array of type GameObject[] we have to store them in an array type variable as well, we can turn any normal single variable into an array by adding the square brackets after the type definition, so GameObject[] instead of GameObject:GameObject[] targets = GameObject.FindGameObjectsWithTag(tag);
We loop trough the array of targets that we found with a foreach loop and for each target we execute the following commands:
-We get the position of the target GameObject and cache it in a Vector3:Vector3 targetPos = target.transform.position;
-We calculate the distance from the target position to the player’s position using the Vector3.Distance() method:float distanceToTarget = Vector3.Distance(targetPos, playerPos);
– Then we check if distanceToTarget is less than or equal to radarDistance:if(distanceToTarget <= radarDistance)
– If the boolean comparison evaluates to true, meaning it is within range, we execute the following three commands to display the entity or object on the radar:
- We calculate the normalised position of the target by calling the NormalisedPosition() method:
Vector3 normalisedTargetPosition = NormalisedPosition(playerPos, targetPos); - We calculate the position of the radar blip from the normalised position by calling the CalculateBlipPosition method:
Vector2 blipPosition = CalculateBlipPosition(normalisedTargetPosition); - Finally we display the RawImage by calling the DrawBlip() method, passing in the blip position and the radar blip prefab that we want to instantiate at that position:
DrawBlip(blipPosition, prefabBlip);
NormalisedPosition() : The normalised position method has two input parameters, the first for the player’s position and the second for the target’s position:Vector3 NormalisedPosition(Vector3 playerPos, Vector3 targetPos)
The method calculates the relative position of the target to the player and returns it as a Vector3 object with x,y and z values. Because this radar script is in 2D we ignore the y- component of the target’s position.
By dividing the distance from the target to the player by radarDistance we can get a normalised value in the range of -1 <> 1, which we can easily map to the x and y axes of the radar background image.
Tip: When normalising a Vector3 or a Vector2 with the Vector3.Normalize() method for example, the magnitude(length) of the vector will be made exactly 1, but the direction of the vector will stay the same. For more information about normalising vectors see this Unity tutorial vid: https://learn.unity.com/tutorial/vector-maths
CalculateBlipPosition() : The CalculateBlipPosition method first calculates the angle from the origin to the target’s normalised position:float angleToTarget = Mathf.Atan2(targetPos.x,targetPos.z) * Mathf.Rad2Deg;
Then we calculate anglePlayer, which is the angle the player is facing. For the angle we use the y component of the player’s rotation which is the direction that the character controller is facing:float anglePlayer = usePlayerDirection? player.eulerAngles.y : 0;
Then angleRadarDegrees is calculated, which is the desired radar angle by subtracting the angle of the player from the angle between the target and the player, since we want the radar to display the relative angle the direction the player is facing to the target entity. We also subtract 90 degrees from the angle because in math an angle of zero indicates an east direction:float angleRadarDegrees = angleToTarget - anglePlayer - 90;
The angle is then converted into radians. One full rotation in radians is 6.28 (two Pi) and multiplied by the Sin() and Cos() of the normalised distances to calculate the x and y values for the blip position:float normalisedDistanceToTarget = targetPos.magnitude; float angleRadians = angleRadarDegrees * Mathf.Deg2Rad; float blipX = normalisedDistanceToTarget * Mathf.Cos(angleRadians); float blipY = normalisedDistanceToTarget * Mathf.Sin(angleRadians);
To calculate the final position relative to the center of the radar in pixel space we multiply blipX and blipY by half of the width and height of the radar:blipX *= radarWidth*.5f;blipY *= radarHeight*.5f;
Half of the width and height of the radar background image are added and half of the width and height of the blip images subtracted, to position the blip relative to the center:blipX += (radarWidth*.5f) - blipWidth*.5f;blipY += (radarHeight*.5f) - blipHeight*.5f;
The final blip position is returned as a new Vector2 object:return new Vector2(blipX, blipY);
DrawBlip() : This method has two input parameters. The Vector2 pos parameter for the position where the blip should be displayed and the GameObject blipPrefab parameter for a reference to the rawImage blip prefab that we want to display at that position:void DrawBlip(Vector2 pos, GameObject blipPrefab)
Inside of the method the first command is to Instantiate(spawn) a new instance(clone) of the blip prefab and the second command parents the blip to the radar background image’s GameObject:GameObject blip = (GameObject) Instantiate(blipPrefab);blip.transform.SetParent(transform);
We cache a reference to the Rect Transform component on the blip by using the GetComponent<>() method:RectTransform rt = blip.GetComponent<RectTransform>();
The SetInsetAndSizeFromParentEdge() method from the RectTransform class is used to position the blip at the right horizontal and vertical locations that we pass as arguments into the second parameter of the method, regardless of where the radar background image is located on the canvas:rt.SetInsetAndSizeFromParentEdge(RectTransform.Edge.Left,pos.x, blipWidth);
rt.SetInsetAndSizeFromParentEdge(RectTransform.Edge.Top,pos.y, blipHeight);
7. Stuff to improve
The enemy radar script scans 360 degrees around the player but it only takes straight distances on the x and z plane into account. So this radar script is only accurate if there is no height difference between the player and the entities. You can however modify the script to also work on the y-axis and maybe decrease the size or change the color of the blips based on the height of the entity so enemies that are a floor height below the player are smaller on the rader for example.
Or you could simply choose to not show blips for entities that are lower or higher than a certain threshold different to the player height.
Another thing that could be improved is the fact that this radar scans trough everything even if there are objects like walls in between the player and the entities. You could also program the radar to use ray casting to check if a target isn’t behind anything before drawing the blip inside the DisplayBlips() method, which could look something like this:
if(distanceToTarget <= radarDistance) {

    RaycastHit hit;
    // If a ray from the camera position, into the direction of the target hits something..
    if(Physics.Raycast(Camera.main.transform.position, targetPos-Camera.main.transform.position,out hit))
    {
        Debug.Log(hit.transform.name);
        // ..and the tag from the object we hit is equal to red or green blip tag..
        if(hit.transform.tag == redBlipTag || hit.transform.tag == greenBlipTag)
        {
            // ..draw the blip
            Vector3 normalisedTargetPosition = NormalisedPosition(playerPos, targetPos);
            Vector2 blipPosition = CalculateBlipPosition(normalisedTargetPosition);
            DrawBlip(blipPosition, prefabBlip);
        }
    }
}
For more information about ray casting, see the Physics.Raycast API: https://docs.unity3d.com/2018.3/Documentation/ScriptReference/Physics.Raycast.html

BUY ME A COFFEE
Donate $5 to buy me a coffee so I have the fuel I need to keep producing great tutorials!
$5.00
Hey fellow Shader Graph enthusiast!
Looking for a highly versatile and easy to modify system for rendering professional Screen-Space Edge-Detection based selection Silhouette Outlines, Contour Outlines and Overlays, around and onto any 3D model in the Unity Game Engine?
Checkout CosterGraphics 🔳 Outline System Pro if you haven’t already!
